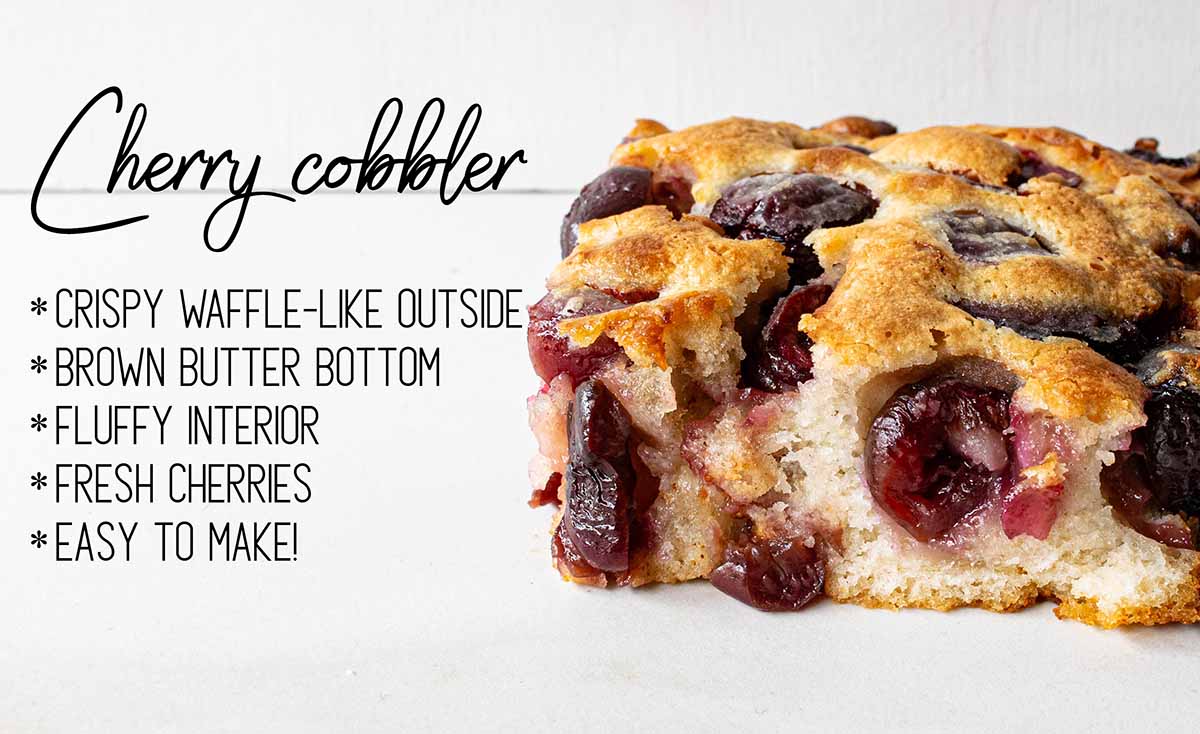
The two most common types of cherry cobbler are ones with a biscuit topping and others with a pour-over batter (sometimes called a "magic cobbler"). This particular cherry cobbler recipe is the thin pour-over batter that cooks to a fluffy texture.
It's really easy to make too - less work than making a pie or even muffins:
- Pit & halve fresh cherries (10 min)
- Melt butter in a pan while the oven preheats
- Make the batter in one bowl (5 min)
- Bake for 1 hour at 350°F
Besides being easy, the other selling point of this fresh cherry cobbler recipe is the rich brown butter flavor.
As the butter melts in the preheating oven, it starts to brown. Then the batter starts cooking immediately when added to the hot pan, creating a delicious, crispy, brown butter crust.

Jump to:

Using fresh cherries
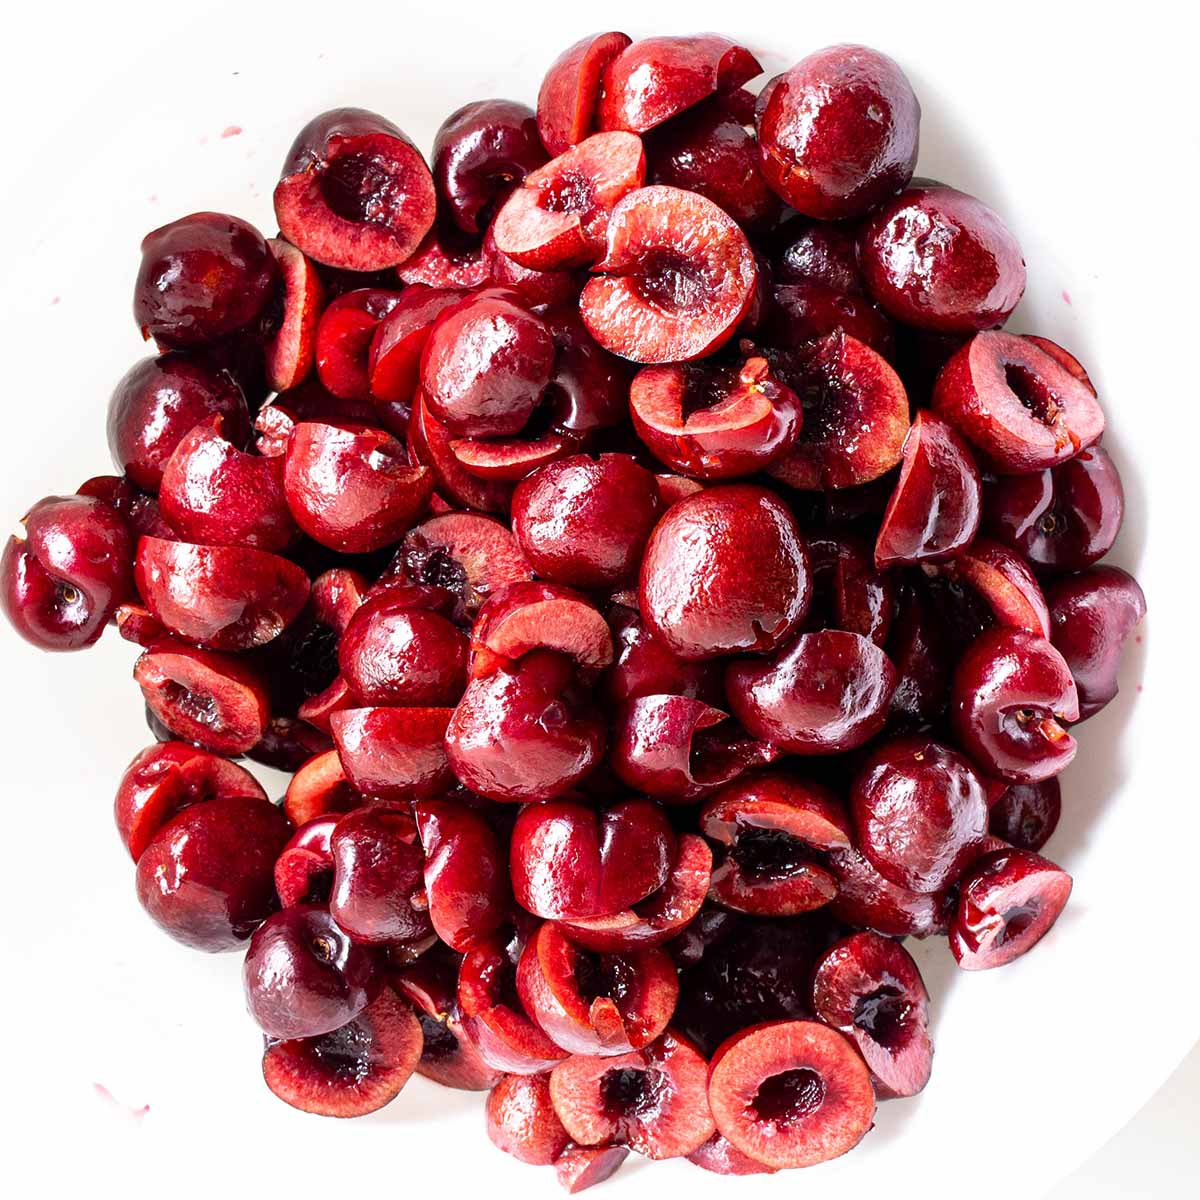
A cherry cobbler is one of the best ways to enjoy fresh cherries when they are in season. It uses up 4 cups of cherries, which is almost 1.5 pounds.
The work to remove stems and pit the cherries takes up the most time, about 10 minutes. Here's how long it took me to prep 4 cups of fresh cherries:
- Removing stems: 2 minutes
- Pitting: 4 minutes (with a tool that pits 4 cherries at a time)
- Cutting cherries in half: 3 minutes
Most cherry cobbler recipes instruct you to cut the cherries in half. I always take the time to do this step to make sure I didn't accidentally miss any of the pits.
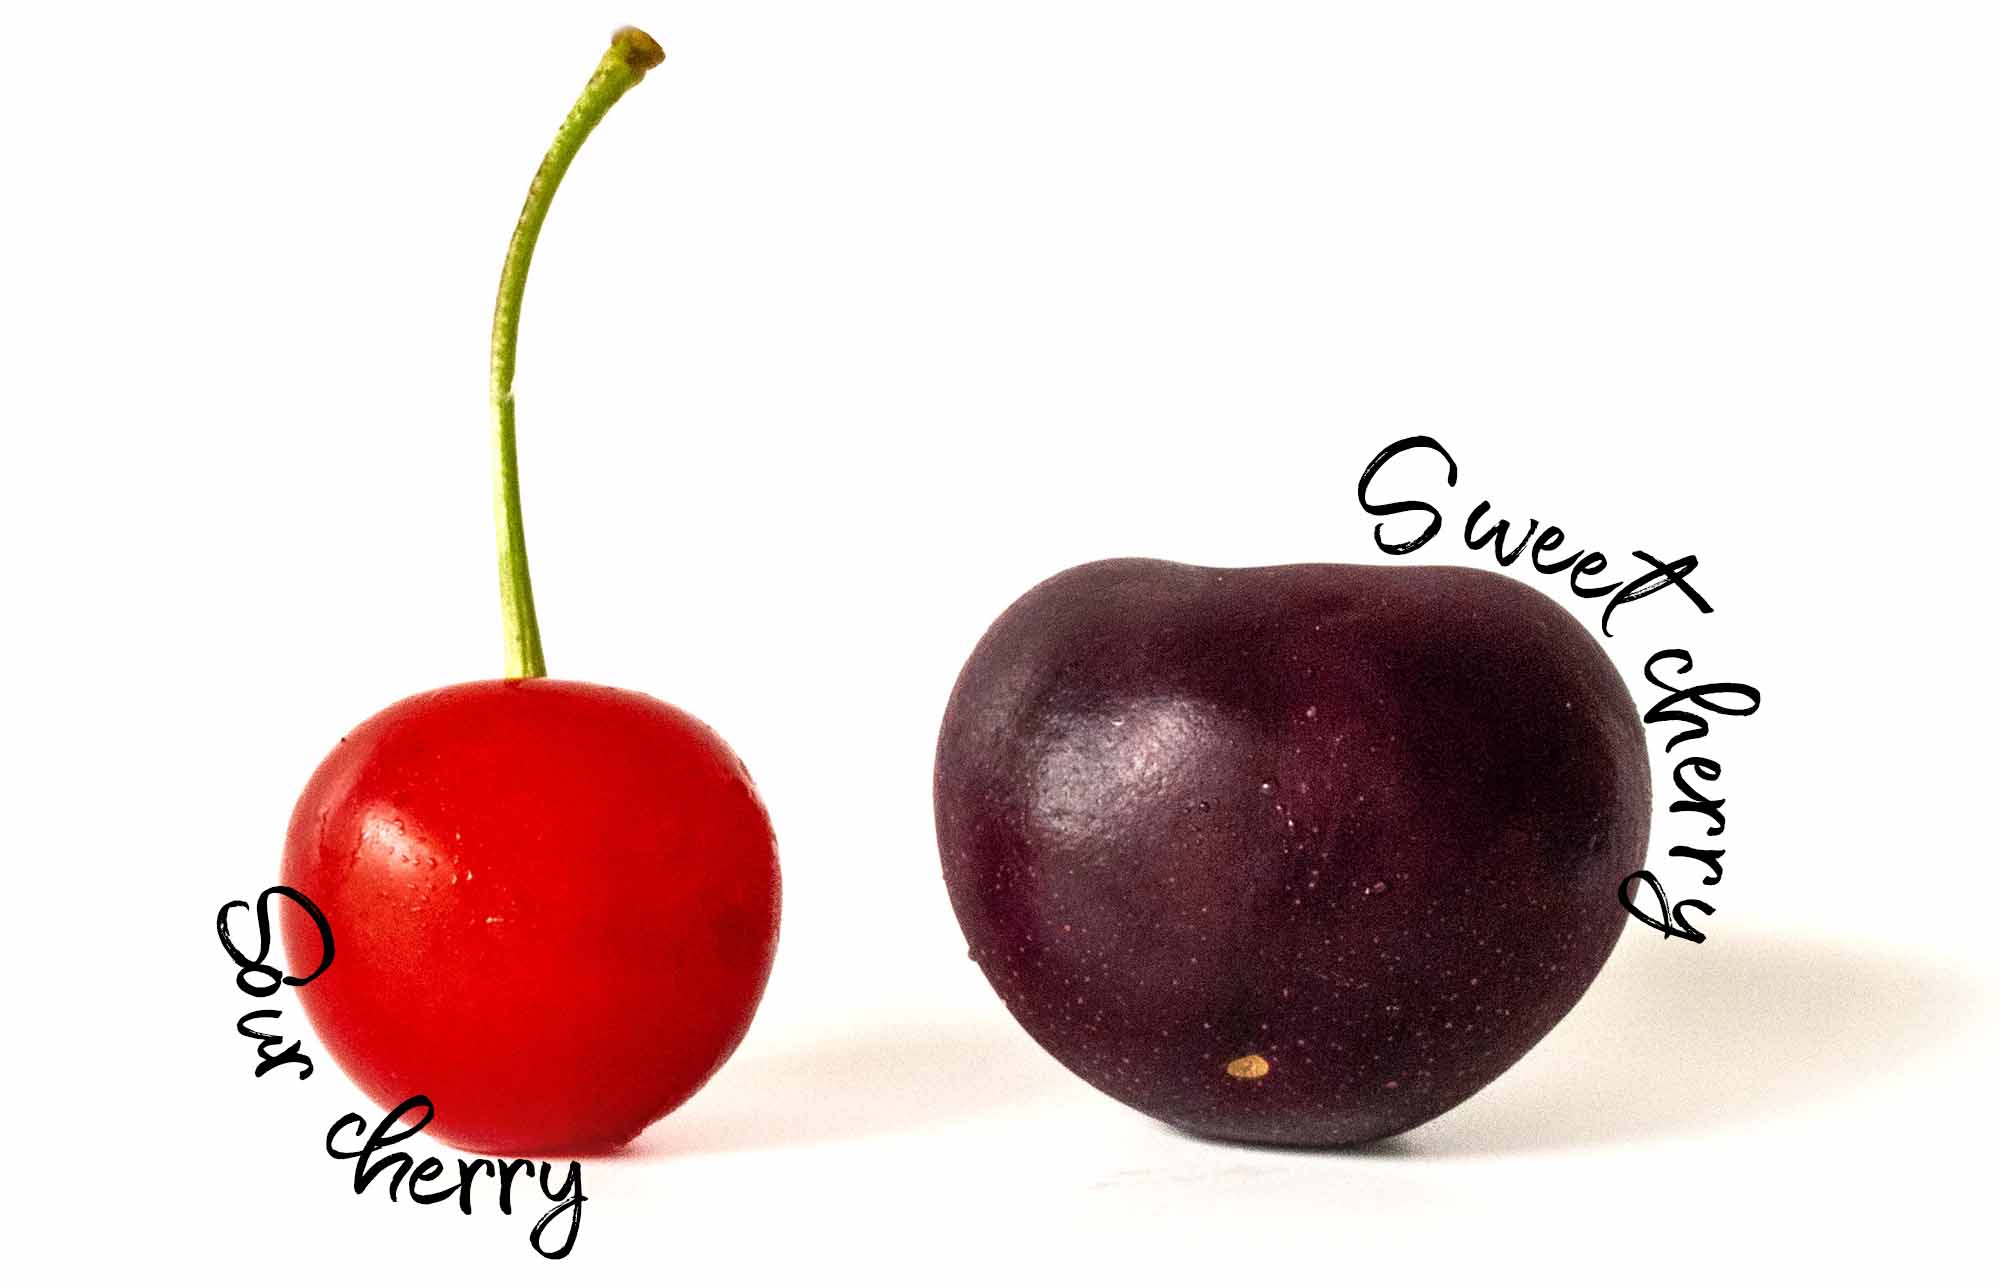
Sweet vs sour cherries in a cobbler
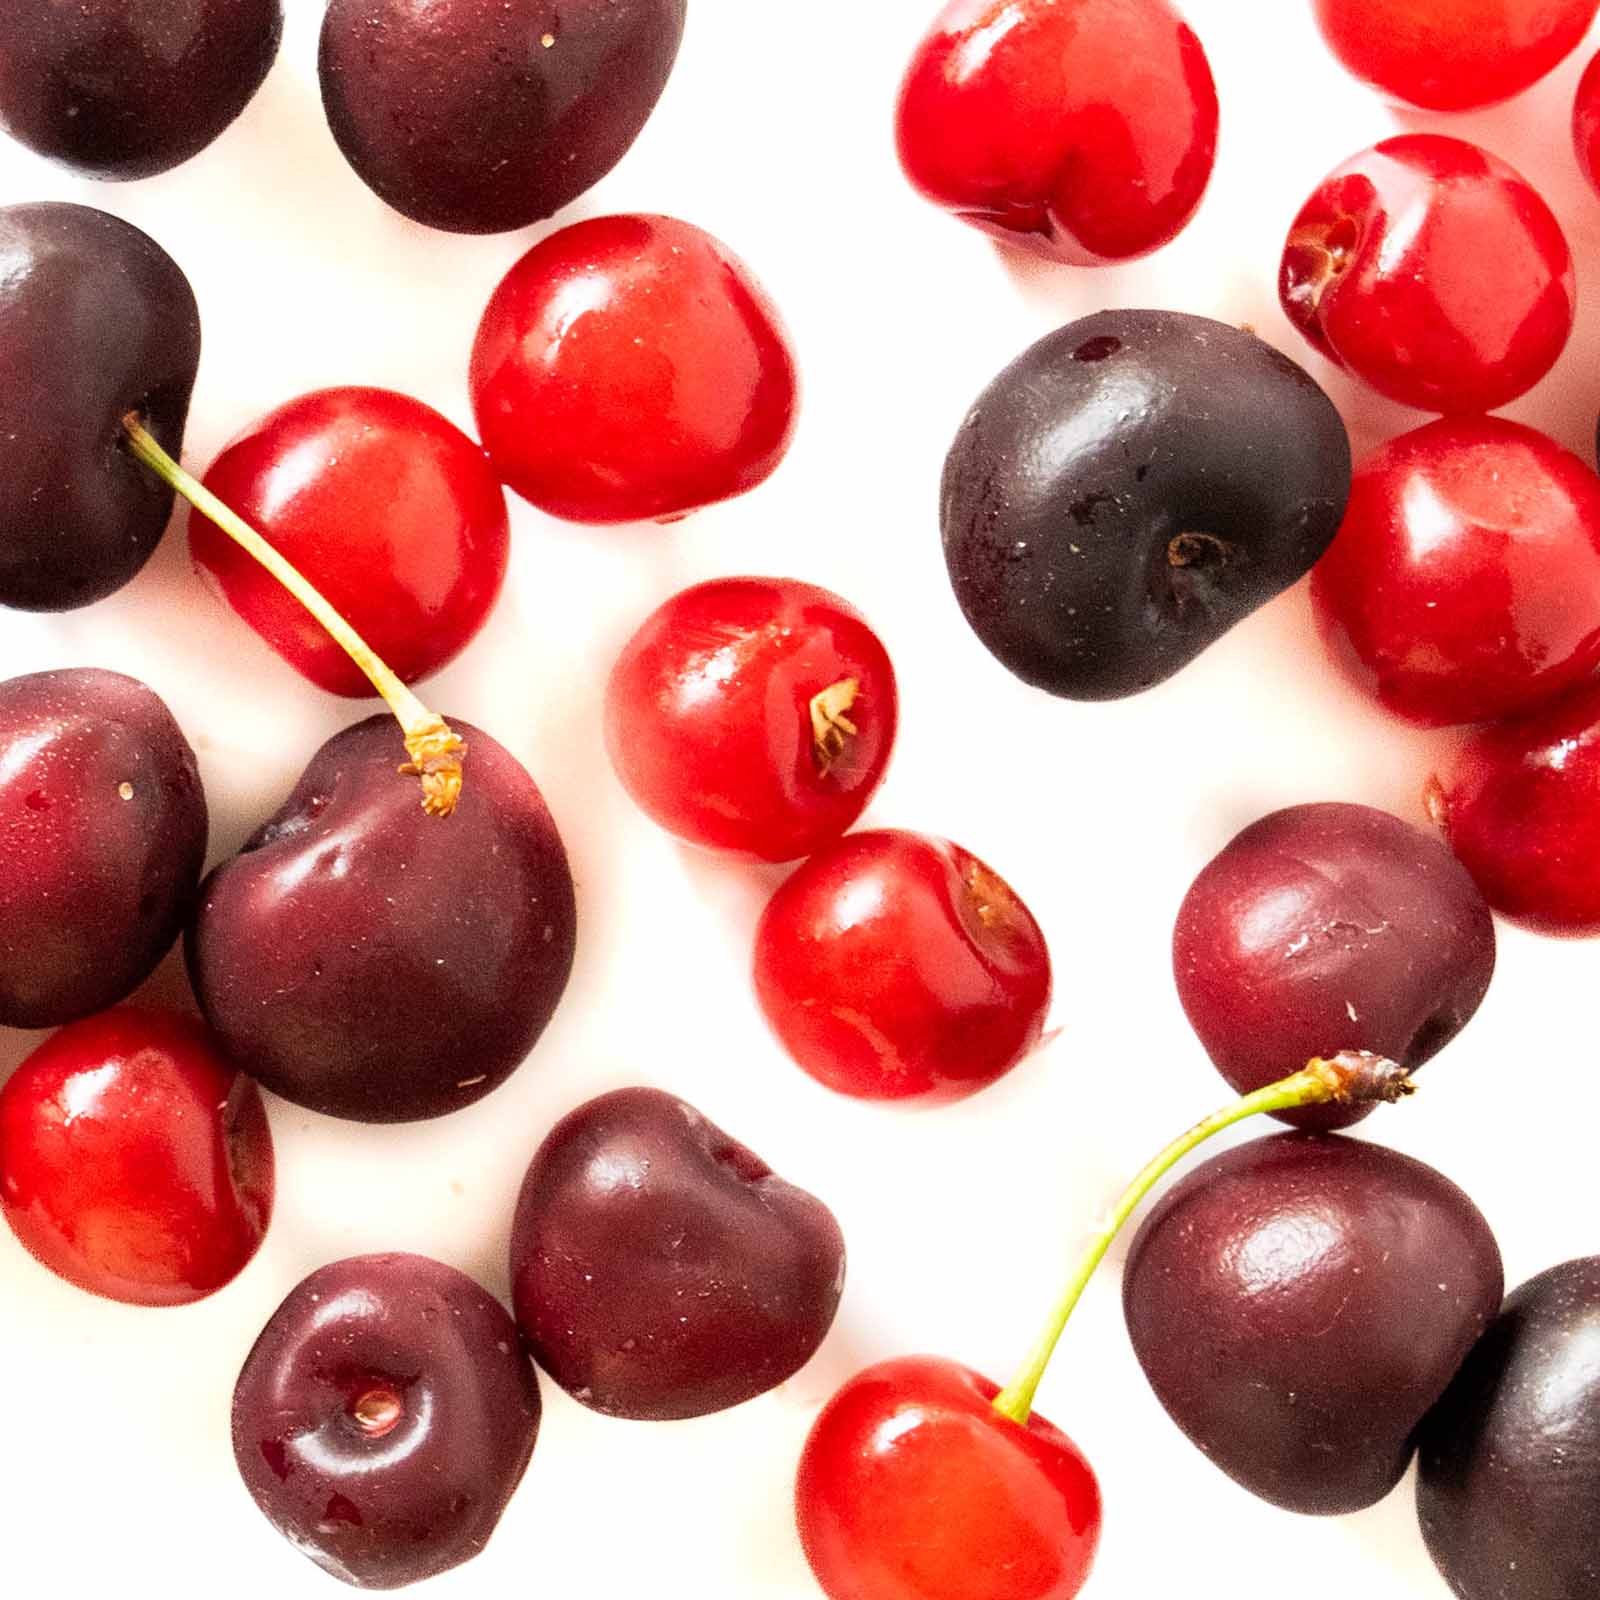
I made this cherry cobbler with dark red sweet cherries. They make a sweet, cherry-jam flavored dessert.
Sour cherries work just as well in a cobbler. They are more tart and bring that classic cherry pie flavor and aroma. They are hard to find fresh unless you live in an area that produces them for farmers markets (like Michigan or Wisconsin).
You can also use a combination of sweet and sour cherries for the best flavor. I ran tests to find the best cherries for pie, and it turns out combining the two brings the best of both worlds. Sweet cherries have a richer, dark-fruit flavor, wheres sour cherries bring a bright acidity and classic flavor.
If you want some other cherry dessert recipes, try this cherry tart with almond cream or chocolate cherry tart (with a layer of chocolate ganache).
Best pan: aluminum
When browsing other popular 'magic' cherry cobbler recipes, I see a lot of comments that the cobbler didn't cook right. It appears this has to do with the pan material (rather than the recipe itself).
So let's dig into this to make sure your dessert turns out perfect.
The best pan for cooking this style of cherry cobbler is an aluminum pan, which also includes aluminized steel. Aluminum excels at transferring heat, while steel provides strength to the pan.
Good heat transfer is important because it quickly sets the bottom crust and creates steam to lift & leaven the batter.
In an aluminum pan, the cherry cobbler gets a nice brown crust and fully cooks through while the top browns (but before it burns). You don't want to have to cover the top with foil because that will trap steam and make the top soggy instead of crisp.
Other pan materials - avoid glass & ceramic
I strongly suggest avoiding glass and ceramic, but other metal pans can still work if you don't have aluminum.
- Cast iron: deeply browned, crisp bottom. Careful not to burn the bottom or overcook the batter.
- Stainless steel: doesn't conduct heat as well as aluminum and can lose heat quickly when the batter is added. Still works better than glass and ceramic.
- Glass: very poor conductor of heat, so the batter won't set as quickly and take a lot longer to cook throughout the center. So you'll have to leave it in the oven longer, risking a burnt top and soggy bottom.
- Ceramic: holds steam, creating a soggy bottom (great for casseroles, bad for cobblers)
King Arthur baking has a thorough article on choosing the right baking pans for different types of recipes.
Sizes
If you have a 9x9 metal brownie pan, you're all set! Skip this section.
However, if you have an 8x8 square pan, or are working with some pie pans, this section is for you. This cherry cobbler recipe was designed for a 9x9 pan, which is 81 square inches.
All you need to do is find another pan (or two pans) that add up to a similar amount.
- 9x9 square pan: 81 inches
- 10" round stainless steel or cast iron skillet: 79 inches
- 8x8 square pan: 64 inches, which is 25% smaller. Reduce cherries to 3 cups - you can try to use the same amount of batter, or just don't use it all
- 9" round pan: 64 square inches, so follow the 8x8 rules above.
- Use two pans: 8" round (which is 50 inches) and an 8x4 bread pan (32").
The higher sides of a bread pan might cook the cherry cobbler a little differently due to the taller sides and how the oven's air won't circulate as easily near the top of the batter.
The other option is to use a biscuit-style cherry cobbler recipe, which can handle different sized pans better. I have a few other recipes at the end of this post that might work.

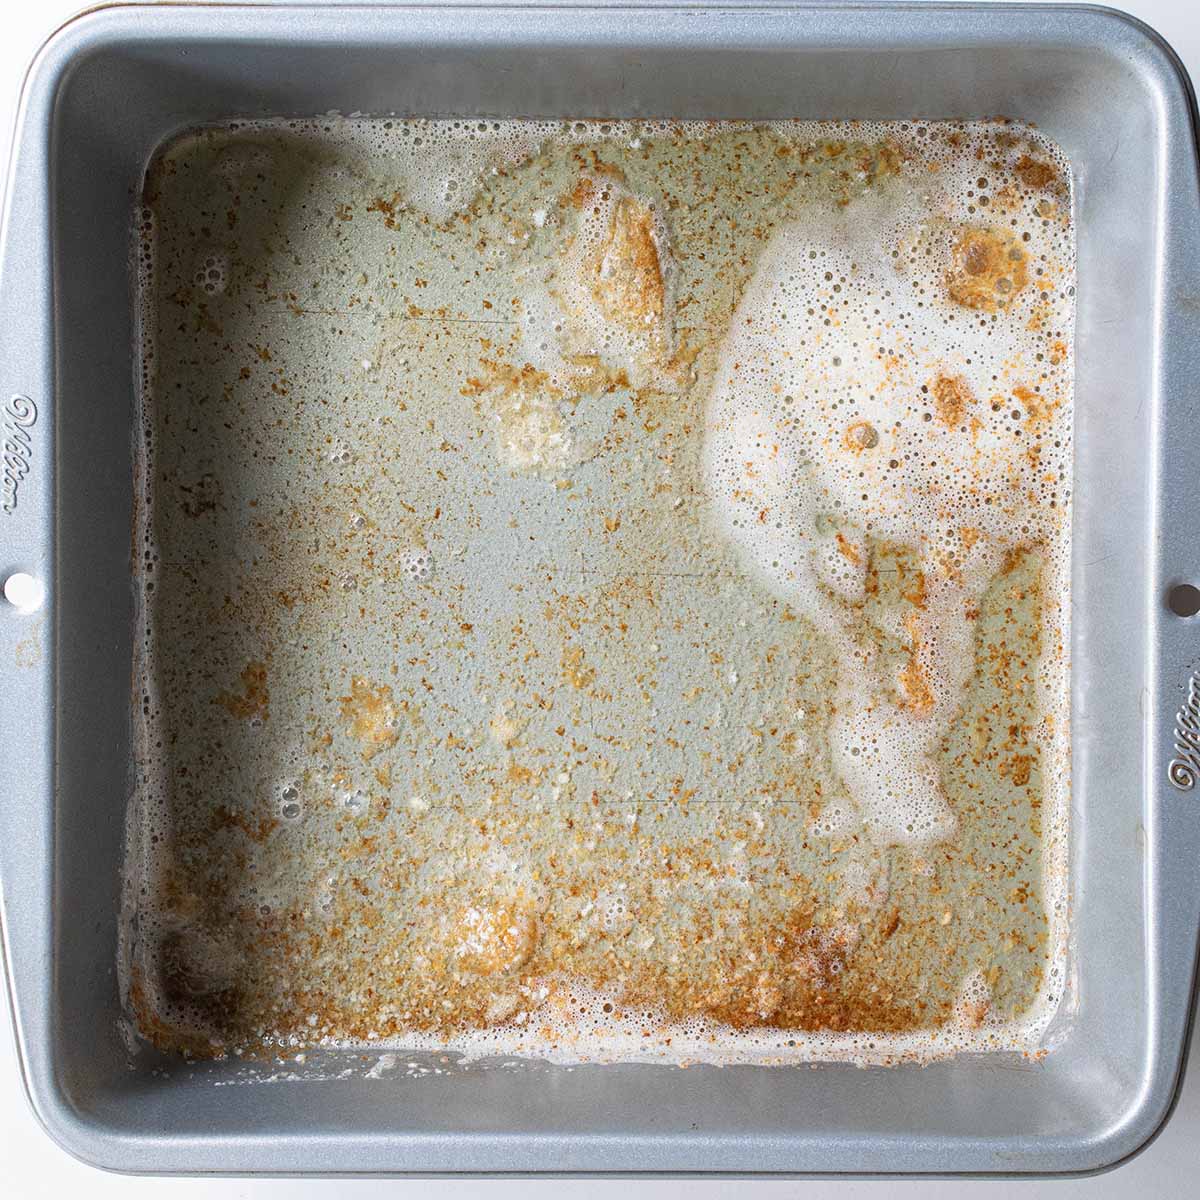
Why melted butter matters
Most cherry cobbler recipes tell you to melt butter in the pan while the oven preheats. This isn't a laziness hack or an idea just to be trendy. It actually changes the texture and flavor of the cobbler in ways you wouldn't get from melting the butter in the microwave.
Here's how it affects the cobbler:
- Browns the butter
- Creates a crispy bottom
- Keeping the fat separate from the batter creates a pancake like texture
Browned butter
First, the butter starts to brown as the pan heats up with the oven. It creates that warm, browned butter flavor. Don't leave it in the oven too long, or it will burn.
Crispy bottom
Second, when batter is added to the hot butter, it cooks quickly. This creates a crispy bottom, similar to the texture of the outside of a waffle. It also helps keep the cherry cobbler firm, rather than soggy as it sits with the fruit.
Cobbler texture
Lastly, keeping the butter separate affects the texture of the cobbler, thanks to a little chemistry. Butter is mostly fat, which coats flour when mixed into a batter. That fat coating slows down flour's ability to absorb water, changing the texture (like in a cake).
For this cherry cobbler batter, the flour can fully absorb the liquid since butter is kept separate. This creates the fluffy pancake texture.
Using a skillet
If you want to make your cherry cobbler in a skillet, you can also heat the butter in the skillet on the stovetop to keep a closer eye on it. The skillet will still be hot when you pour the batter in and transfer it to the oven.
How to make cherry cobbler
Making a cherry cobbler is probably one of the easiest desserts to make.
There is no fussy crust to work with, no muffin tins to fill and clean, and no filling to get just right. Here's how easy it really is to make a cherry cobbler:
- Pit & halve the fresh cherries
- Add butter to pan while you preheat the oven
- Stir together flour, sugar, milk, baking powder, salt, and vanilla (and almond) extract in a bowl to make a pancake-like batter
- Remove hot pan from oven. Add cherries. Pour batter over the top.
- Bake for an hour. Done.
Let's look at each step with more details, in case you have any remaining questions on making a cherry cobbler from scratch.
Pitting cherries
Pitting and cutting the cherries will take about 10 minutes. Be sure to wear old clothes or an apron since cherry juice can stain.
Don't skip the step to cut them in half. Not only does it make for a better texture in the cobbler, but it helps you find any missed pits.
Preheating instructions
The timing on this step is important - you want the butter to brown and be hot when you add the batter.
You can't leave the butter in too long or it will burn, but you also don't want to take it out early and cool down. So the trick is to start preheating the oven with your pan and butter when you start working on the batter (after you've pitted and cut the cherries).
Here are some key temperatures:
- Butter melts around 90-95°F
- It foams as water boils off at 212°F
- Milk solids brown at about 250°F
- Butter burns around 300°F
I leave my pan in the oven for the full preheat cycle, which takes about 10 minutes (in a modern, well-sealed, full size Miele oven). When I took it out, I measured the butter's temperature and it was 280°F.
If it does burn, you can throw out the burnt butter and melt new butter in the already preheated oven. No big deal (other than having to throw away butter!).
Make the cherry cobbler batter
The batter comes together quickly and easily in one bowl. It will have a runny consistency, similar to pancake batter.
Adding vanilla extract seems obvious, but you might be wondering why almond extract? Cherries actually share some aroma compounds with almonds, which is why those flavors are harmonious.
This recipe calls for a small amount (just ¼ teaspoon) because we're going for a subtle hint of almond that supports the cherry cobbler flavors without taking center stage.
If you want a more almond-flavored cobbler, you can increase it to ½ a teaspoon and add slivered almonds to the top of the batter.
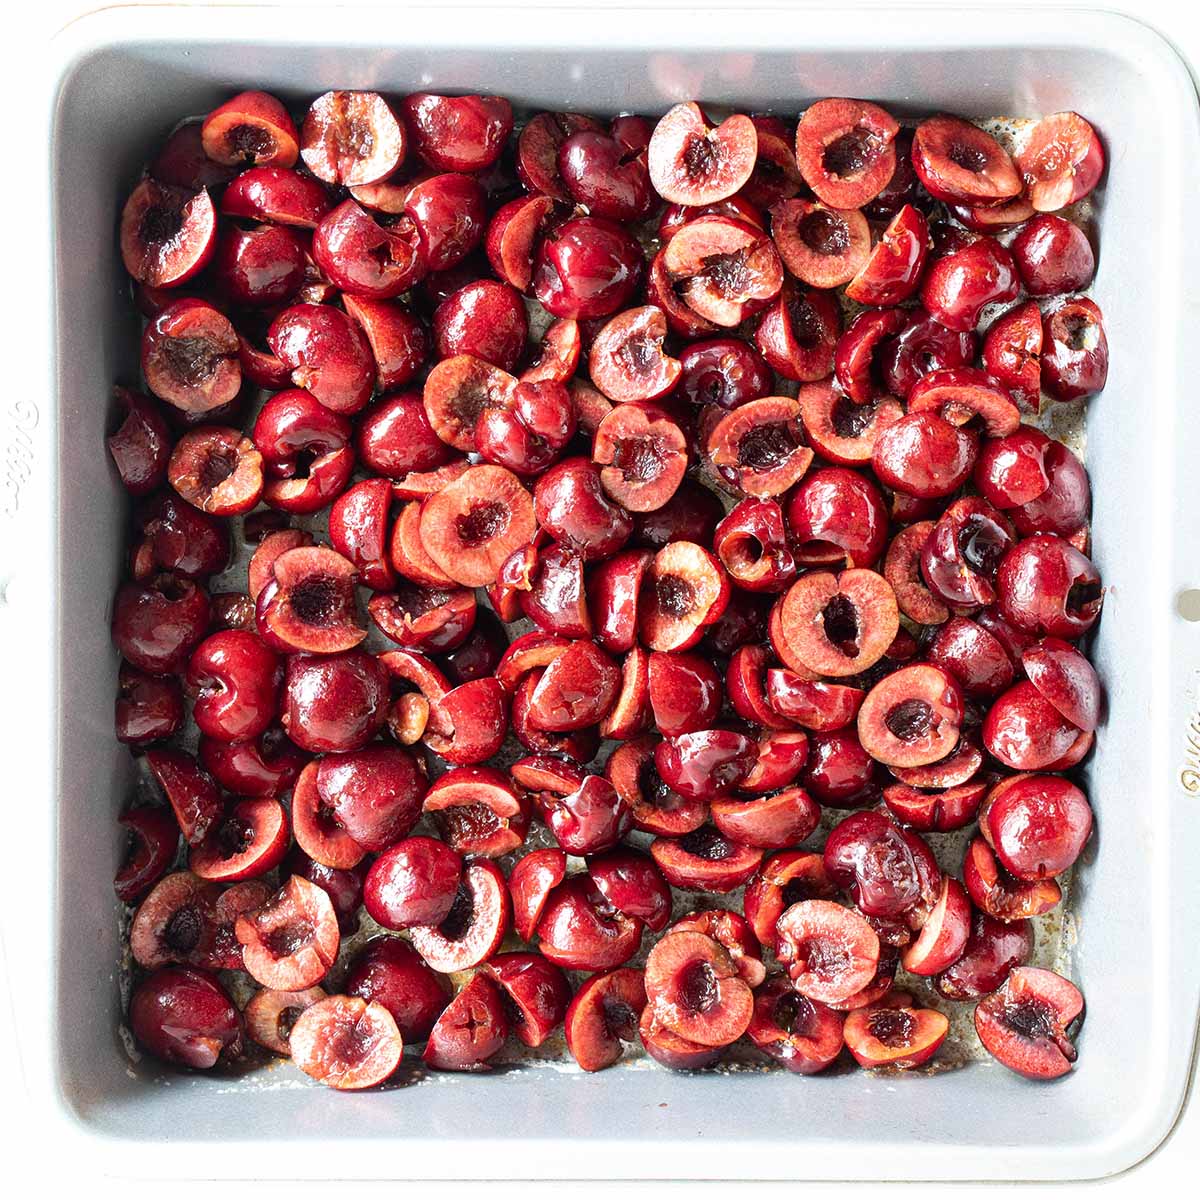
Add fresh cherries to the pan with the melted butter.
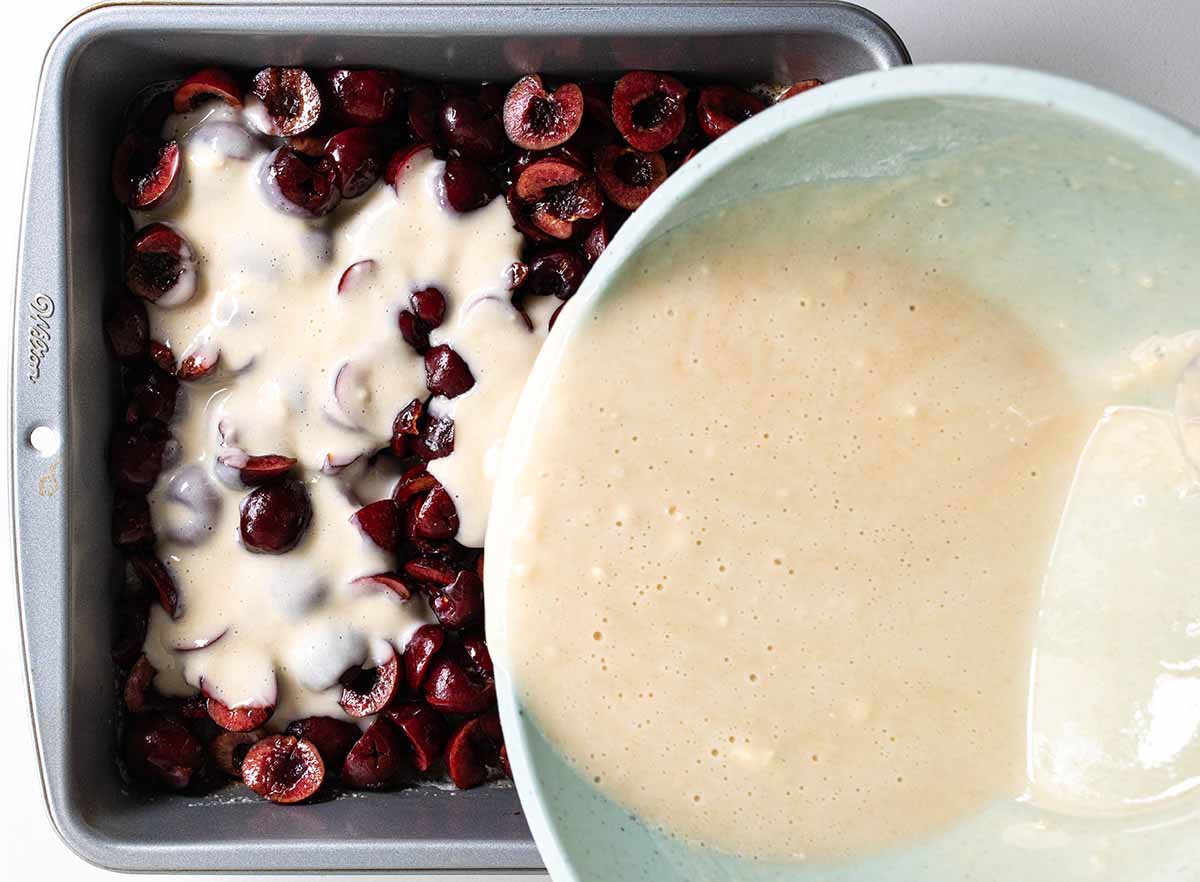
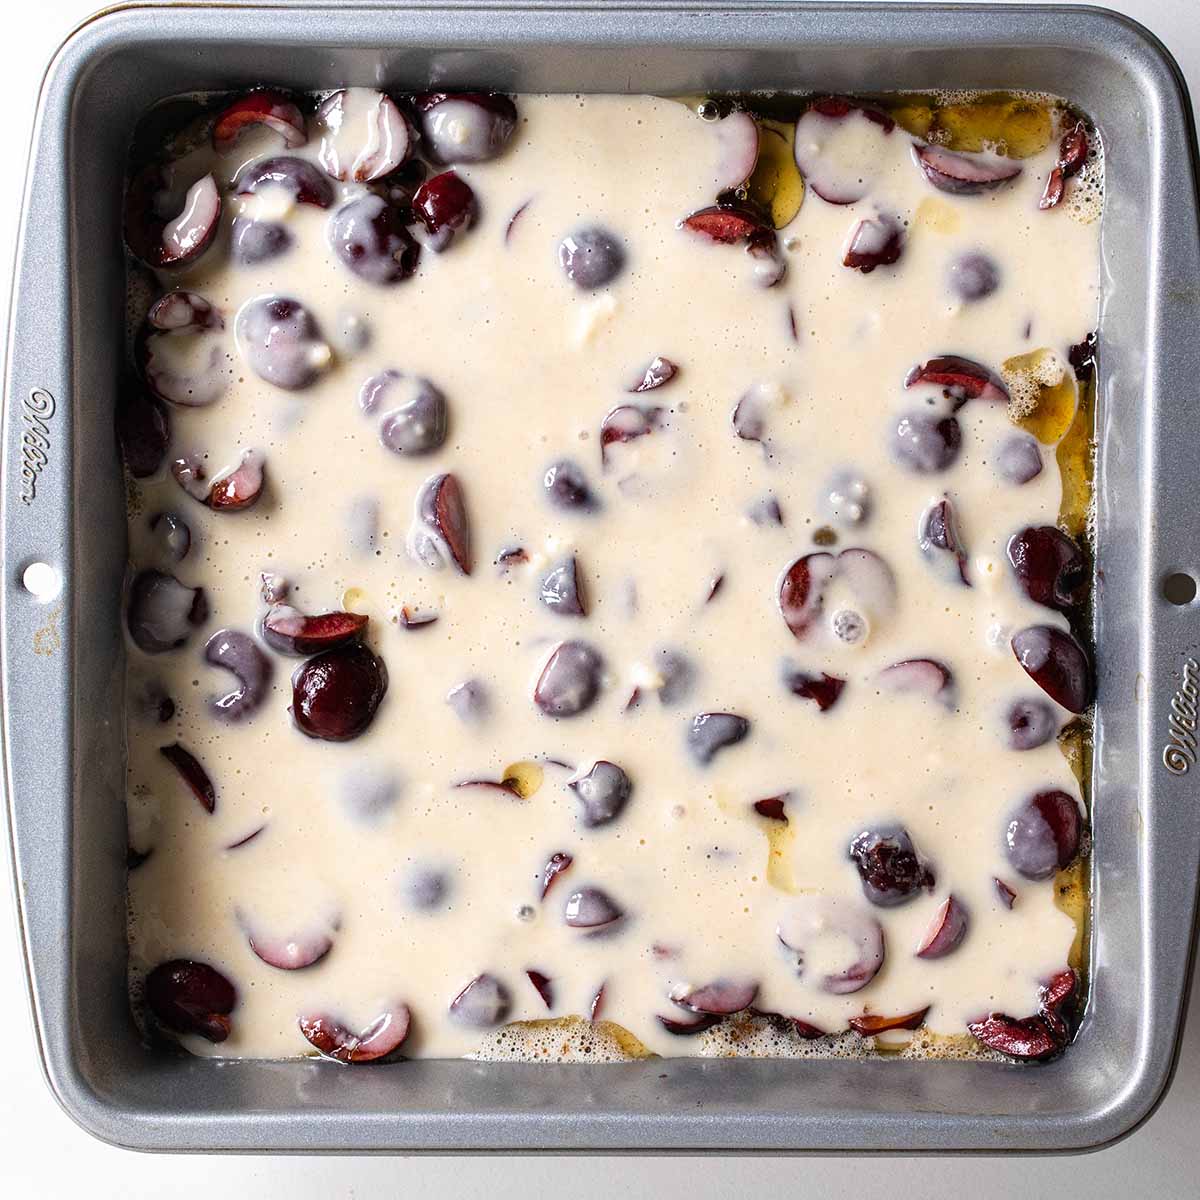
Pour the batter over the cherries until they are covered. No stirring!
Assembly
Assembling the cherry cobbler is kind of fun. Carefully remove the hot pan and set it on some hot pads on your counter. Scoop your cherries into the pan and then pour the batter over the top.
You might see some of the butter pool up and around the batter. That's normal. Don't stir the batter or do anything else.
Baking the cobbler
Now you just pop your cherry cobbler back in the oven at 350°F. Let it bake for about an hour.
Most cherry cobbler recipes set the oven temperature to 350°F for a good reason. You want the oven hot enough to make the batter rise, but not too hot to burn the bottom (or top).
Even an oven at 375°F can start to burn the dough before the fruit has finished cooking, according to Tasting Table.
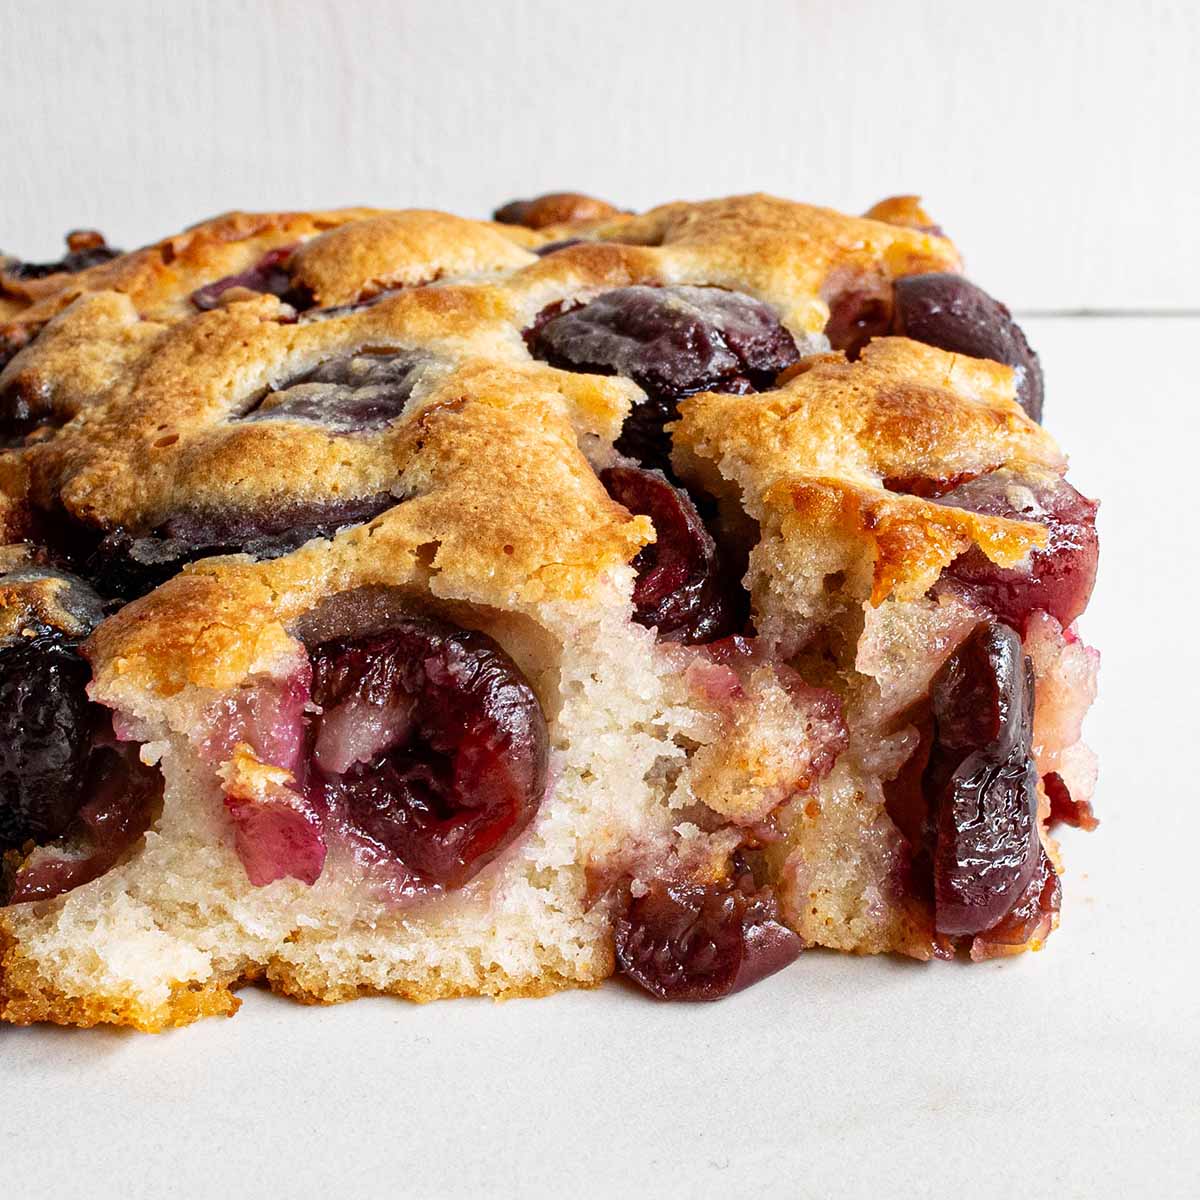
Cook the cobbler until the top is golden brown and the batter is cooked throughout. A toothpick should come out clean, but I personally find that unreliable. I use an instant-read thermometer and check a spot that doesn't have a cherry in the way. The internal temperature should be between 200°F and 210°F when it's done.
Texture
There are a bunch of types of cherry cobblers - some are topped with biscuits, others are fluffy and cake-like, and everything in between.
This cherry cobbler has an interior that's very similar to a pancake, with a crispy exterior like the outside of a waffle. The cherries don't make the cobbler soggy, even when stored in the fridge for several days.
It's also strong enough to hold up to some ice cream, turning your cherry cobbler from a possible breakfast-with-coffee situation into a decadent dessert.
Recipe

Equipment
- 9" square pan or 10" round skillet (which has about the same area) - see note for other sizes
Ingredients
- 4 cups cherries 1.25 pounds (560 grams)
- 6 tablespoon butter cut into 3 chunks
- 1 ⅓ cup flour 6 ounces (170 grams)
- ⅔ cup sugar or ¾ if you like really sweet desserts
- 1 teaspoon baking powder
- ¼ teaspoon salt
- 1 cup whole milk
- 1 teaspoon vanilla extract
- ¼ teaspoon almond extract
Instructions
Prep work: cherries
- Pit & halve the cherries. This will take about 10 minutes for 4 cups.4 cups cherries
- AFTER the cherries are done, place butter pieces in a metal 9x9 pan and preheat the oven to 350℉. The butter will melt and start to brown (this step helps create a crisp bottom when batter is added in a later step, hitting the hot butter & hot pan).6 tablespoon butter
Make the batter
- In a large bowl, whisk the dry ingredients together.1 ⅓ cup flour, ⅔ cup sugar, 1 teaspoon baking powder, ¼ teaspoon salt
- Then stir in the milk and extracts. The batter will be thin.1 cup whole milk, 1 teaspoon vanilla extract, ¼ teaspoon almond extract
Assemble the cobbler & bake
- Take the pan out of the oven. Scoop in cherries then pour the batter over the top. Bake for about an hour. Every oven is different, so check after 50 minutes (and it can take as long as 75 minutes to fully cook).The cherry cobbler is done cooking when the internal temperature of the batter (not cherries) reaches 200℉-210℉ (or a toothpick comes out clean).
- Let cool 10 minutes before serving. After it fully cools, you can also store it in the fridge (covered) and reheat in the oven at 350℉ if the top gets moist.
Notes
- 9x9 square pan: 81 inches of area
- 10" round stainless steel or cast iron skillet: 79 inches
- 8x8 square pan: 64 inches, which is 25% smaller. Reduce cherries to 3 cups - you can try to use the same amount of batter, or just don't use it all
- Use two pans: 8" round (which is 50 inches) and an 8x4 bread pan (32").
- Aluminum is the best and most forgiving option
- Cast iron can create an incredible crust but needs to be watched so it doesn't burn
- Stainless steel is similar to aluminum, but might not heat as evenly.
- Glass and ceramic will struggle to brown the bottom or cook it as well (leaving it undercooked but brown on top)
Nutrition
More recipes & resources
If you're looking for other cherry cobbler recipes (because why stop at just one?) - here's a few that caught my eye:
- Cherry cobbler by Tastes Better from Scratch: a similar recipe but it pre-cooks the cherries on the stovetop for more of a fruit-filling feel
- Cherry cobbler with a biscuit topping that spreads, from Culinary Hill
- Cherry cobbler with a chewy cookie topping from Of Batter & Dough
- Fresh fruit cobbler recipe for using any fruit, from King Arthur Baking
- Easy berry cobbler from Midwest Living
Serious Eats also has an article talking about the different summer fruit desserts, from cobblers to crisps, and I have a collection of 50 cherry recipes to catch your interest.
If you're wondering what else is currently in season, check out my calendars to see what produce is in season each month (and coming up soon).


Leave a Reply