This Thanksgiving, make a green bean casserole with fresh green beans, a homemade mushroom sauce and fried shallots.
This version takes more effort, but it pays off with the a green bean casserole that will steal the spotlight. The green beans taste fresh and bright, the mushroom sauce is rich & savory, but well-rounded, and the shallots are bold and crunchy.
The recipe might look long, but that's because I wrote clear and descriptive instructions.

After the recipe, I walk through every step of how to make the ultimate green bean casserole from scratch. I include the basics like trimming and blanching fresh green beans as well as the best way to wash the mushrooms, and detailed steps for making the mushroom sauce and the fried onions.
The casserole only takes 20 minutes to bake in the oven (while the turkey rests and you finish the rest of your Thanksgiving side dishes). It can also be made ahead of time and it bakes up perfectly in 30-40 minutes if it's been chilled in the fridge.

Jump to:
Recipe

Ingredients
Green beans
- 2 lbs fresh green beans
Mushroom sauce
- 1.5 lbs cremini mushrooms see note about adding shiitake
- 2 cloves fresh garlic
- 2 tablespoon olive oil or shallot oil from frying
- 2 tablespoon butter
- ¼ cup flour 30 grams
- 1.5 cups chicken stock or vegetarian stock
- 1.5 cups half & half see note for using milk or heavy cream
- 1 tablespoon lemon juice
- 2 teaspoon worchestershire sauce or sub in soy sauce
- ½ teaspoon pepper or more to taste
Fried shallots
- 2 lb shallots
- 2 cups oil for frying like vegetable oil
- salt to taste
Instructions
MAKE THE FRIED ONIONS
- Slice the shallots thin - about 1/16th inch thick (the thickness of a wheat thin or 2 credit cards). Use a mandolin if possible so they are the same thickness and cook in the same amount of time.2 lb shallots
- Place shallots in a saucepan & cover with oil. You may need to do this in 2 batches depending on your pot size & the amount of oil you want to use. If you do it in 2 batches, you can reuse the oil. I use a medium sized stainless steel pan. Use a high-heat oil like vegetable or avocado oil. The shallots should just float so they aren't touching the bottom of the pan (which can burn them).
- Cook over high heat - the oil should be anywhere between 250℉ and 325℉. Stir occasionally and check on the color of the shallots.
- Prepare drying area. You will need a metal strainer and a heat proof bowl so you can quickly drain the shallots. Line a baking sheet with several layers of paper towel to absorb oil once you remove them.The strainer needs to be dry (water and oil don't mix). If you used the strainer for rinsing green beans, make sure to thoroughly dry it.
- Remove when light-to-medium golden (not golden brown). They will continue to darken after removed as the oil and their internal heat continue cooking. To remove, pour into a metal strainer over a heat-proof bowl. Transfer to paper towel lined baking tray and pat dry with paper towels. Salt to taste. Remove to clean paper towels to finish drying. (Extra oil makes them soggy). You can fish them out instead of straining, but you have to do it in 1-2 passes. Even an extra 30 seconds can over cook them (see post for timeline photos).
TRIM & BLANCH FRESH GREEN BEANS
- Trim the ends off the green beans.2 lbs fresh green beans
- Heat a pot of water to boiling with about 1 tablespoon of salt per quart of water. Meanwhile, prepare a bowl with ice water (ice water IS better than cold tap water).
- Add your fresh green beans to boiling water and cook for 5 minutes. They will start to soften and still be bright green. Strain and then immediate transfer to ice water for 5 minutes. Then strain and set aside.
MAKE MUSHROOM SAUCE
- Prepare vegetables & milk-mixture. Chop mushrooms into small pieces or give them a few pulses in a food processor. Dice garlic. Mix together the half & half, broth, lemon juice, worchestershire sauce, and pepper.1.5 lbs cremini mushrooms, 2 cloves fresh garlic, 1.5 cups chicken stock, 1.5 cups half & half, 1 tablespoon lemon juice, 2 teaspoon worchestershire sauce
- Add olive oil in a skillet (or use leftover oil from frying the shallots or even butter). Cook mushrooms until they release their water, then continue cooking until the mushrooms start to dry out a little.2 tablespoon olive oil
- Add garlic and continue to cook mushrooms & garlic until golden and fragrant. Season with salt.
- Melt the butter in the pan with the mushrooms. Then add flour and stir to combine. Cook until it smells toasty - about 5-7 minutes. (See post for a white vs golden roux).2 tablespoon butter, ¼ cup flour
- Add ¼ cup of the milk mixture to the hot pan. DO NOT ADD MORE! Whisk to combine. The mixture will ball up and turn into a blob.
- And another ¼ cup of the liquid. Whisk to combine. Continue adding liquid in SMALL increments (adding too much at once will create lumps). Continue until the mushroom sauce is your desired thickness. You may not use all of the liquid.
- Taste & adjust. Add more salt or pepper if desired. If the sauce is too thick, add more liquid (run out of your mixture? Just add more dairy or broth, no need to mix more). If it's too runny, simmer until it thickens.
BAKE THE GREEN BEAN CASSEROLE @ 350℉ for 20 MIN (40 MIN IF CHILLED)
- Add the green beans to a 9x13 pan (see notes for scaling). Stir in the mushroom sauce and ¼ cup of the shallots (just to add a little more flavor).If you are using french's fried onions, don't mix them into the sauce, just add them to the top.
- Bake for 20 minutes if the casserole was assembled warm/hot. Top with remaining shallots and serve.If it was chilled, cover with foil and bake for 30 minutes. Uncover and cook for another 10. Top with remaining shallots and serve.
Notes
- Heavy cream: For Thanksgiving, if you will already have heavy cream around, you can use that instead of buying half & half. Leave the amount the same for a really rich casserole, or reduce it by a half-cup (per batch) and replace that with extra broth.
- Milk: if you run out of half & half or heavy cream, don't worry. You can use milk. Use an extra half-cup (per batch), add 2-4 tablespoon of butter (per batch, for richness), and reduce broth by a half-cup.
- If you make a half-batch, use an 8x8 pan
- You can add up to 50% more in a regular 9x13 pan
- You can double the recipe and still use a 9x13 pan if it's a really deep, deep dish.
- Bake for 30-ish minutes in a slightly cooler oven (300-325F)
- Bake for 20 minutes in a 350F oven
- Bake for 10-15-ish minutes in a 375-400F oven
Nutrition
Serving size
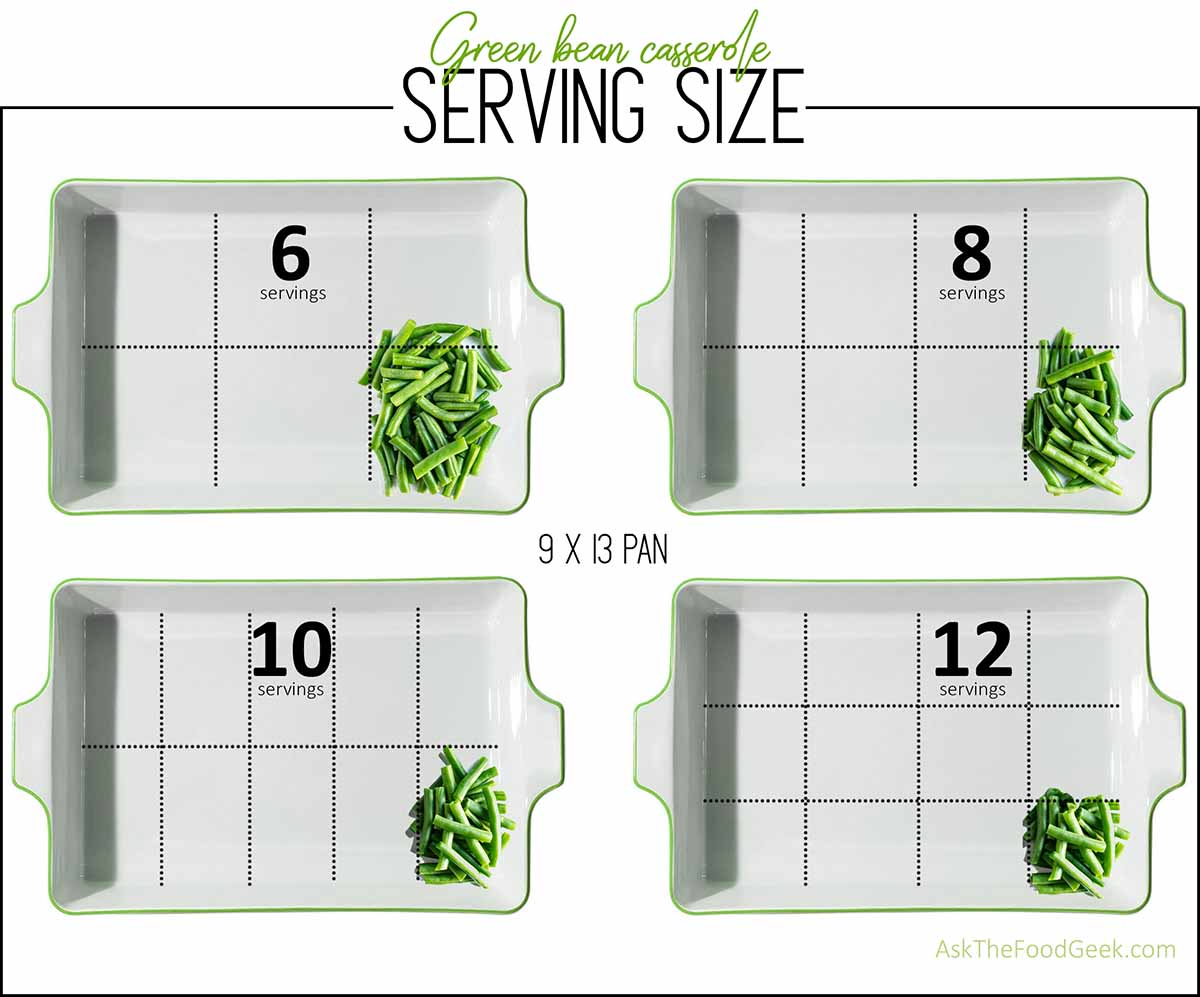
Most green bean casserole recipes are designed for a 9x13 baking dish and use 2 pounds of fresh green beans. These recipes also claim to serve anywhere from 8 to 12 people (without leftovers).
The amount you need to make really depends on how much your Thanksgiving crowd tends to eat. I like to picture that same 9x13 baking dish with a lasagna cut into 12 portions (which stacks about twice as high as a green bean casserole).

I use those portions to compare the size of a scoop I think everyone will take, ranging from children to hungry teens, to adults, to grandparents. Then I overestimate it a little, knowing (hoping!) I have leftovers.
If you want to ensure you have leftovers, steal my trick. I have a bunch of small oven-safe, glass storage containers and I make some extra in one of those and leave it, unbaked, in the fridge. It's all mine!

Using fresh green beans
A green bean casserole made with fresh green beans doesn't even compare to ones with canned or frozen. Their texture is firmer (but still soft), they don't get limp or slimy, and the flavor is better.
It definitely takes more effort, but for a big holiday like Thanksgiving, I tend to pull out all the stops.
If you're short on time, you can make this same green bean casserole ahead of time. (I do it every year, actually).

Tips for buying fresh green beans
Your grocery store will likely have a big section of fresh green beans, often pre-packed in open bags (like grapes). You can fill those bags to get your desired weight, rather than sticking to their pre-filled amount.
Since fresh green bean season ends in September for most of the US, the ones we buy for Thanksgiving are shipped from Florida or imported from Mexico. This means they have longer travel times, so it's important to inspect them for freshness.
The green beans should be a vivid green color, not brown, and be velvety and dry (not slimy). They should be sturdy and snap when bent. If they are limp and bend without breaking, they are no longer fresh.
Green beans may be labeled is string beans or snap beans. The gold standard variety are French green beans (also called haricots verts). They tend to be a little skinnier but longer, slightly more tender, and cook quicker. The seeds are also small.
That said, I doubt most people will notice a difference if you use French or 'regular' green beans. Using fresh green beans over canned makes makes a biggest impact on the quality of your casserole than the specific variety of green beans.
When possible, avoid pre-cut green beans. The ends dry out pretty quickly and they won't taste as good. But if you are shopping the same day you are baking the casserole, you could probably get away with a precut option as long as they still look fresh.
Store the green beans in their plastic bags in the fridge. If they looked really fresh when you bought them, they should last in the fridge for at least 3 days (or up to 5 but that could be risking it for a big Thanksgiving meal).
If you can't find green beans that look fresh, you can try using frozen ones, simmered in stock for 20 minutes (according to Eric Kim of the NYT). I haven't tried it, but people on Reddit say it worked and I also generally trust NYT recipes.

Trimming
You'll want to trim the ends off your fresh green beans. The stem-end in particular can be tough and fibrous, ruining the texture of the casserole.
If you're looking for the best way to trim the green beans, A Couple Cooks has an easy-to-follow guide.
I follow their method, which essentially stacks up some of the green beans line up on one end, then cuts the ends off. Then push the beans to line up on the other side and cut again.

With this method, I lost about 3-4 ounces per pound of green beans. I didn't add more green beans to the casserole, since this recipe (and other recipes) list the precut weight, knowing you'll need to trim them.

Blanching
If you haven't blanched vegetables before, or do so rarely, you're in good company. Outside of green bean casseroles, I have a hard time recalling the last time I blanched vegetables.
Anyway, it's an important (but easy) step in making the ultimate green bean casserole for Thanksgiving. Blanching partially cooks them, but they still retain some firmness. This gives them a head start so they cook up perfectly soft (but not limp) in the casserole dish.
To blanch the fresh green beans, drop them in a pot of heavily salted, boiling water. Use about 1 tablespoon of kosher salt (or 2 teaspoons table salt) per quart of water. The beans soak up a little bit of that salt, marginally improving their flavor.
Cook for about 5 minutes - they should just start to turn tender (while also being firm, not limp). Then strain them in a colander and immediately drop them into a bowl of ice water.
According to tests from Serious Eats, the ice water bath really makes a difference compared to cold tap water.

Making the mushroom sauce from scratch
I know I said that using fresh green beans makes all the difference in a green bean casserole. But a homemade mushroom sauce is probably as equally important.
The canned mushroom soup is bland and always seems to be missing something. That something is the richness from dairy. After inspecting the ingredients, I realized there is more vegetable oil than cream or milk! Either they are using a ton of vegetable oil or almost no dairy.
I feel like it's also missing the savory umami flavors from the mushrooms. When you make a homemade sauce, the mushrooms are sauteed to perfection, bringing out their best side.
This mushroom sauce is rich and savory, with a hint of mushroom flavor. When the mushrooms are diced small, they blend right into the sauce, adding their umami flavors without ever being noticed.
I make cream sauces all of the time, and in the beginning I had my fair share of mistakes. I've learned from those mistakes so I know what to do and what not to do. I'll walk you through the process to help you get it right on the first try.
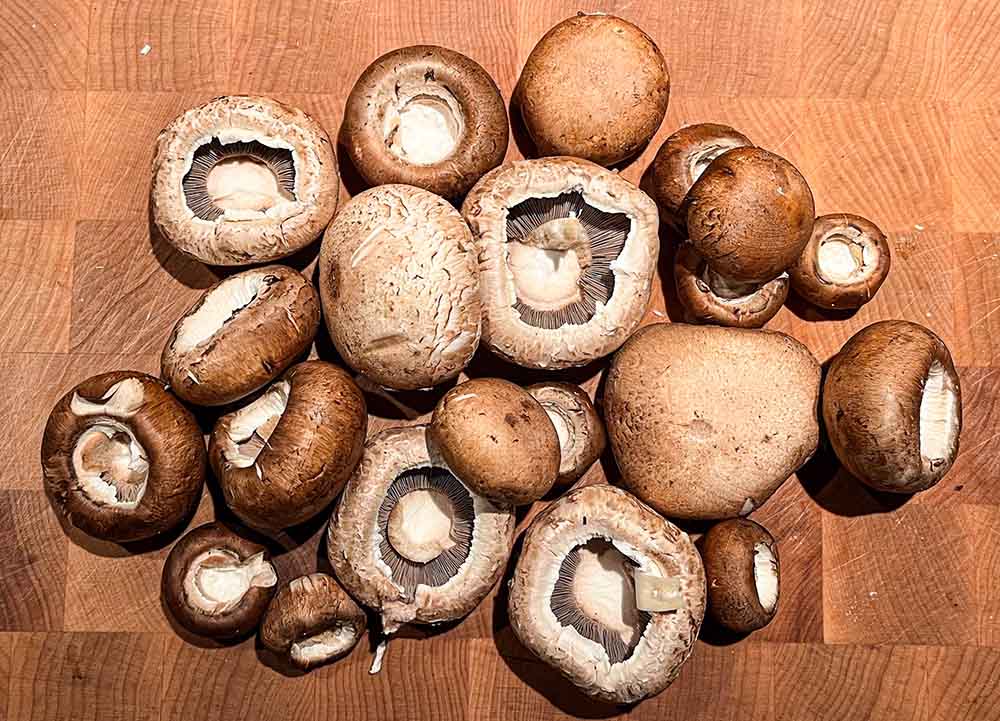
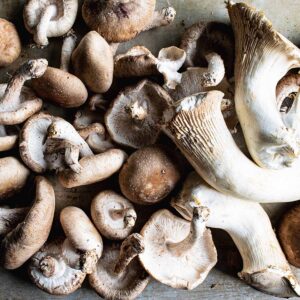
Step 1: clean & dice the mushrooms
Cleaning mushrooms can be time consuming. Sometimes they are really clean straight from the store, other times they are covered with spots of dirt. I usually wipe dirt off cremini mushrooms with a paper towel.
It's been common advice (in the past) to never wash mushrooms or they turn soggy. However, modern advice has been modified to specify that only mushrooms with exposed gills (like portobello) should avoid being washed since it's the gills that absorb the water.
Other mushrooms, like shiitake or cremini (neither of which have exposed gills) are fine to wash, according to America's Test Kitchen:
"In fact, when we weighed batches of white, cremini, portobello, shiitake, oyster, and maitake mushrooms before and after submerging them in water for 1 minute, the mushrooms without exposed gills retained almost no water, while those with them soaked up as much as 25 percent of their weight in liquid."
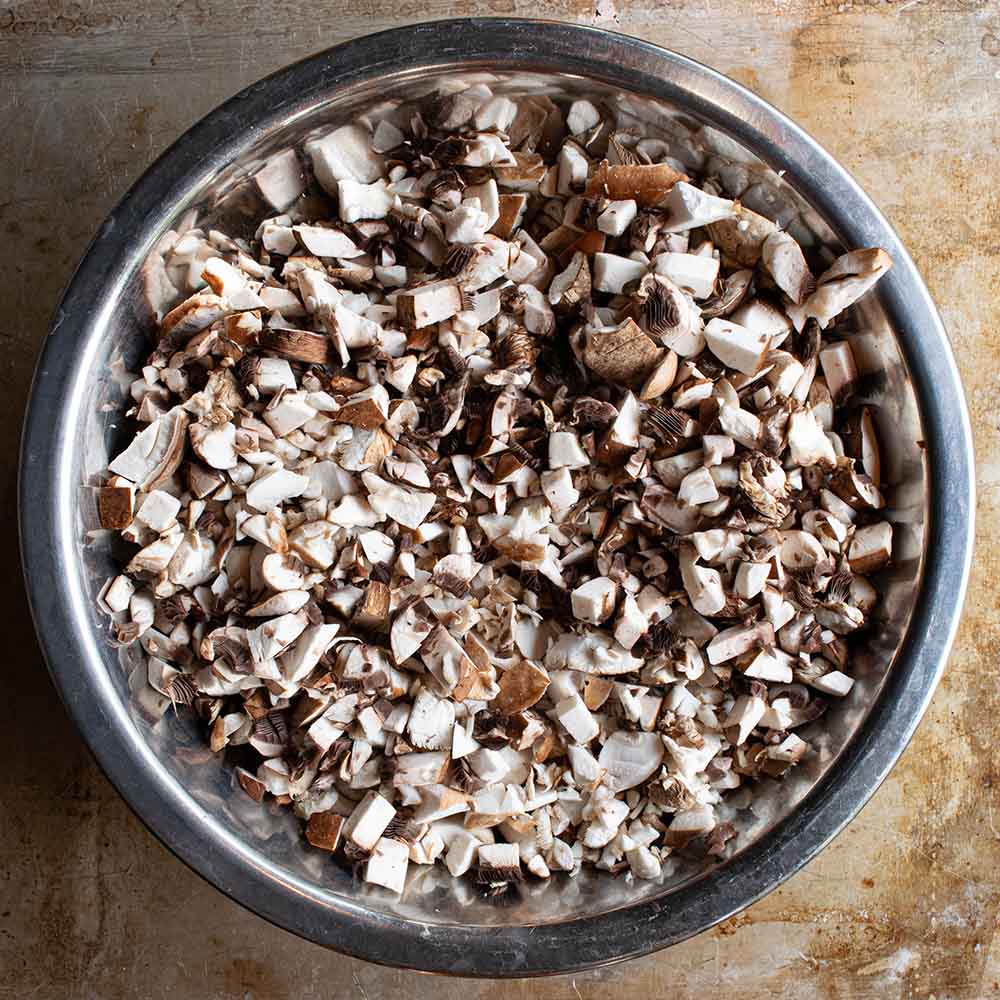
Next, cut the mushrooms into tiny pieces. You can chop them in a pile on a cutting board, or chop them with a few pulses in a food processor (you'll likely have to do it in a few batches).
Step 2: cook the mushrooms in butter
In a large skillet (preferably stainless steel or cast iron for better browning), melt the butter then add the mushrooms. Cook until they release their moisture, then continue cooking until they brown and start to dry out. This takes maybe 15 minutes.
Then add in chopped garlic and continue to cook until they mushrooms have browned and are more dried out. (Adding in the garlic sooner can cause it to burn and turn bitter). This takes another 2-5 minutes.
This concentrates the mushroom flavor and removes the water so the sauce doesn't get too watery.
Step 3: make a roux
A roux is a fancy term for a mixture of equal parts (by weight) of flour and fat (like butter or oil). Flour is very starchy, so it is used as a thickener for gravies, sauces, and even soups.
But first, that flour needs to bind with fat to prevent lumps. So at this point, you need to add more butter to the mushrooms in the pan. Don't skip this to try to be healthy!
Once the butter is melted, add the flour to the mushrooms. The amount of flour used compared to the amount of liquid (next step) determines how thick the mushroom sauce will be.
A gravy will use about 1 tablespoon of flour per cup of milk, whereas a thick sauce that won't run at all might use 2-3 tablespoons of flour per cup of milk. This recipe uses recipe uses about 1.5 tablespoons of flour per cup of milk for a thick, but pourable sauce.
Once you add the flour, mix it with the butter and cook the mixture until it smells toasty (3-5 minutes) or cook it for longer (5-10 minutes) for more flavor but less thickening power.
White vs blond roux
A white roux is milder in flavor and cooked minimally (3-5 minutes). It's also a better thickener because more of the starch is left intact.
A blond roux is cooked longer (5-10 minutes) - until the flour turns more of a golden color. It will have a slightly richer flavor, but not as much thickening power because some of the starch breaks down (so you'll need to add less liquid).
However, because of the way the starch breaks down and forms different bonds, the blond roux has more holding power when cooled which means it's less likely to congeal on a plate.
Either method will make a delicious mushroom sauce for your green bean casserole. It can be easily adapted because you'll be adding the liquid slowly and stopping once you reach the desired consistency.
Step 4: slowly add in the liquid
This is where most people (myself included) have messed up in the past. You must add in the liquid a little bit at a time, whisking continuously. If you add it all at once, your sauce will be watery with floating flour lumps.
At this point, we're basically making a bechemel sauce - a white sauce made with milk, half and half, or heavy cream. This is actually a pretty easy sauce to make, if you're diligent about adding the liquid slowly.
In Harold McGee's On Food and Cooking, he explains the flour is better at thickening milk based sauces rather than meat or stock based sauces because "it bonds both to the milk proteins and the fat globules and so recruits these weighty ingredients into its flow-slowing network." (page 618).
Making the mushroom sauce
You can add your milk-mixture at room temperature, or even a little cold. It doesn't need to be warmed up ahead of time.
The first step is to add a small amount of liquid, about a quarter cup. Whisk it into the flour.
When only a tiny bit of liquid (about a quarter-cup) is added, the flour mixture (the roux) quickly absorbs it. It turns from a dry-ish flour paste, into a wet, sticky blob like ball.
Then you add a little bit more liquid (another quarter cup), and as you whisk, it will still be very pasty, but more like a cookie dough texture. A little more liquid and it becomes more like a muffin batter texture.
Keep adding a little liquid at a time and it eventually becomes a smooth sauce, and it's the thickness you're looking for in your casserole. I like it to have the consistency of a cheese fondue when it's really hot and smooth.
You might only use ¾th of the liquid, or you might need it all. If it's too thick, add more liquid. If it's too thin, just simmer it until it thickens.
Step 5: Check consistency
As long as you sauce is smooth, you can make it thinner or thicker until it's the consistency you want.
The first thing to know is that the sauce will thicken slightly as the starch from the flour absorbs more liquid over time. So even if the fresh green beans release some water, the sauce can handle it.
If the sauce is too thick, add in a little more of your milk-mixture. If you've run out, just add in straight milk, half and half, heavy cream, or even broth.
For a sauce that's too thin or runny, simmer it until some of the liquid evaporates. Keep an eye on it and stir occasionally because it can thicken up all at once.
Step 6: Taste & season
This is the easy part. Taste the sauce. Season it how you see fit. Does it need more salt? Pepper? Want to add some sage?
The mushroom sauce carries the flavor of the casserole, especially the saltiness. So make sure you like how it tastes. The fried onions add more flavor (and salt, depending on how salty you made them).

Homemade "French's" fried onions
I almost never deep fry food - it always seems like too much of a hassle and a waste of oil. Instead I get my deep fried fix of fries or chicken from restaurants.
But these fried onions are worth it and not that hard to do. They even stay crispy for a couple months in an air-tight on the counter. I stored some of the extra shallots I made at Thanksgiving on the counter and used them in February. They were still crispy!

Slice shallots super thin
Use a mandolin (or a deli slicer!) to cut the shallots thin - about the thickness of a wheat thin cracker. If they are too thin they will brown too quickly and likely burn. If they are too thick, they take forever to fry.
You can use a knife to slice them. If you do, try your best to make them equal thickness so they fry up at the same time.
Dry the shallots with a paper towel to remove any excess moisture that resulted from slicing them. (Oil and water don't mix).
Fry the shallots
First, you'll need to prepare your area of deep frying. Don't skip this step!
Grab a baking tray and line it with 2-3 layers of paper towel. This will be used to dry the shallots after you fry them.
Have extra paper towel ready to also dab the excess oil off the top of them. Excess oil will turn the shallots soggy, so it's important to get it all off!
Have some salt ready. Once they are removed from the frying oil, they cool and dry quickly. You want to salt them when they are still hot so it sticks. Kosher salt or table salt both work.
Get a colander or large strainer ready, along with a heat-proof metal bowl, pan, or something that can handle the hot oil being poured into it. Once the shallots start to turn golden, you'll need to remove them from the oil all at once. You don't really have 1-2 minutes to fish them out in batches.
Next, grab a sauce pan (I use a metal sauce pan). Add in your shallots and then pour oil into the pan to cover them. They should float the tiniest bit so they aren't resting on the bottom of the pan (which can burn them).
Heat the oil with the shallots. It will start to bubble and fizz as it cooks the water out, stirring occasionally with a heat proof utensil.
Oil temperature
Oil for deep frying is usually between 250-375 degrees. If it starts smoking, it's too hot and starts to break down, and can add an off-flavor. If the oil is too cool, the shallots will retain too much moisture and end up soggy.

Cook until pale golden in color
If your oil heats up fast, these can be ready in 15 minutes. I have an induction cooktop that heats very quickly! Otherwise, it can take 20 minutes or more.
Some of the shallots will start to turn pale yellow while the rest are still white. This is where you need to watch very closely. Some will start to turn a rich golden color, while others are pale gold.
Be ready, within 30 seconds they will be perfect. They start to turn fast - really! Another 30 seconds can make them burn. You don't want to take them out when they are light-brown because at this point they might get too dark by the time they are removed from the oil.

I like to think of it on a scale from 0 to 100. At 0 they are raw and white and at 100 they are black and burnt. You want them to be at 60-75% golden. To reach that, you want to take them out at 50%, and they will continue to darken slightly as their internal heat continues to cook them for a minute or two.
If you let them go too long, they can get an off flavor. I experimented and had some that were a little pale and some that were a little too browned. The pale ones tasted better.
To put that in context, I'm someone who likes my bacon daaaark brown and super crispy. I like it to disintegrate when I chew it. But that doesn't work for fried shallots... the batch I let go longer didn't taste great.
Remove from hot oil
The shallots need to be removed quickly, which is easily done by (carefully) pouring the oil over a strainer that's in a heat-proof bowl.
Then immediately transfer the shallots to the paper-towel lined baking tray(s). Blot them with extra paper towel. Then pick them up in one paper towel and drop them onto the layer below. You want to get excess oil off to keep them crisp.
While still hot, sprinkle them with salt. Let the fully cool, about an hour.
Store them in an airtight container lined with paper towel. Try not to eat them all before you add them to the green bean casserole!
Fry up some sage too!
While you have the oil around, you can use it to quickly fry some fresh sage. The sage leaves fry in just 15-20 seconds and are delicious crumbled on this casserole, on top of mashed potatoes, and pretty much anything at Thanksgiving.


How to make the green bean casserole
Making the individual components is the time-consuming part. Once you've blanched the fresh green beans, made the mushrooms sauce, and fried the onions, you're in the home stretch.
Put the green beans in a 9x13 baking dish. Then stir in the mushroom sauce and a few of the fried onions (¼ cup) to add a little extra flavor.
Bake in a 350F preheated oven - you have some wiggle room here - you just need to heat it up and let the green beans cook a tiny bit more.
- Bake for 30 minutes in a slightly cooler oven (300-325F)
- Bake for 20 minutes in a 350F oven
- Bake for 10-15 minutes in a 375-400F oven
Once you remove it, cover with remaining fried onions. Serve!
I really hope this article helps you make the perfect green bean casserole. But if you've had problems in the past, this Southern Living article about mistakes when making green bean casserole (any recipe), might be worth a read.
More recipes and resources
If you're looking for other green bean casserole ideas, I've got you covered.

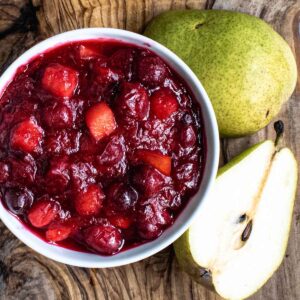
Now are you ready to make cranberry sauce? It's a fast, easy side dish that can be made well in advance.
Try my low-sugar pear cranberry sauce. It's naturally sweetened with the pears and the since there's less added sugar, the naturally cranberry flavor shines through.
Have a smaller gathering and don't want to cook a whole turkey? Try my Thanksgiving roast chicken with herb butter recipe. Use the extra herb butter to make this gravy recipe - you'll be happy you did!

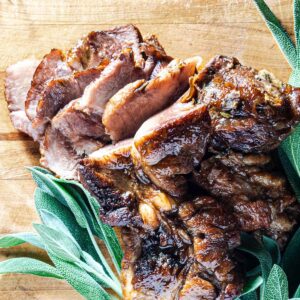
Anytime I cook pork for Thanksgiving, people seem happier than usual. It's just too good to pass up some years. Here's a favorite recipe of mine.
If you're wondering what else is currently in season, check out my calendars to see what produce is in season each month (and coming up soon).


Leave a Reply