Butternut squash is one of the easiest vegetables to grow in the garden, but one of the hardest to know when to pick.
That's because of the different ripening stages butternut squash go through. In the first stage, the skin turns from green to tan. Next, the flesh sweetens and softens. In the last stage, which you can't see, the seeds fully ripen.
If the seeds aren't fully mature when harvested, they steal nutrients from the flesh. This is why making sure butternut squash are fully ripened before they are picked.
How to know when to pick butternut squash
- Color: tan skin with no (or very faded) green striping
- Stem: corked, turning brown, and drying out
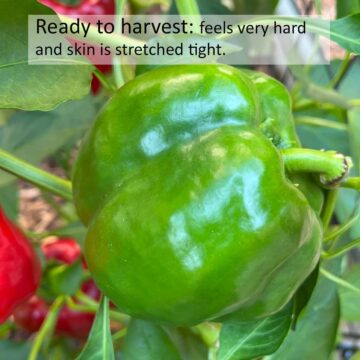
- Skin: hard, and not easily (or not at all) pierced with your fingernail
There are 3 main characteristics to look for to ensure your butternut squash have reached the stage where they are fully ripened. Not only will fully ripened butternuts taste better, they store longer too.

I'm here to make it easy to identify the signs when your butternut squash is ready for harvest.
Let's look at each one of these more in depth, along with pictures to further grow your confidence when harvest time comes along. All pictures in this post are of my Waltham Butternut Squash vines grown in my Midwest backyard in zone 6a.
Jump to:
1. Skin color will be tan and green stripes fade
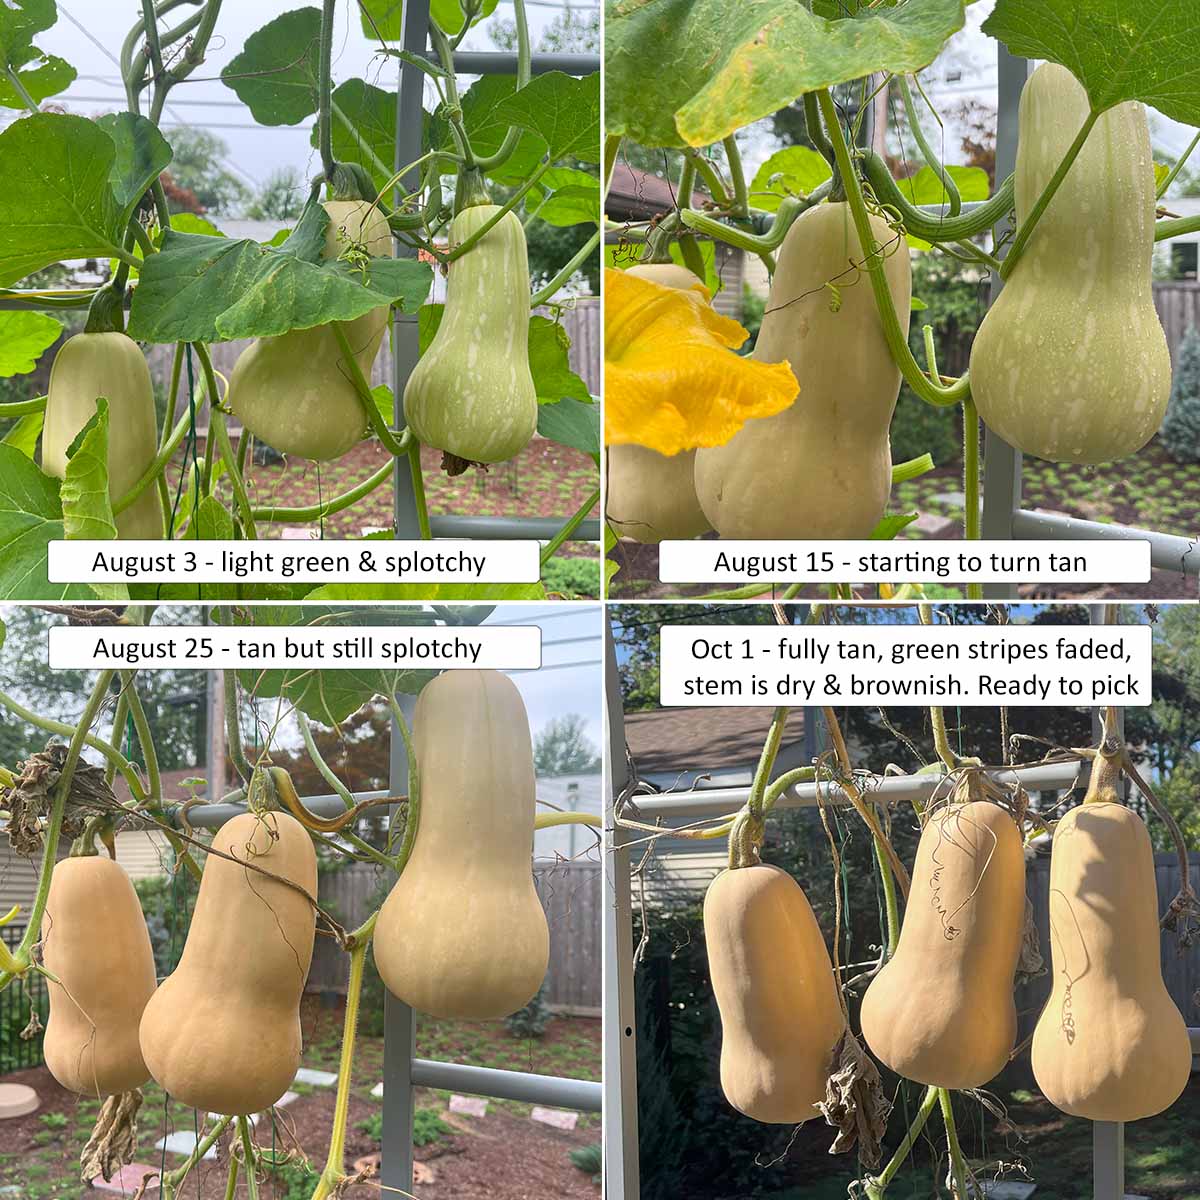
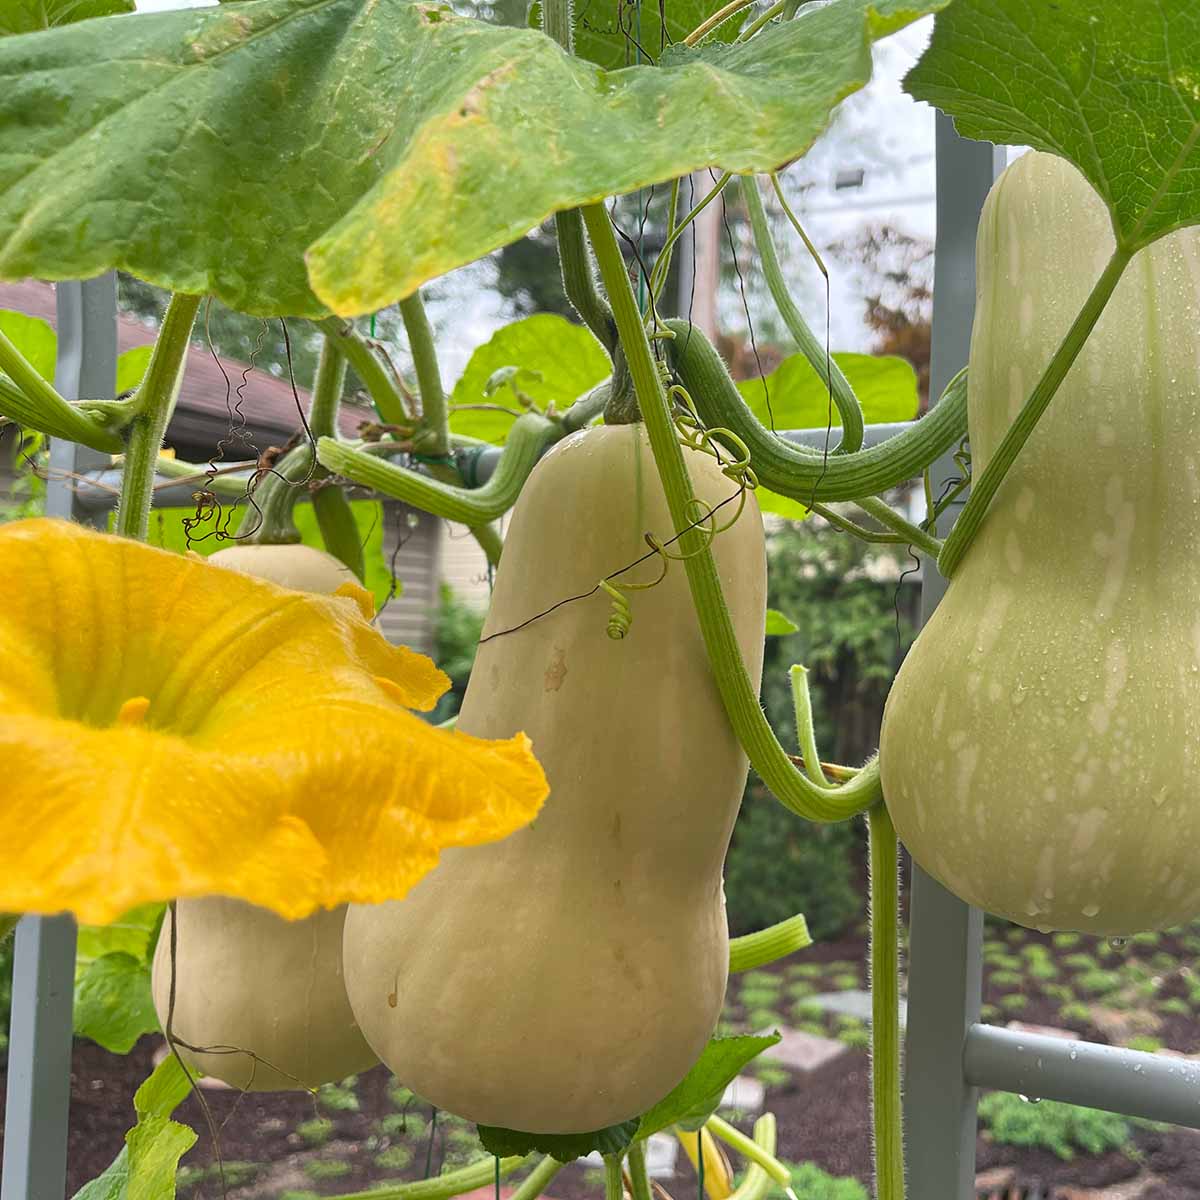
Butternut squash turn from splotchy green to a solid tan in the first stage of ripening. Once they start to turn tan, they'll be ripe about 6 weeks later (on average).
This is what makes harvesting butternut squash so difficult. The color change happens well before they are ripe, taking away your biggest visual cue. Their tan color doesn't really change or get more intense over the next few weeks either.
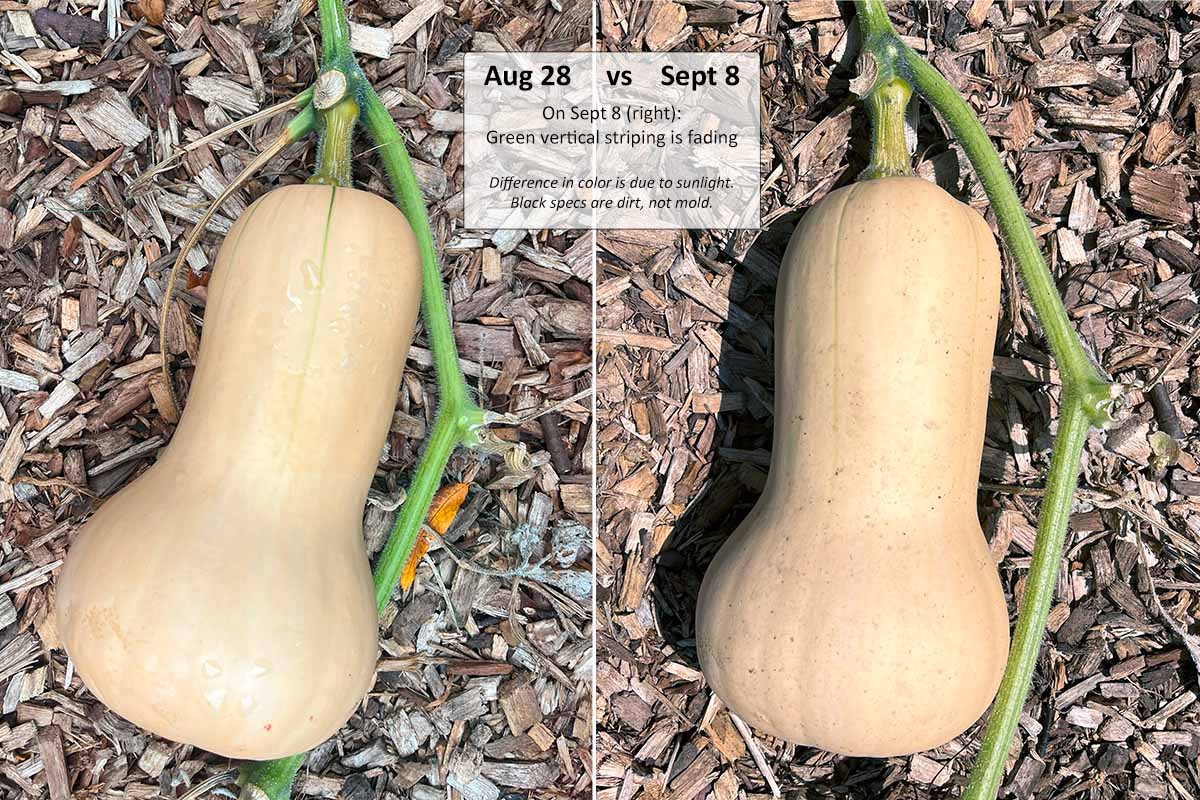
Instead, pay attention to the green stripes that originate from the stem.
As the butternut squash continues to mature, those stripes will turn into a very faded green or almost completely disappear.
As long as the stripes are a faded green (as pictured on the right, above), they can be harvested. But they will be even better if you can wait longer!
I waited another couple of weeks to harvest the butternut pictured above. There's no harm leaving them on the vine longer to be sure they are fully mature - they rarely over ripen on the vine.
That said, there are some good reasons to pick them as soon as they are ready, which I get into later in this article.

2. Stem will be corked, dry & brown
The next step to help you determine when your butternut squash are ready for harvest is to examine the stem. It goes through 3 stages:
- Immature stems will be a bright, vegetal green color
- As it matures, it dulls to an army green with browns mixed in and starts corking
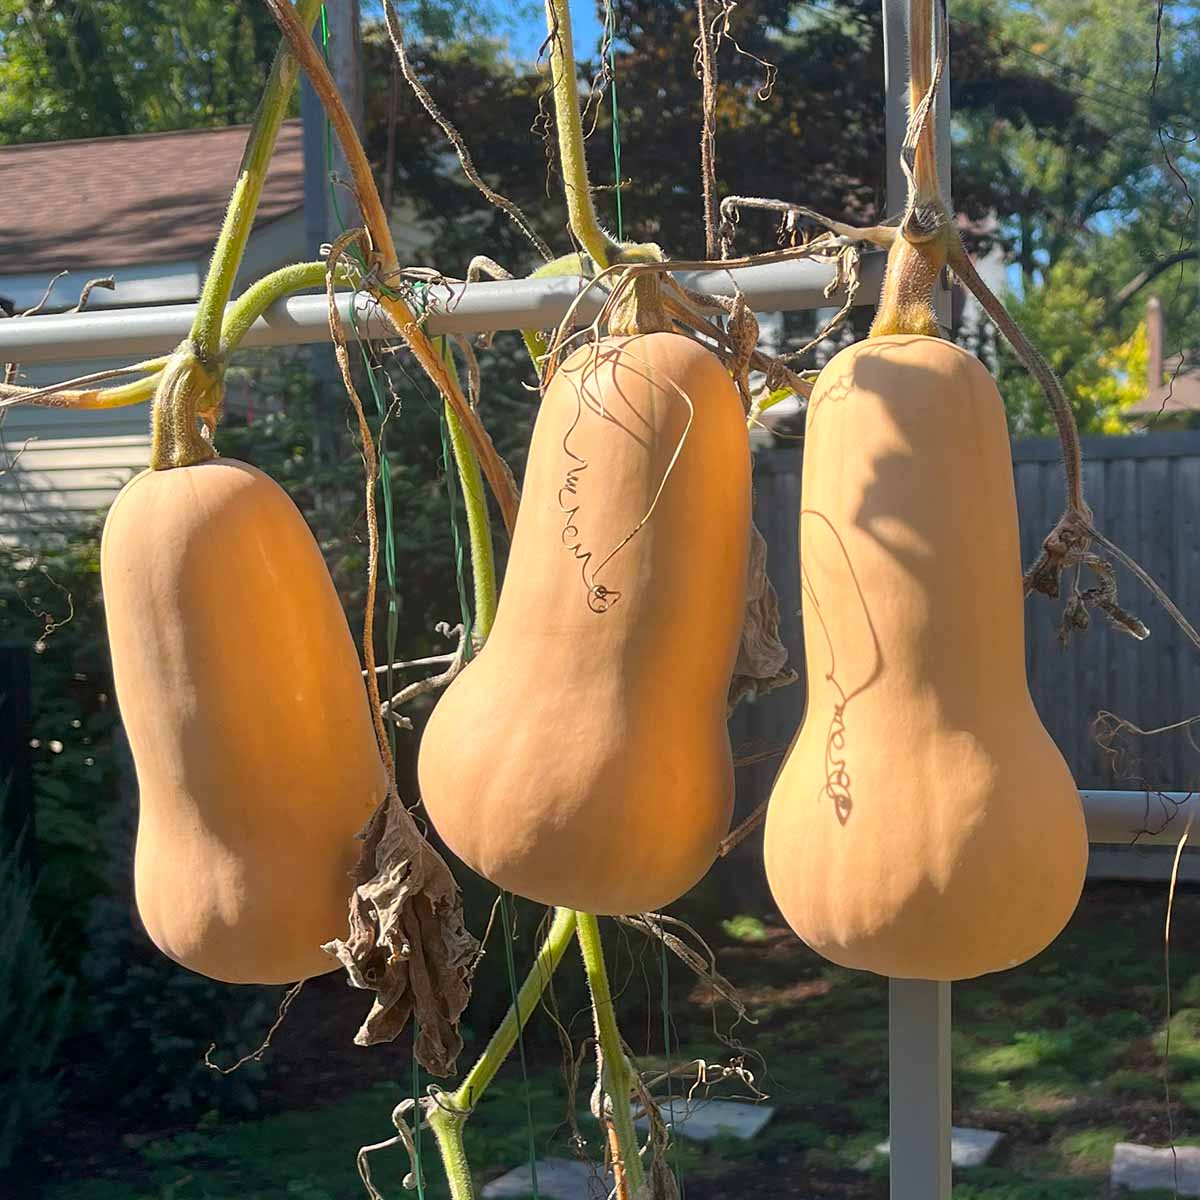
- Near harvest, the stem turns more brown with more signs of corking and dries out.
When it's close to harvest, the stem starts to turn brown-ish (as shown on the right). But note that the butternut on the right in the photo above is still not ready for harvest because it still has prominent green striping.
Early in the growth cycle, the stem also starts to show corking, which looks like little stretch marks. As the butternut squash nears maturity, the stem will look more and more woody and dried out.
The stem won't turn as brown and dry as the ones you buy in the store - that transformation happens after harvest.
3. Skin is very hard
The final thing to test is the hardness of the skin.
Don't test this before the other two criteria are met - you don't want to unnecessarily damage the squash. (They do heal fairly quickly, but ideally they don't have to!).
If the butternut squash looks ready to harvest, now try to pierce the skin with a fingernail. It should be very difficult to actually pierce through and might only leave a dent (or no dent at all!).
The Kentucky extension office further clarifies this by saying, "Keep in mind that the rind of a pumpkin and most winter squash will likely give if you push hard enough with your nail. You're looking for firm resistance, not an impenetrable layer."
It is difficult to describe this properly with words or even pictures, so I found a couple of videos to share.
- The first video shows how hard the skin is, not even piercing after a good amount of pressure. (Side note: the video is short and does a great job showing these same ripening stages).
- The second video shows what it looks like to easily pierce the skin (on the first butternut), and what it looks like when it's a bit harder (on the second butternut). In my opinion, that second butternut is still not ready to harvest since you can see the splotchy skin color that hasn't yet turned a solid tan, and the skin was too easily pierced. (She harvested it anyway, likely because she's dealing with wet weather conditions causing her butternut squash to split).
If you do this test and determine the squash isn't ready, leave it on the vine to continue to ripen. The cut skin heals pretty quickly, making a little woody scar. Make sure the puncture is facing up and away from the ground so it doesn't rot (if you aren't growing your butternut squash up a trellis).
When in doubt: harvest late!
If this is the first year you are harvesting butternut squash, you are probably still a little unsure.
I get it, it's hard until you've done it yourself (once, twice, or a dozen times, to be honest). So my advice to you in this case is to just leave them be for a little while longer.
I actually prefer to pick my butternut squash later since the quality isn't affected with a few extra weeks on the vine (with some exceptions described in the next section).
I do this as long as I don't have frost or heavy rains to worry about. I grow the squash on a trellis, so I'm also not worried about them rotting on the ground or (most) critters taking snack-sized bites.
I'm not the only one who shares this advice. Toni from Toni Farmer's Garden is a Master Gardener with a Masters Degree in Regenerative Agriculture (say that 10 times fast!). She relates to every gardener's struggle when harvest time comes around. In her own words:
"You'll worry. You'll look at those fat squash sitting on the ground, exposed to animals and insects and you'll worry! Should I pick them now? Should I clip those stems and bring them in? Don't do it! They will be happy in your garden until right before the first frost - and they will last in your pantry all winter long, hence the name winter squash."
Harvesting too early affects flavor and shelf life
Why shouldn't you harvest them early? Because it creates a few problems:
- Less flavorful
- Shorter storage life
- Seeds steal energy
Most fruits and vegetables have a longer shelf life when picked early, but the opposite is true with winter squash.
Under-ripe squash won't spoil in a week or two, but they won't store long over the winter either.
Butternut squash will easily last 3-6 months when harvested at the right time and stored in a cool, dark place with good airflow. The ones I picked at the beginning of October are always still good by the end of March.
The main cause of this problem is the immature seeds. Once harvested, the seeds can no longer get nutrients from the plant to finish growing. They have to take energy from the butternut's flesh instead. This causes a loss of quality and storage capability.
If you do harvest too early, just eat them sooner than later. I use a sharpie to label the bottom with the harvest date and a note if it was picked too early.
Pick early if frost is expected, among other reasons
Just when all of this seemed easy, I'm going to throw in some exceptions. You can absolutely pick your butternut squash as late as possible, except under the following conditions:
- A frost is in the forecast
- A very heavy rain is expected (especially if you have clay soil)
- You have bug or other pest problems
- You have under ripe butternut squash that need to ripen before your first frost
Frost
Winter squash plants are not frost tolerant... at all. Seeds need to be planted after all danger of frost has passed, and come late fall, the plants will completely wither when frost hits.
The butternut squash themselves also don't like cold temperatures. It deteriorates the flesh (which is why you don't store them in the fridge unless they are cut up already).
Heavy rain
A very heavy rain can cause the plants to soak up excess water, delivering it straight into maturing squash. The squash take on so much water but they are unable to expand properly to accommodate it, so they crack (like in this video).
Rain is an even bigger problem if you have clay soil. It doesn't drain well and pools around the plant and its roots. If you have clay soil, considering picking at least some of your squash before a medium rain even.
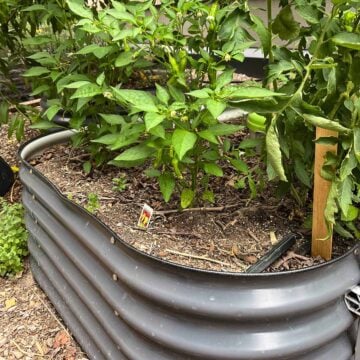
I suggest always leaving at least a few squash on the vine during a rain storm for science! It will let you catalogue the results so you know if this is a problem for your garden or not. My butternut squash are grown in a raised bed with very well draining soil and I've never had them split, even with a heavy rain.
Pest problems
Pests problems always seem to be different from one gardener to the next. One garden might be plagued with squash bugs, while another is dealing with snackish squirrels.
I personally have had a raccoon that tormented me... she would take one bite out of every single type of fruit or vegetable I grew, leaving the unfinished portions sitting neatly on a fence post or table.
It's better to have slightly under ripe squash than no squash at all.
If you have pest problems, discard my advice to wait as long as possible. You can pick some that are just slightly under-ripe (maybe there is some green striping left, for example). Then try to wait to harvest the rest until they are fully mature if possible!
Under ripe winter squash are perfectly fine to eat. They just might not have the best flavor or the best texture. It also won't store as long.
Pick early to allow more squash to ripen before the end of the season
The last consideration has to do with the maturity of the rest of the butternut squash on the same plant.
During late summer or early fall, there's likely no need to worry - you can let ripe ones continue to hang on the vine.
The concern is related to your first frost date. Since the plants and the squash don't like freezing temperatures, they all need to be picked before that happens.
In my experience (Midwest climate, zone 6a), it can take significant time for a full-sized butternut to ripen.
Once the squash starts to turn from green to tan (where you can see both hues), it will be pretty ripe in 4 weeks and perfectly ripe in 6.
This timing will be different depending on your climate - it will happen quicker in hotter climates and slower in mild ones.
From here, take your first average frost date and work backwards. Mine is October 15th, so I need to make sure all of my butternut squash are ripening 6 weeks prior.
That means starting September 1st, I might want to harvest ones that are ripe to free up resources if any of them are still green. If all of them have started to turn tan, or are fully tan, I can leave them on the vine for longer.
This doesn't work (at least in my climate) for speeding up the process for baby, very immature squash.
For example, I had a few butternut squash that formed very late in the season thanks to some late flowers. Even mid-September they were half-sized and very green. They didn't have time to make it through all of the ripening stages, which isn't surprising.
Butternut squash should also be 'cured' after harvest if you plan to store them over winter. Simply leave them outside on warm, sunny days. This hardens the outer skin and helps maintain moisture in the flesh throughout storage.
Lastly, their flavor improves after at least several weeks of storage. The starches in the flesh convert to sugar, and the flavor itself intensifies as well.
How to harvest, cure, and store
Now that your butternut squash are ripe, let's dive into harvest, curing, and storage.
Harvest with a knife and leave the stem attached
Butternut squash need to be cut from the vine, unlike other vegetables that can easily be removed by hand.
- Cut with a knife or strong clippers
- Keep 1 inch of stem on the squash
- Do NOT pull with your hands, it can remove or damage the stem
The stems are very hard and woody at this point and won't easily pull from the vine. You want to keep part of the stem attached to prevent moisture loss during storage.
But more importantly, you want that stem to protect the squash from bruises, mold, and disease that can sneak in where the stem used to be. Remember, the skin under the stem was never exposed to the sun, air, or other elements, so it isn't as tough as the rest of the skin.
What is curing
Now that you've harvested your squash, you'll want to cure them.
What is curing, you might ask? It's simply leaving the harvested squash in a warm, sunny location for 1-2 weeks.
The purpose of curing winter squash is prolong their storage life. Curing extends their storage capability because it allows for cuts to heal and the skin to harden. This prevents bacteria from entering into any open wounds and a hard skin slows moisture loss.
Cured winter squash also have higher levels of sugar than ones that weren't cured. I personally prefer winter squash with more sugar because they caramelize better when roasted!
How to cure
The ideal conditions for curing most winter squash is to place them in a sunny, location in 70-80F weather with high humidity. Leave them outdoors for 1-2 weeks.
If you live in a climate where that works out, wonderful! If not, there are alternatives.
You can still cure them outdoors in cooler temperatures, as long as it's above 45F degrees. Be sure to check the weather for low temperatures at night and bring them in if it drops because they don't like to be stored below 50F.
South Dakota State University's extension office explains:
"Pumpkins and squash are warm-season crops that are sensitive to temperatures below 45 degrees Fahrenheit, and they should be harvested before frost. The fruit can withstand brief exposure to cooler temperatures, even down to 35 degrees Fahrenheit, as long as they are exposed to warmer temperatures (around room temperature) soon afterwards, which will help reverse some of the chilling injury." -SDSU extension office
When the weather forecast calls for rain, bring your squash inside. Return them to their sunny, outdoor curing spot when the rain stops.
If your weather is just too chilly, which is common during harvest season in the Midwest and Northeast, you still have options:
- An outdoor greenhouse (even those inexpensive plastic ones)
- A sunny window, indoors
- A warm attic (no sun, but the warm temperatures help - just DON'T forget about them)
Winter squash can be eaten and even stored without the curing step. They just likely won't store as long. Don't cure acorn squash - it actually worsens their quality. This is the one exception to the curing rule!
Storage improves their flavor
The first thing to know is that butternut squash, in particular, taste even better after at least a month of storage. They convert starch to sugars during storage, improving their flavor and texture.
A fully mature butternut squash at harvest has 3 times more starch than sugar. After several months of storage, that ratio is flipped and the flesh has 3x more sugar than starch, as shown by tests from UNH on page 4 of "The Nuts and Bolts of Eating Quality in Winter Squash (pdf)."
Butternut squash are one of the best winter squash for long-term storage. They store for 3-6 months in a cool, dark room with good airflow. The ones I harvested on October 1st were still good in April! Other winter squash don't store as long, sometimes only lasting 1-2 months.
Basements make great storage spots if you use them right. They are naturally cool and have higher humidity which keeps the squash from drying out. Don't store them in a mechanical room that is heated up by a furnace. A furnace makes the room too hot and too dry for good storage.
Other good storage areas can be in colder rooms in your house (one without a heating vent or where you can close the heating vent). Some people make use of the space under their stairs too.
If you don't have cooler-than-average spots in your house, room temperature is fine. They just won't store nearly as long. At the very least, avoid storing them near appliances like refrigerators and ovens because they give off heat.
Storage techniques
There are two storage techniques to improve the shelf life of your winter squash: a sorting system and open shelving.
First start by sorting your squash into two groups. One group is for your best squash that are fully matured, cured well, and have no signs they might spoil. Butternut squash in this group will store for 3-6 months.
The second group is for any squash that might not have fully matured, lost a stem, or have bruising. For example, if you accidentally dropped a squash, it should be sorted into the second group. Eat the squash from this group first because they won't store as long.
Store all winter squash in a single layer when possible to improve airflow and discourage premature rotting. Open slat or wire shelves are ideal because they allow for extra air flow. You can also use a solid shelf as long as you check for signs of deterioration more often.
How to know if they are still good to eat?
When butternut squash go bad in storage, you might see visible signs of decay, like soft brown spots, or spots covered in mold. Those have gone bad!
Some squash might start drying out on the inside, which you won't see until you cut them open. This often happens in the middle of the neck first - the flesh will look a little spongy. They are perfectly fine to eat and still work well in a soup. Alternatively, you can cut away the spongy center portion and discard it.
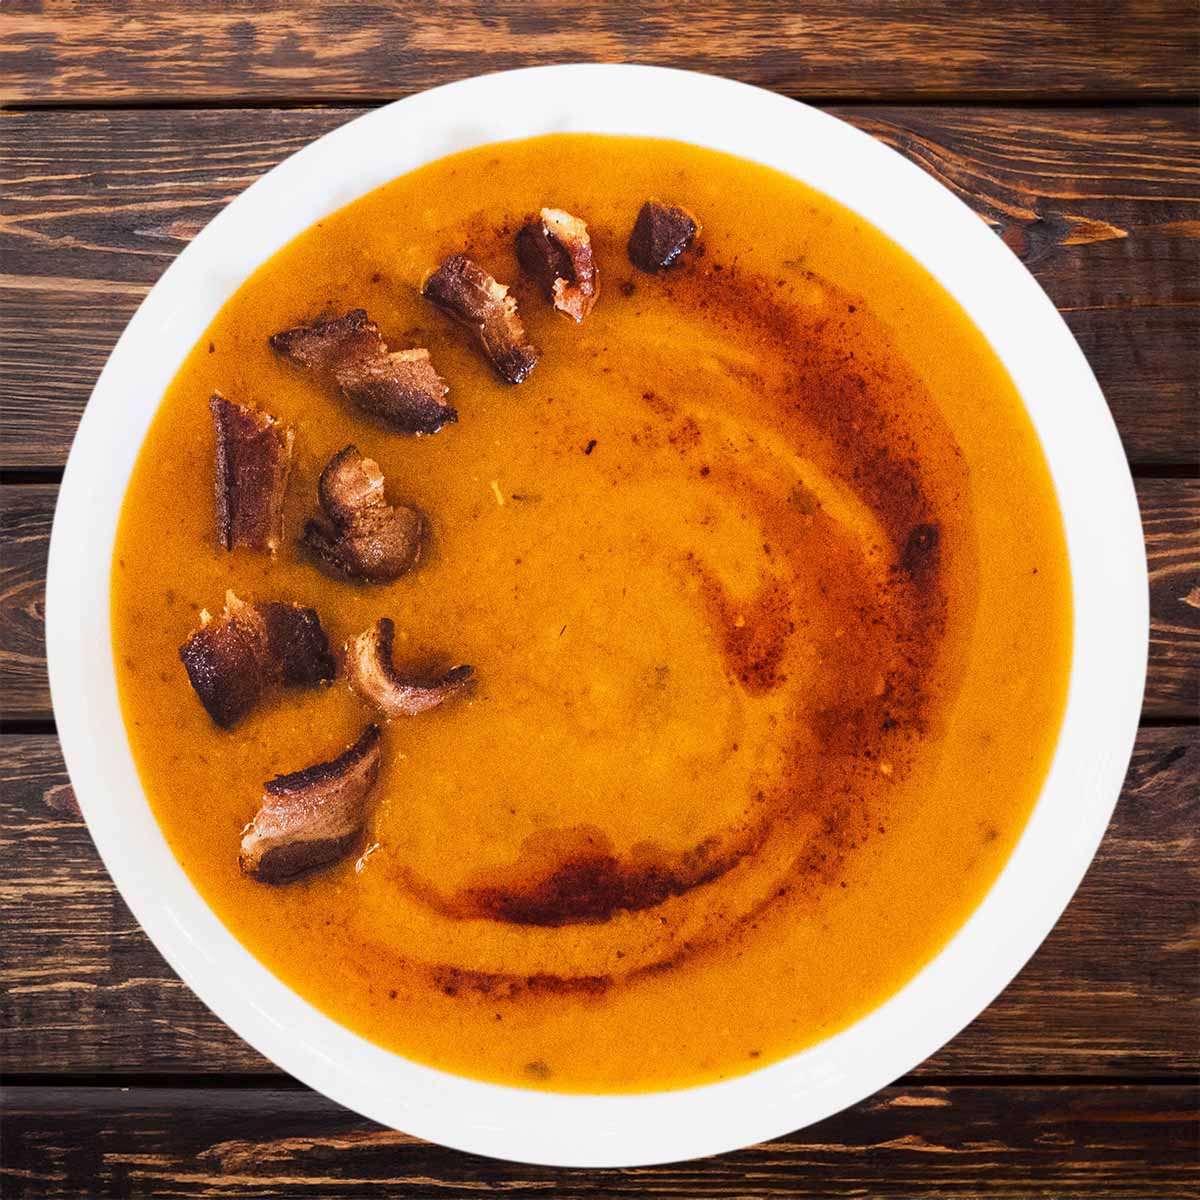
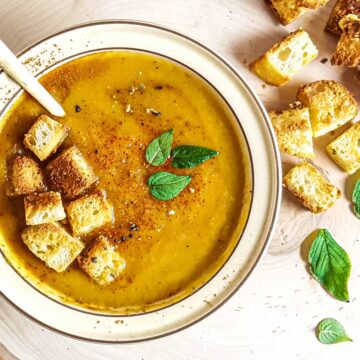
Recipes & other resources
There's no shortage of butternut squash recipes, but my favorite ones are always soup. It's a perfect winter dinner that can scale up or down with the size of my squash. Peeling and preparing them isn't too much work, especially after all of the practice you'll get with your harvest this year.
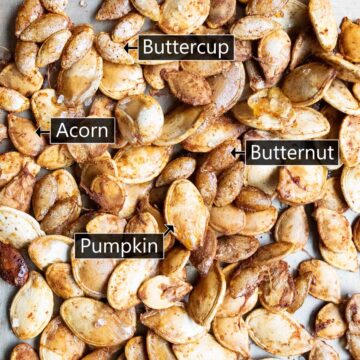
I also got in the habit of roasting the seeds for a little snack. The seeds don't even need to be rinsed, just simply coated in oil, spices, and roasted. Each butternut squash has about ½ of a cup of seeds, enough for two people or to add to the top of a salad.


Garden guides
Check out my gift guide for gardeners and other gardening resources.

Julie says
I've grown butternut for years, but always have difficulty ripening them fully due to Michigan's short season. Your photos with the dates are a great help! I learned the most from the August 25 picture, showing "splotchy" as not quite ripe. Crazy warm September here in 2025, so I'm hoping for some tasty squash this year!
Veronica T says
I'm so glad the pictures (and dates) helped! And yeah we've had such a warm September and even start of October this year, it's crazy! Crossing my fingers for you.
Kelly says
Thank you! This is my second year growing butternut squash and I was looking for some advice on harvesting and storage. Last year's crop was not a good one. I was on vacation and my neighbor, trying to be helpful, picked all of the huge squash. The problem is, it wasn't ready. I was so bummed. But, this year - it's going to be awesome!
Veronica T says
I'm so excited for you this year! I've had some squirrels get a bunch of mine, so bummed. I also had a helpful hand that was pulling weeds, pull some beans planted for fall. Whoops!
David W Pace says
Thanks for the info. I am growing an "early" butternut variety on a tepee trellis in Houston and they are doing very well. It's my first time to try them, so I was unsure when to pick them. It's November 12 in zone 9 here, so we have a ways to go before frost. I appreciate the info and photos in your posting that show how they look when ready to pick.
Veronica T says
I'm rooting for you! When did you plant them, out of curiosity? I assume your growing region is quite warm, being Houston. When I grew winter squash in the Bay Area it was a test of patience to try and get them to mature. I was in zone 9a because we didn't get freezing temperatures, even in winter. But our summers rarely got past 75-80, which makes a lot of things grow so slowly.
Louise Blundell says
Thank you so much for these great tips! I couldn't find the answer anywhere else on google. I appreciate it so much! I now have enough confidence to grow more pumpkins!
Veronica T says
I'm so glad I could help and thanks for commenting, you made my day (probably my week)! I take extensive notes and pictures when I find myself wondering these things, in hopes to help other people.