Layered cakes can be fussy. They require more round baking pans than most people own, the cakes need to be leveled, and the frosting can be hard to apply.
This carrot cake recipe solves all of those problems, making it pretty easy, even for beginners. It takes time, but it doesn't require much skill or equipment.
- It can be baked in two 9x13" sheet pans because it only rises to a single layer height (½ to ¾ inch tall).
- The cake in each pan is simply cut in half, then assembled in a rectangle-loaf shape.
- The top doesn't dome, so you don't need to cut the top off to level out the layers.
- The cream cheese frosting is sturdier than most, so it's very forgiving and not runny.
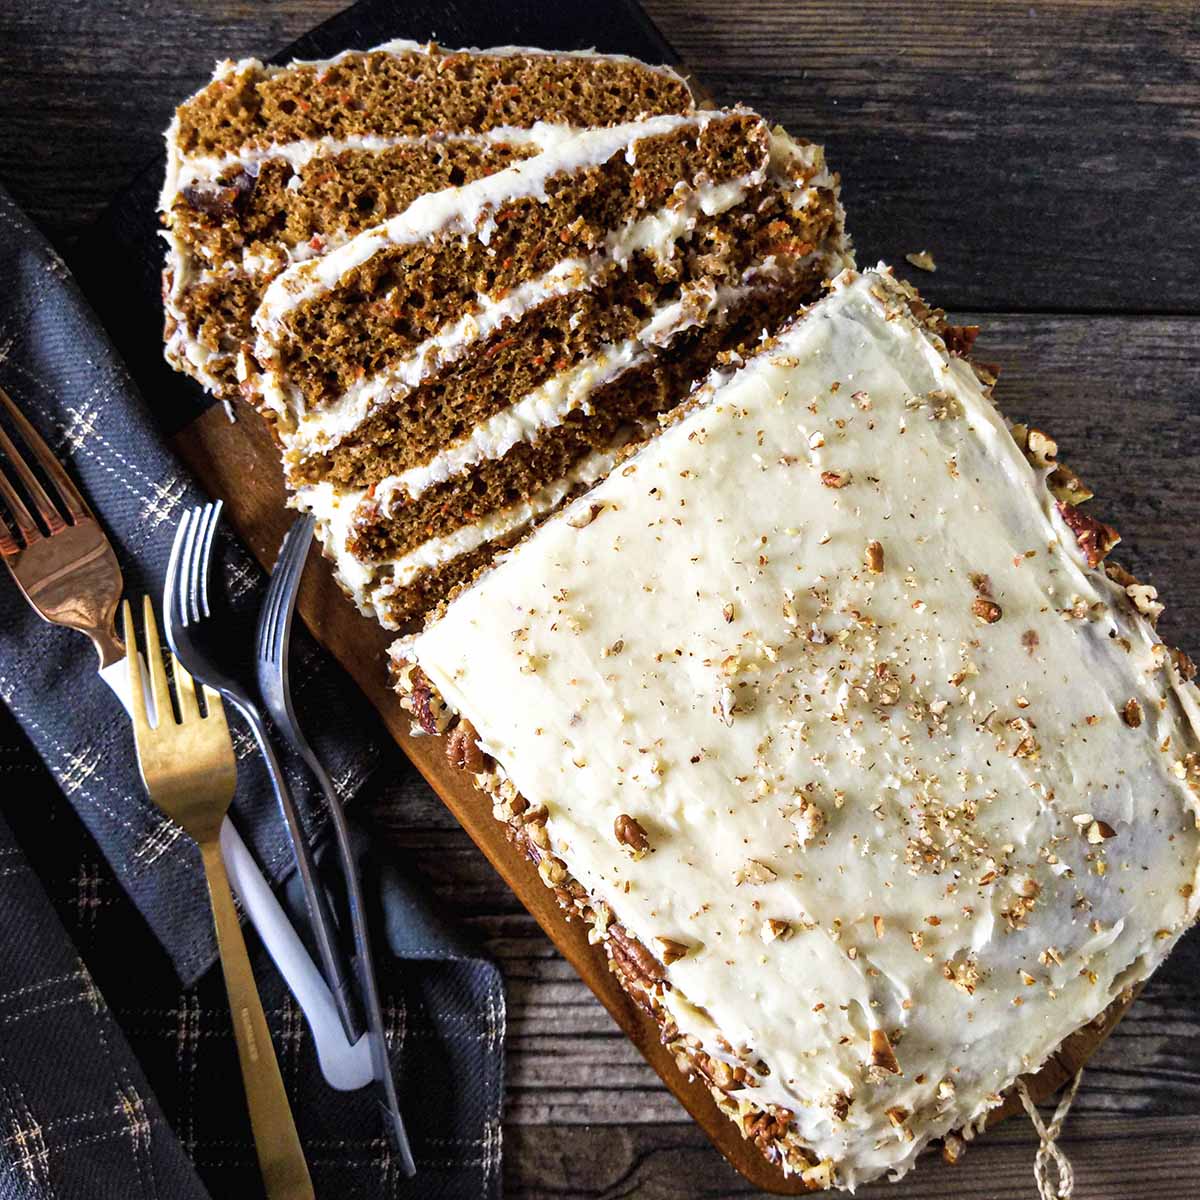
This carrot cake is layered with a thick cream cheese frosting. The tangy flavors of cream cheese frosting balance out the cake's sweet side.
To make this recipe easy, I spread the frosting on the cake without worrying about crumbs mixing in, because I press chopped nuts to the sides to hide any crumbs.
I also have one secret ingredient - I add dates. They are soft so their texture melts seamlessly into the cake, and their caramel flavor adds a rich, sweet flavor. But you can leave them out or use raisins if you want - it's an easy swap.
The carrot cake recipe itself looks long, but it's because I thoroughly explain each step. In general, it's pretty simple: bake the cake on a sheet pan, cut into quarters, and stack the layers with the cream cheese frosting in between.
Jump to:
Recipe
Ingredients
DRY INGREDIENTS
- 1 ¾ cups all-purpose flour (8.75 ounces)
- 2 teaspoon baking powder
- 1 teaspoon baking soda
- 2 teaspoon ground cinnamon
- 1 teaspoon ground nutmeg
- ¼ teaspoon ground cloves
- ¼ teaspoon salt
WET INGREDIENTS
- ¾ cup vegetable oil
- 3 large eggs
- 1 ¼ cup brown sugar (8.75 ounces)
- 1 teaspoon vanilla extract
- 2 ½ cups shredded carrots (10 ounces, about 4 medium)
- ¾ cup finely chopped dates optional, or swap in ½ cup raisins
CREAM CHEESE FROSTING
- 2 cups butter room temperature
- 3 cups powdered sugar (12 ounces)
- ⅓ cup buttermilk powder usually found in baking aisle
- 2 teaspoon vanilla extract
- ¼ teaspoon salt
- 12 ounces cream cheese (cold)
TOPPING
- 2 cups pecans
Instructions
PREPARE INGREDIENTS
- Shred fresh carrots. Wash the carrots, but no need to peel them. Shred on a box grater, but do not wring out water. (store-bought pre-shredded carrots are dry and hard and not great for carrot cake).2 ½ cups shredded carrots
- Chop dates into pieces the size of raisins. Dates will stick to your knife and each other, clumping in the batter, which you do not want. To fix that, you'll toss them in flour as you cut them. Grab an extra ½ cup of flour and put it on a plate or bowl. As you cut the dates, put them in the flour and toss around. The extra flour in the batter won't be a problem.¾ cup finely chopped dates
- Preheat oven to 350° with a rack set in the middle for baking.
- Prepare your baking pan(s). Use a metal 18"x13" pans or rimmed baking sheet, or two metal 9x13 pans / rimmed baking sheets. See note for more options. Grease the baking pans, line with parchment paper, then grease the parchment paper. (The goal is to very easily release the cake from the pan and paper).Note: I like 2 smaller pans so that they fit on my cooling racks easier. If you don't have an 18x13" cooling rack, consider using 9x13's to fit on regular sized racks.
MAKE THE CAKE
- Get out two bowls: a medium one for dry ingredients and a large one for wet ingredients.
- In the medium bowl, whisk together the dry ingredients: flour, baking powder, baking soda, cinnamon, nutmeg, cloves and salt.1 ¾ cups all-purpose flour, 2 tsp baking powder, 1 tsp baking soda, 2 tsp ground cinnamon, 1 tsp ground nutmeg, ¼ tsp ground cloves, ¼ tsp salt
- In the large bowl, whisk together the first 4 wet ingredients: sugar, oil, eggs, and vanilla (not the carrots or dates yet!). Stir until it's a smooth consistency.¾ cup vegetable oil, 3 large eggs, 1 ¼ cup brown sugar, 1 tsp vanilla extract
- Add the dry-ingredient bowl to the wet ingredients, and fold in with a spatula. Fold until just combined, avoiding overmixing which can cause the cake to be tough. Then add in shredded carrots and dates, folding them in just until they are evenly(ish) distributed.2 ½ cups shredded carrots, ¾ cup finely chopped dates
- Transfer the batter to the greased-parchment lined baking sheet(s). Spread until even and smooth on top.
- Bake for about 15 minutes. The center should be firm. An instant read thermometer will read 210℉ when done.
- Cool on a wire rack. When the cake is done, flip it upside down onto a wire rack and let cool for 5 minutes. Then flip it again onto a second rack (it will be less fragile after a short cooling period) so it is right side up. Let cool completely (about 30 minutes.
MAKE THE FROSTING
- Prepare ingredients: - use room temperature butter: if you forgot to take it out of the fridge, cut it into ½" cubes and let rest for 30 minutes to soften. Do not microwave. I've found salted and unsalted butter to work.- use cold cream cheese. Cut them into about 10 cubes, and return to fridge if not using right away.- use buttermilk powder (not liquid buttermilk)
- In a stand mixer, beat butter, sugar, buttermilk powder, vanilla and salt on low speed. Beat until smooth, about 2-3 minutes. Scrape down the bowl as needed, so the ingredients are well incorporated.2 cups butter, 3 cups powdered sugar, ⅓ cup buttermilk powder, 2 tsp vanilla extract, ¼ tsp salt
- Add cream cheese, one cubed piece at a time, on medium-low speed (slightly faster than before). Adding in small amounts helps it incorporated more evenly. Mix until smooth, about 2 minutes.12 ounces cream cheese (cold)
TOAST PECANS
- Finely chop the pecans, then toast in a pan until fragrant. Keep an eye on them so they don't burn.2 cups pecans
ASSEMBLE THE CARROT CAKE
- To build the cake, you want to assemble it on a surface that you can easily move it from when done. I like to make it on a fresh sheet of parchment paper on top of a rimless cookie sheet. When done, you'll slide it off onto your serving tray, cake stand, or container for travel.
- Move the cooled cake to a cutting board, facing right side up, and cut into 4 even rectangles. Make sure you cut through the parchment paper too.
- For the bottom layer, remove the parchment paper and place it on your cake-making surface right side up. Spread ½ - ⅔ cup of frosting over the top, depending on how thick you want the frosting.
- Layer 2: pick up the next layer and flip it upside down on the previous layer, then remove the parchment paper. This helps even out the shape of the layers. Cover with another ½ - ⅔ cup of frosting.
- Layer 3: remove the parchment paper and place right side up on the cake. Add more frosting.
- Layer 4: flip the last layer upside down on the cake. This gives your top a nice, flat surface (since the bottom side is flat, and the frosting fills in any gaps between the layers).
- Finish frosting: frost the top and sides of the cake with the remaining cream cheese frosting. You should have plenty. If cake crumbs start to get into the frosting, you have 2 options:1. Ignore it, because you'll cover the sides and top with pecans anyway.2. If not using pecans (or you want to be Pinterest worthy), spread a thin layer of frosting on the cake, then put it in the fridge. The frosting will harden up, then take it out and finish frosting with a thicker layer - the crumbs will stay put. This is called a crumb coat.
- Add nuts: grab a handful of pecans and gently press into the side of the cake. The frosting needs to be soft (room temp-ish, not fresh from the fridge or they won't stick). Continue until the cake is covered.
STORE IN FRIDGE
- Store the cake in the fridge until ready to serve (you can remove it 30 minutes early if you want). Cream cheese frosting is not shelf stable, so you want to keep leftovers refrigerated.
Notes
- Use metal baking pans. Glass and ceramic heat much slower and will also dry out the edges.
- I use rimmed baking sheets, often two 9x13's. They can placed side by side in the oven and rotated half way through. If one is placed above the other, be sure to switch racks half way through.
- You can also use three 8" square or 9" round pans. The batter might be thicker in the 9" round pans and take a little longer to cook.
Nutrition

Cream cheese frosting
Some cream cheese frostings can be runny, which is bad for a layer cake - espeically 4-layered carrot cake with cream cheese frosting. With 4 layers, a runny frosting would ooze right out the sides and the layers would slide around and would be harder to keep level.
One of the problems is that cream cheese has about 55% water. That's why cream cheese frostings always incorporate butter, which has only 18-20% water.
This recipe make a thicker, sturdier cream cheese frosting than most other recipes, while still being soft and fluffy.
First, it has more butter than some other recipes. Secondly, the frosting is further stabilized with the addition of buttermilk powder - a trick I picked up from America's Test Kitchen.

Buttermilk powder is usually found in the baking aisle of the grocery store. I use this brand and store it in my fridge. I find it incredibly useful for recipes that call for liquid buttermilk - you just mix this powder with water to make buttermilk.
The buttermilk powder is not mixed with water, just straight powder. It also adds some tang back in to the frosting (which was lost with the higher ratio of butter to cream cheese).
This recipe makes a generous amount of frosting. I usually have maybe 20% left over, but when I've scaled it back I find I often needed just a little more.

How to make a layered carrot cake
This carrot cake recipe is probably the easiest way to make a layered cake. It takes time, but it doesn't require mastering special skills.

Step 1: make the batter
This is pretty simple and doesn't need much extra explanation. The batter will look really lumpy with the shredded carrots and dates (or raisins).
When you pour it into the baking sheets, it will be a pretty thin layer. This is normal.

Step 2: Bake on greased & parchment lined baking sheets
This carrot cake recipe works with a number of different pan options. Rimmed sheet pans work best, even with the short sides. When I measured the cakes after baking, mine were just under ½" tall.

This means the carrot cake rises to about the height of the rims, maybe slightly above it. It's much easier to remove the cake from a rimmed baking sheet than from a deeper brownie-type pan. But a deeper pan will work in a pinch.
Choosing pans
Use a metal pan. They transfer heat quicker than glass or ceramic, helping the cake properly rise and not dry out.
You have a few size options to work with, but my preferred method is two 9x13" baking sheets.
- One 13x18 inch sheet pan: I use this USA pan all the time and love it (affiliate link). It's actually a 12x17 but works just fine. IF you use this size pan, make sure you have a cooling rack that can hold the cake when you remove it from the oven.
- Two 9x13 inch sheet pans: I use these little quarter sheet pans (affiliate link) most often for this carrot cake. I spread the batter between the two pans. I find them much easier to flip onto a cooling rack and handle without the cake falling apart.
- Three 9" round cake pans: these aren't ideal because of the higher sides. But they would work if you don't have any other options. Just make 3 layers - one from each pan.
- Three 8" square brownie pans: these also aren't ideal because of the higher sides, but will work. Make 3 layers instead of 4, one from each pan.
Grease pans & parchment paper
One of the most important parts of making a layer cake is to be able to easily handle each layer without it breaking. A large layer, for example, could break in the middle if you don't support it when moving it around.
Layers can break when moving them out of pans or to and from the cooling rack. The parchment paper helps keep them intact while moving around. It's only removed once it's being layered with the cream cheese frosting.
The pans should be greased first, so that nothing sticks to them, even if batter gets behind or under the parchment paper. Then the parchment paper should also be greased so it peels easily from each layer of the cake.

Step 3: Cool on wire rack & cut in half
Once you take the cakes out of the oven, carefully flip them upside down onto cooling racks. The parchment paper will still be attached to the bottom, which is good. Leave it attached - it helps keep the layers in-tact when you have to move them around.
The cakes might get indents from the cooling rack and that's totally fine. In fact, the ridges hold onto more of the tangy cream cheese frosting, so everyone wins.
After cooling for 5 minutes, you can carefully flip them right side up to finish cooling. Cool the cakes completely, about 30 minutes. The cream cheese frosting will melt if spread over a warm cake!

Once cool, cut the cakes in half. I actually use a scissors, so I can cut through the parchment paper too. Keep the parchment paper attached to the bottom of the cakes.

Step 4: spread cream cheese frosting to the bottom layer
Set a piece of parchment paper on the counter - this will later help you move the cake around once it's finished. Flip one of the carrot cake layers right-side up onto the new piece of parchment paper.
You might be wondering if you should first remove the attached piece of parchment paper from the bottom - it's up to you. I like to leave it in place to help me move the cake around easier. When I cut it for serving, the pieces just pull off the parchment.

Spread some of the cream cheese frosting on top of this carrot cake layer. Crumbs might mix in and that's totally fine. No one will really see it! Spread the frosting out to make a roughly level surface.

Step 5: flip the next layer on, upside down & add frosting
Take another layer of carrot cake and place it on the frosted base upside down. Why upside down? The bottom of the cake seems always seems easier to spread frosting around, as it doesn't pick up as many crumbs.
Remove the parchment paper attached to the bottom. Then add cream cheese frosting, leveling it out for the next layer.
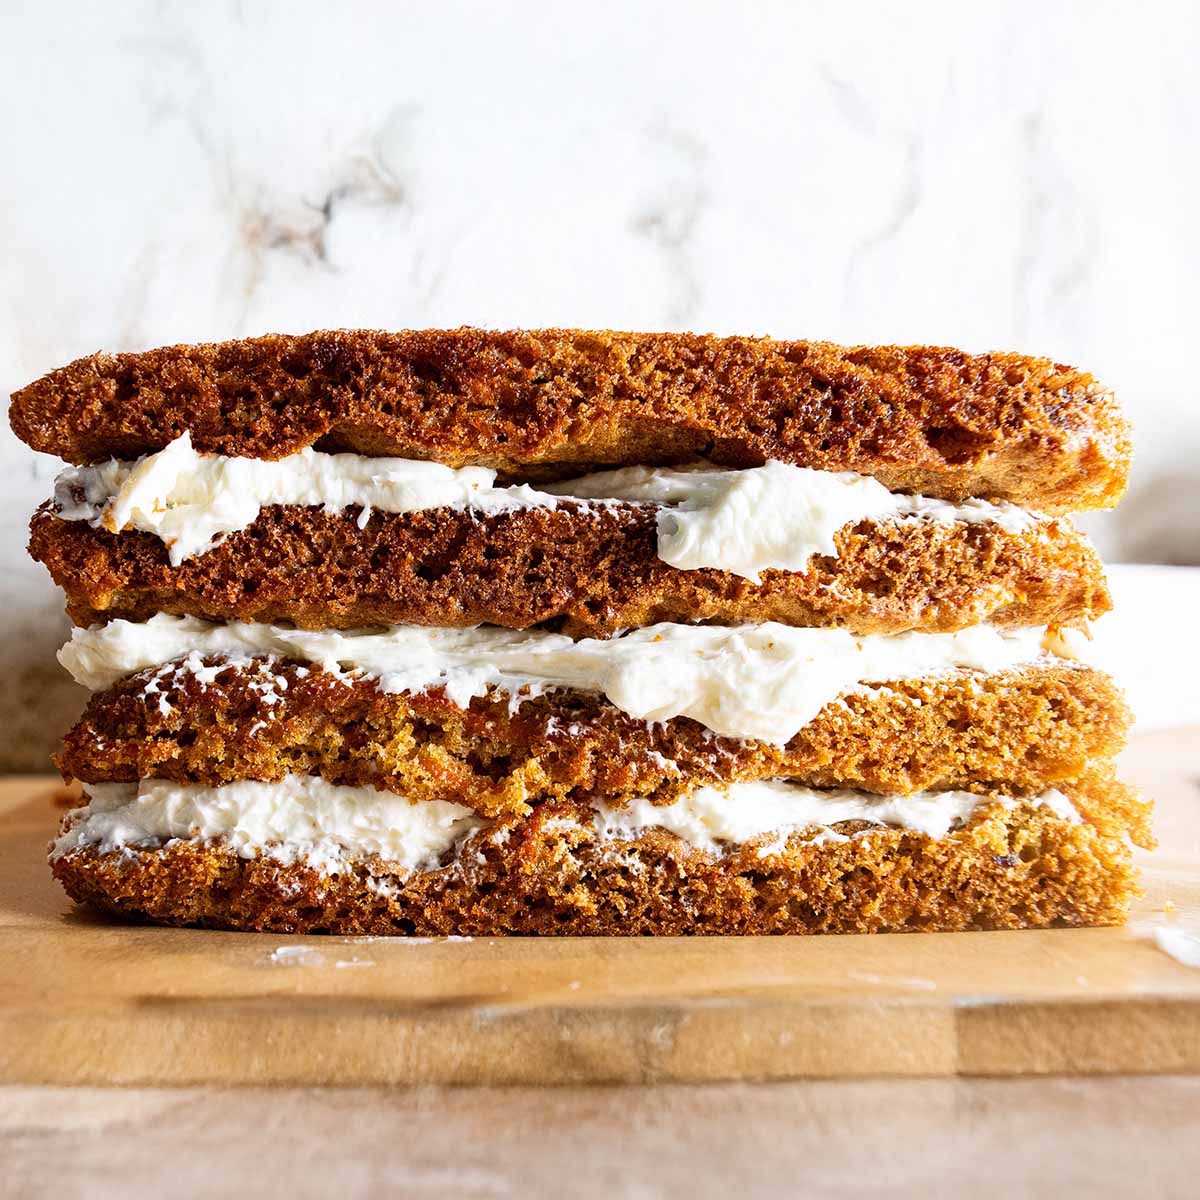
Step 6: Repeat with remaining layers
Continue this process with the remaining carrot cake layers. If it starts to look lopsided, add frosting between the layers to try to even it out.
I add the top layer upside down as well because it makes for a nice flat-topped cake presentation.

Step 7: Frost outside & add nuts
Use the remaining cream cheese frosting to cover the sides and top of the carrot cake. You'll inevitably get crumbs in the frosting and you'll worry that you're ruining it, or at the very least making it look ridiculous.
But don't worry, there's another step to make this cake presentable without the extra effort of doing a crumb coat. After frosting it, I press finely chopped nuts into the frosting.
I have a pile of chopped nuts next to me, then take some into my hand and just press it into the frosting. Some stick, some fall. I press some more in until it's covered. (I do the same thing with sprinkles for other cakes).
The nuts cover up any crumbs that were picked up in the cream cheese frosting. It looks festive and delicious, if I do say so myself!
Making a moist carrot cake
A few innocent substitutions can turn the cake dry, so I suggest you follow the recipe closely. The carrots, brown sugar, and oil can all noticeably impact the the moisture.
Freshly shredded carrots are one key element. They have a much higher water content than the pre-shredded ones in a bag at the grocery store. Don't substitute them, even though it would be much more convenient.
Brown sugar makes for a moister cake than white granulated sugar. This is because the molasses in the sugar add moisture and likes holding onto it. In this recipe, light and dark brown sugar are interchangeable. (I personally tend to use dark brown sugar for the extra molasses flavor).
Oil is superior to butter when it comes to keeping a cake moist. According to King Arthur Baking, "Why does oil give cake superior texture? Butter is 18% water, so when the batter is baked, some of its liquid evaporates." In addition, oil helps maintain a more tender cake, whereas butter can end up tougher because the water content mixes with the flour to form more gluten (creating a tougher cake).
Cakes made with oil also store better in the fridge. The oil keeps the cake moist, even when cold. A cake made with butter is firmer and tastes slightly dryer unless its brought to room temperature.
Cookbook author Rose Beranbaum confirms this in an article with Epicurious, "A butter cake will firm up in the refrigerator, so for the best taste and texture you have to let it come to room temperature, which can take over an hour. Oil cake? It's pretty much good to go straight from the fridge. And when considering a second slice at midnight, after everyone else has gone to bed, that's exactly what you want in a cake."
I've used canola oil, avocado oil, and a mild olive oil, all with great results. I found the stronger flavor of olive oil doesn't come through, so if that's all you have, go for it. Pecan or walnut oil are amazing, but also quite expensive. I most often reach for avocado oil because I have it on hand and like the flavor better than canola oil.
In theory, coconut oil (warm enough to be liquid) should work and would impart a delightful flavor. However, I have not personally tried it yet and couldn't find specific information on using it as a substitute in cakes. If you try it, please leave a comment and let me know how it turned out.

Using fresh carrots
Fresh, firm carrots are ideal here. If they're old or really bendy, they've lost a fair amount of water content and will likely make a dryer carrot cake. I've used orange, yellow and red carrots, all with equal results. As long as the carrot tastes good raw, they will taste good in the cake.
Now that you've got your fresh carrots, you need to shred them. I've shredded them for this carrot cake different ways over the years:
- Fine side of a box grater
- Large side of a box grater
- Shredding disk in a food processor
I've found that all of these methods work about equally well. When shredded smaller they incorporate slightly better into the batter, but I haven't noticed a difference on the final texture after baking.
I also don't peel the carrots, but I do scrub them really well. The skin holds a fair amount of flavor and nutrients - you know, for those of us eating the cake for its nutritional benefits...
Dates or raisins?
As I mentioned before, I think raisins add a chewy texture that takes away from the enjoyment of eating a fluffy carrot cake layered with a cream cheese frosting. The dates in this recipe are soft enough to go unnoticed, other than adding a sweet, caramel flavor.
Dates
I use medium sized Medjool dates and it should take about 8-10 dates to yield ¾ of a cup of loosely packed, chopped dates. Don't overdo the addition of dates as that can affect the sturdiness of the carrot cake.
If you've work with dates before, you know cutting them can be tedious. They stick to your knife and to each other. This can be solved by coating them in flour.
I usually cut them in half (removing the seed), then toss each half in flour before I continue dicing into smaller pieces. Then I toss the small pieces in a bowl of flour. Once I'm ready to add them in, I pick them up with both hands and shake the excess flour off between my fingers.
My process is pretty haphazard and the amount of flour on them varies from one batch to the next. However, I haven't noticed this making a difference in the final texture of the carrot cake.
Raisins
You can replace the dates with raisins or even currants if you want - we all look for something different in a carrot cake.
If you use raisins or currants, use about a half-cup in this recipe. Don't overdo it, or the cake might crack easier when moving it around.
If you don't want raisins or dates, leave them both out. Sally's Baking Addiction (a well-loved and trustworthy baking site) shares her favorite carrot cake recipe that is also made without raisins. She doesn't use dates either, and adds nuts to the batter along with some ground ginger.
Store in the fridge
Any carrot cake with cream cheese frosting should be stored in the fridge. Cream cheese frosting almost always has too much water content to be safely stored at room temperature.
Cream cheese frosting can stay at room temperature for about 2 hours, but then it needs to be refrigerated. Note that this time is shortened if the cake is out in hotter temperatures (like an outdoor picnic).
In case you are curious, nearly every buttercream frosting is safely stored at room temperature.
Calories
A majority of carrot cake recipes don't list the nutritional information and there's a reason. It's very high in calories and turns a lot of people away. I look at this as a once-a-year indulgence when I make it for St. Pat's day, Easter, or to celebrate the spring break that none of us get as adults.
The problem isn't as much as the carrot cake itself, rather it's when you combine the carrot cake with cream cheese frosting.
More than half of the calories for this cake comes from the cream cheese frosting. There's 4 layers of frosting, so I suppose none of us should be surprised.
I define a serving as half of a generous 1" thick slice (it sounds small, but it's very rich and filling).
If you use all of the frosting, it accounts for 334 of the 632 calories per serving. If instead you made a single-layer cake and frosted the top, it would account for about 84 calories (250 calories less).
But please don't let that deter you from making all 4 layers of this cake. It's so very worth it! My friends and family request it every single year, well in advance to confirm I'm making it for their gathering.
It's also worth noting that this cake has about 30% less sugar in the batter than other cakes (1.25 cups vs 2 cups). I think the full amount of sugar would be overly sweet with all of the layers of frosting (and I do love sweet things!).
By the way, you are getting 6 grams of protein per serving, so that offsets the sugar and fat... right?

Other carrot cake recipes & resources
If you're looking for other carrot cake recipes, The Pancake Princess did a carrot cake bakeoff to test and rate 12 different recipes. If you haven't visited her site before, I expect you'll love it. Her bakeoffs are a go-to resource of mine.
Other carrot cake recipes:
- Carrot cake with only 2 layers by Sugar Spun Run
- A single-layer carrot cake baked in a sheet pan (about as easy as it gets!) from Gemma's Bigger, Bolder Baking
- Carrot cake cupcakes by Love & Lemons
- Cheesecake swirl carrot cake bundt cake by Sally's Baking
If you're wondering what else is currently in season, check out my calendars to see what produce is in season each month (and coming up soon).


Leave a Reply