Squash vine borers are easy to miss until you see the tell-tale signs of frass or wilting leaves. But it's not too late! Even extensive damage has a chance of recovery.
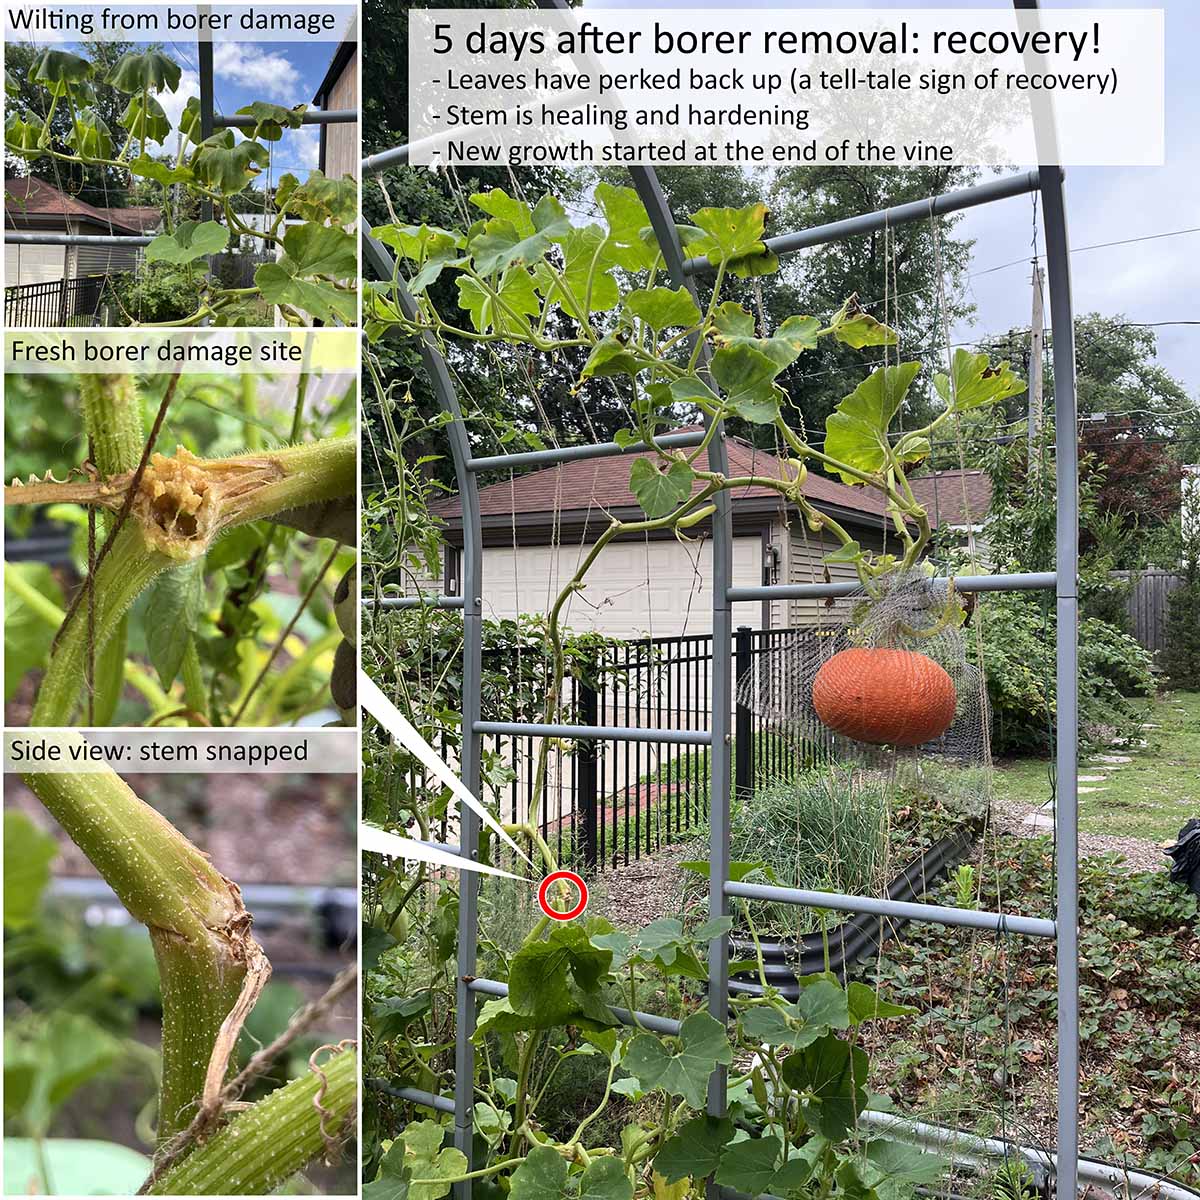
I deal with squash vine borers every year and have successfully saved plants, even when it's looked too late and a little dire. I'm here to help you:
- Identify the squash borer damage and get rid of them
- Assess the damage so you can take determine if the plant will live
- Learn, in detail, the various ways to remove (and kill) the larva to stop further damage and save your plant
I want to help you do all of this, right now! I know you're probably panicking and want to fix it immediately. So let's jump right in.
Jump to:
Confirm a squash vine borer is damaging your plants
There are several signs of squash vine borer damage, from entry holes and frass, to wilting leaves.
Let's use these to diagnose the problem. Then I will explain what action to take at each stage, in detail, so you have the best chance of saving your plant. I deal with these buggers every year and can tell you what works out the best.
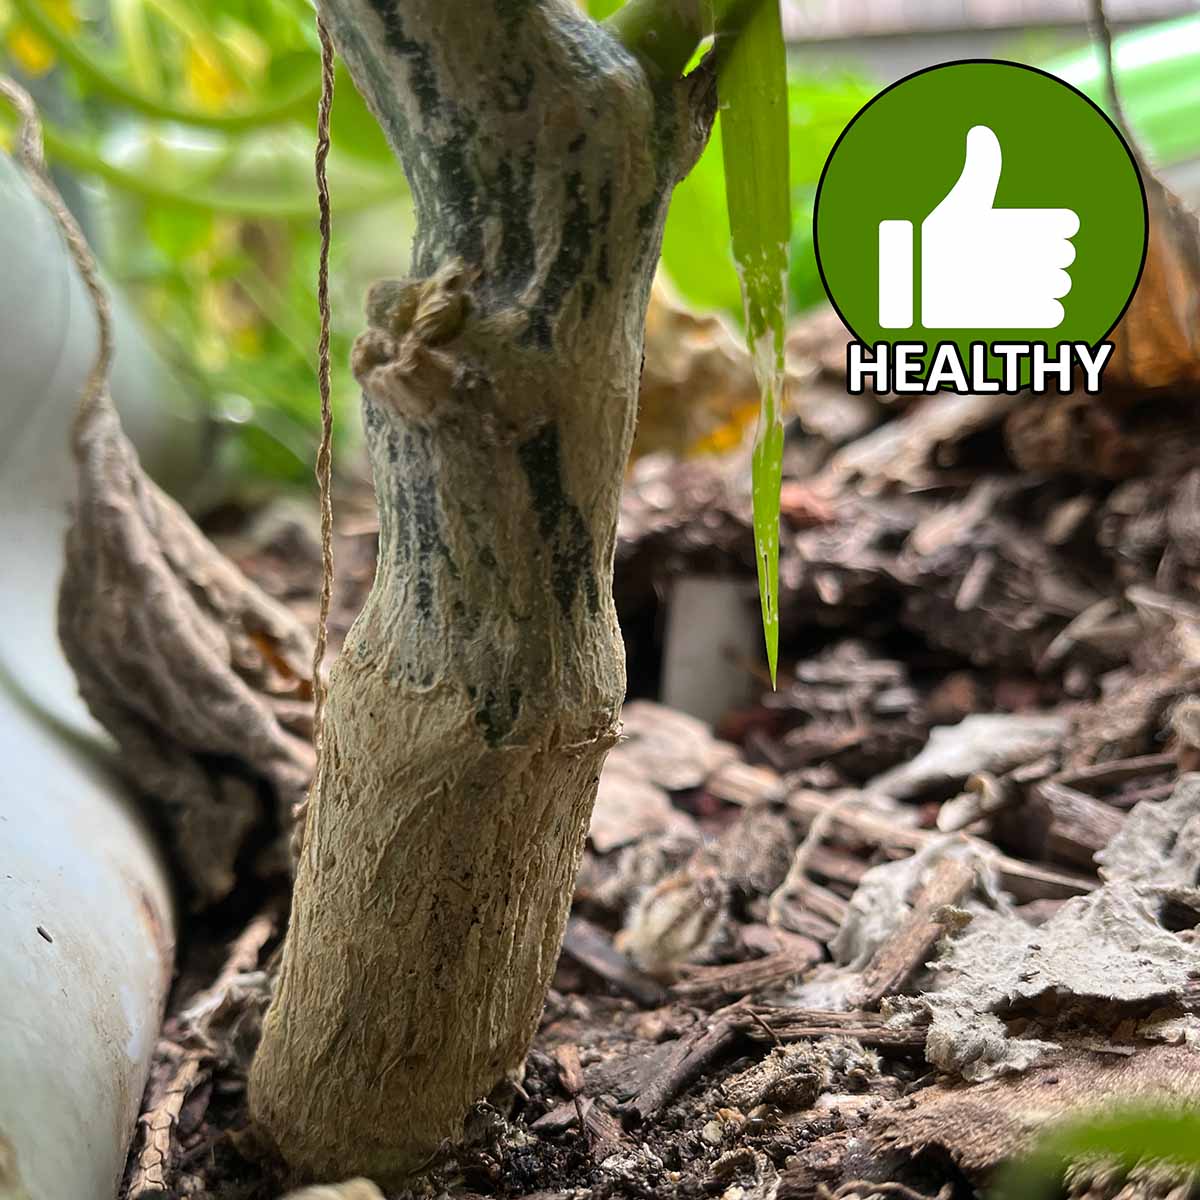
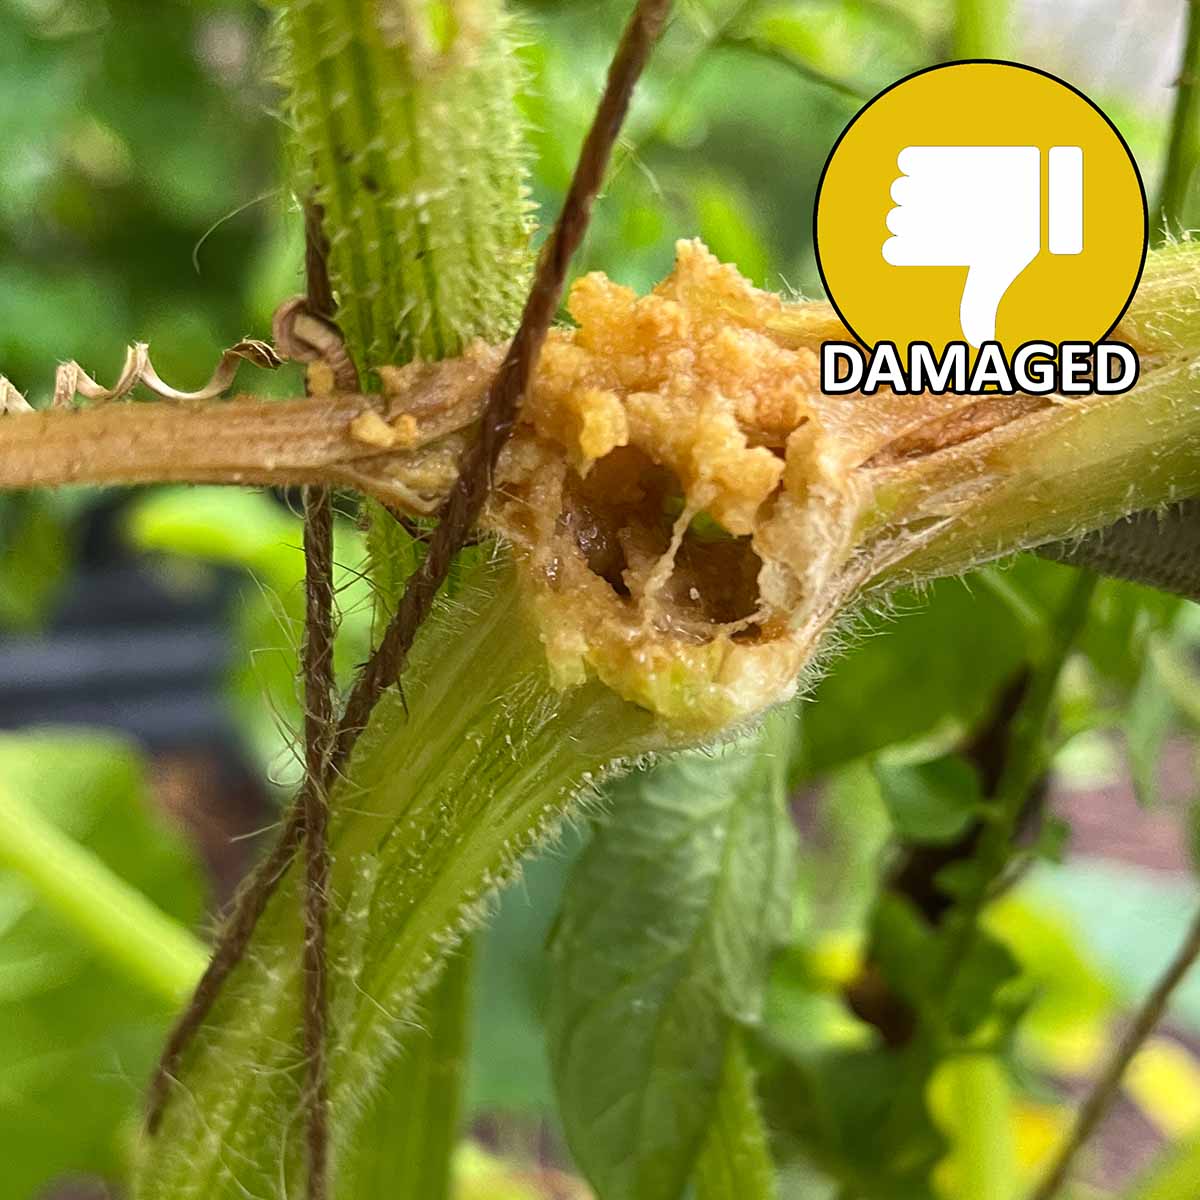
What does a damaged stem look like?
A lot of gardeners see a woody, corked stem and start to worry. It doesn't look pretty, but it's normal. As the plant grows, it hardens for protection and support. This happens at the base first.
If you're unsure, gently squeeze around the base of the stem. Make sure you go just below the soil surface as well, since borers can get in there. If it feels soft or mushy, then you do have squash vine borer damage.
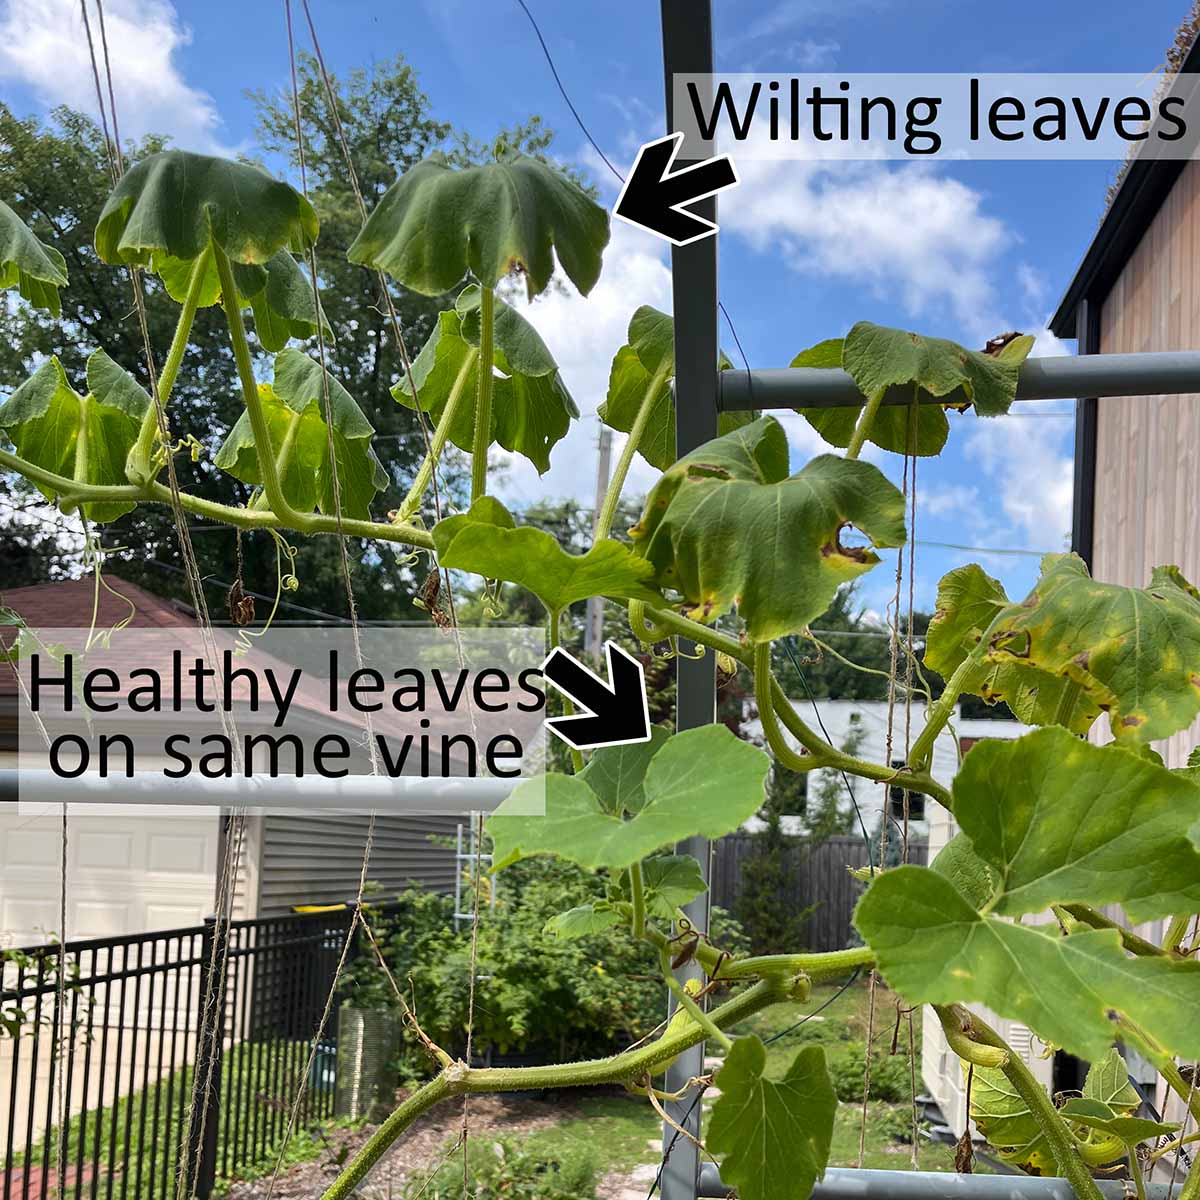
Are your leaves wilting or turning yellow?
Squash vine borer larva get into the stem and start munching inside it. As they continue to eat and mature, they consume enough plant tissue to inhibit the plant's ability to deliver water and nutrients further down the vine.
This causes the leaves to wilt, which will first be noticeable during hot afternoons or extreme heat.
This is the last sign of damage, but often the first one gardeners notice if they aren't closely inspecting the plants on a daily basis.
However, zucchini and winter squash leaves naturally wilt during extreme heat to protect themselves. Leaves also wilt from a lack of water. These two things make most gardeners dismiss wilting leaves as a problem, until they notice them not recovering.
At that point, there's been extensive damage and it will be harder to save the plant. But not impossible, so it's worth trying!
So how do you tell if the leaves are wilting from heat or water stress vs squash vine borer damage?
Natural wilting from hot weather will affect the entire plant pretty evenly. It will also affect all of your other squash plants. By evening (or at least by sunrise), the wilted leaves will fully recover, as if nothing ever happened.
Wilting from squash vine borer larva will affect only part of the plant, usually starting with a handful of leaves, then more each day.
- If the larva is at the base of the vine, only some leaves wilt right away rather than the whole plant at once.
- If the larva is half way up the vine, you'll notice the bottom leaves are healthy, and the leaves past the larva wilt. The plant doesn't fully recover in the evening (or overnight) either.
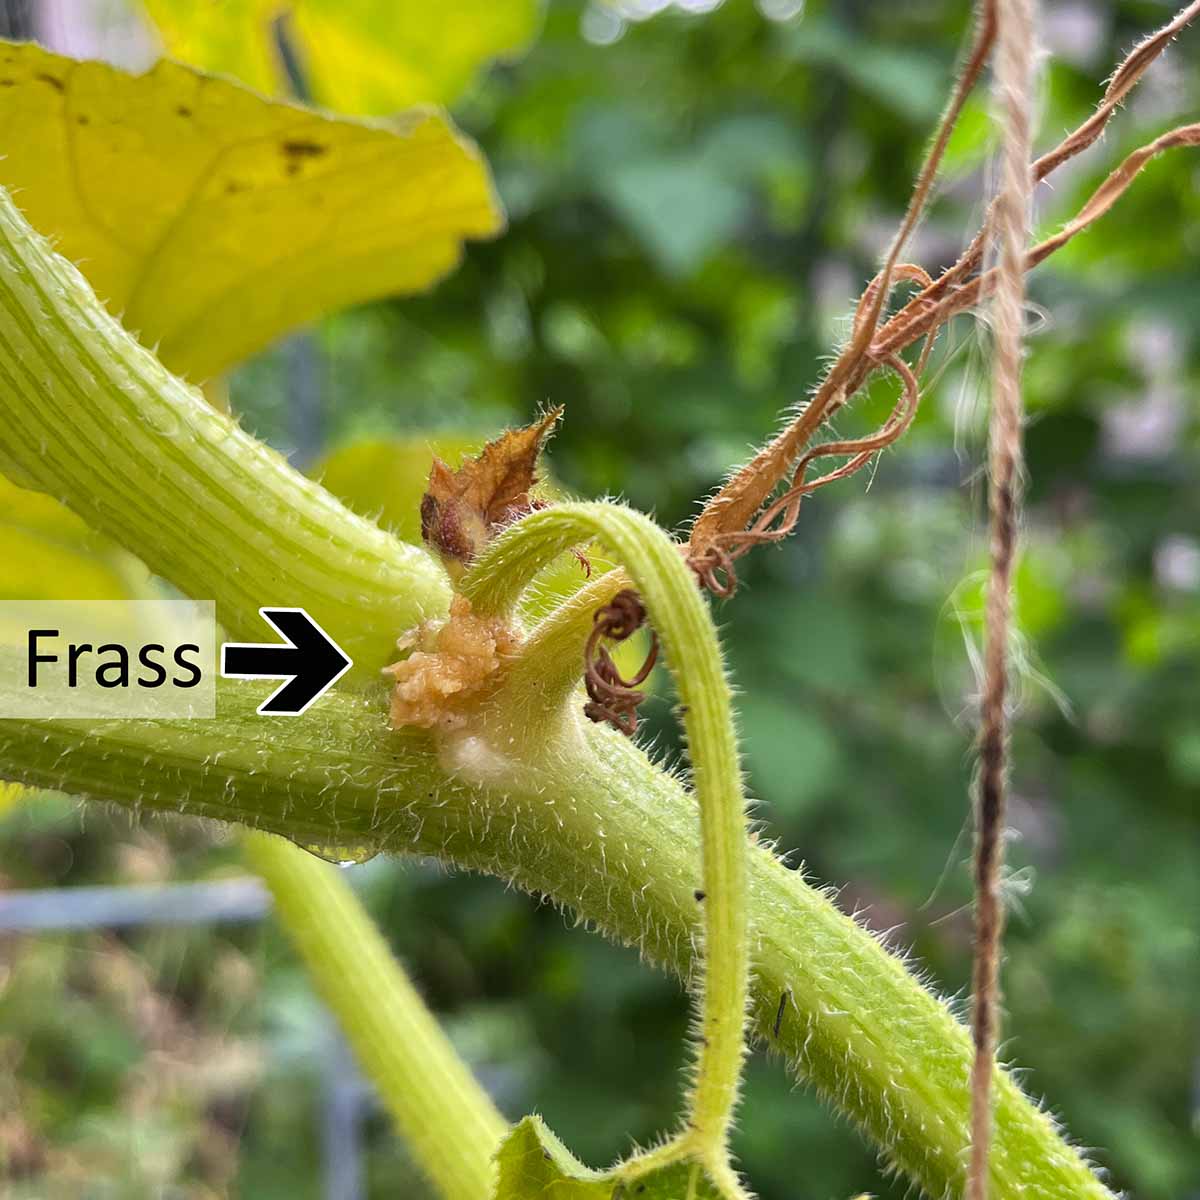
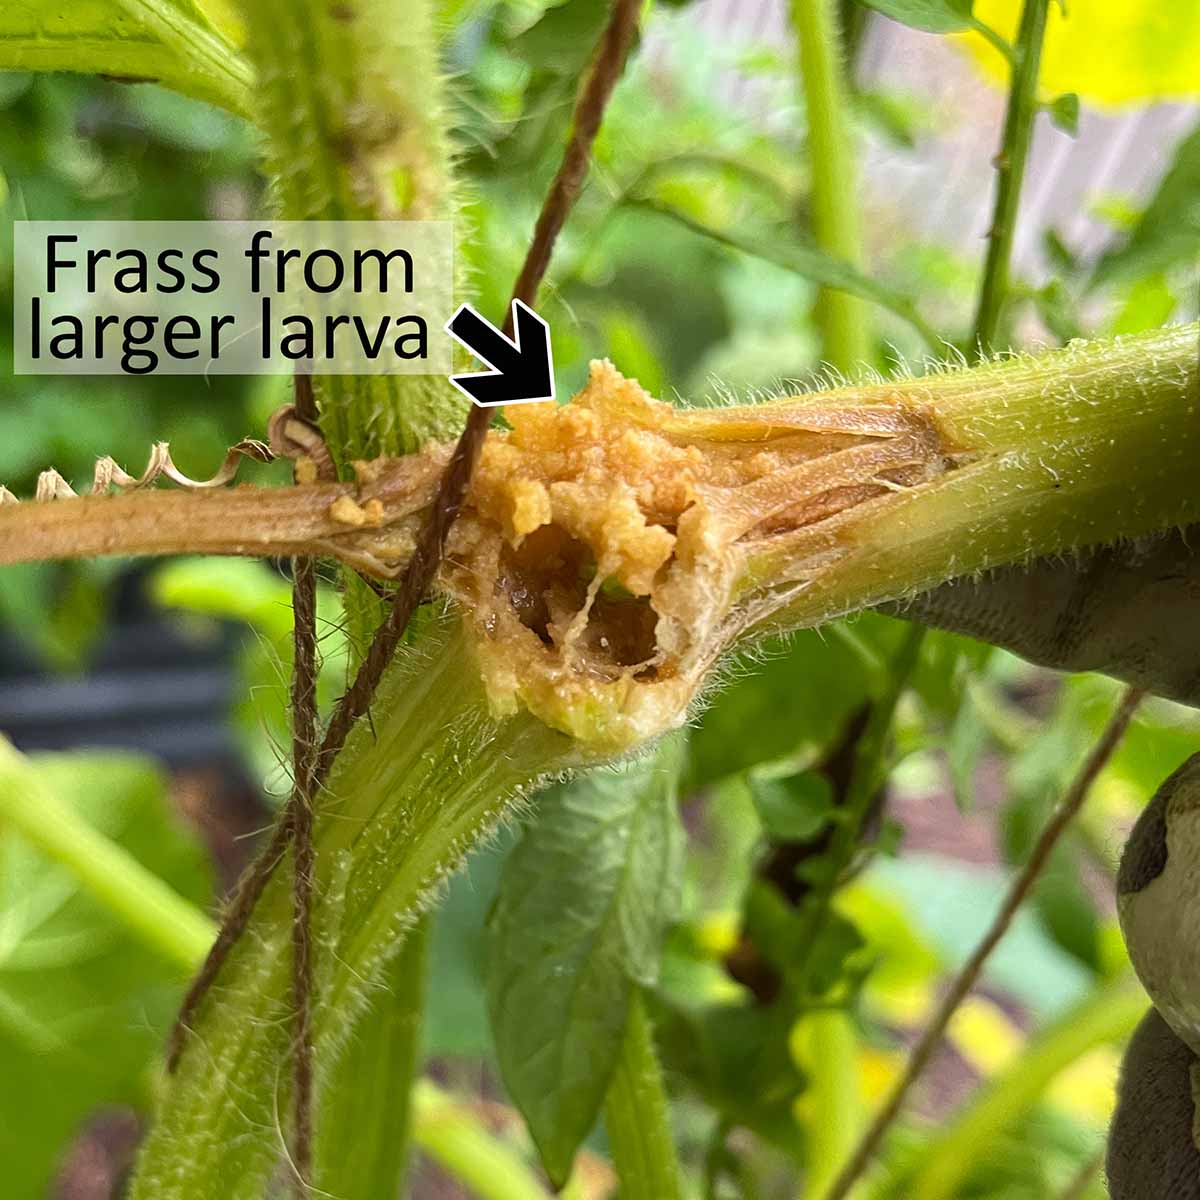
Have you seen frass?
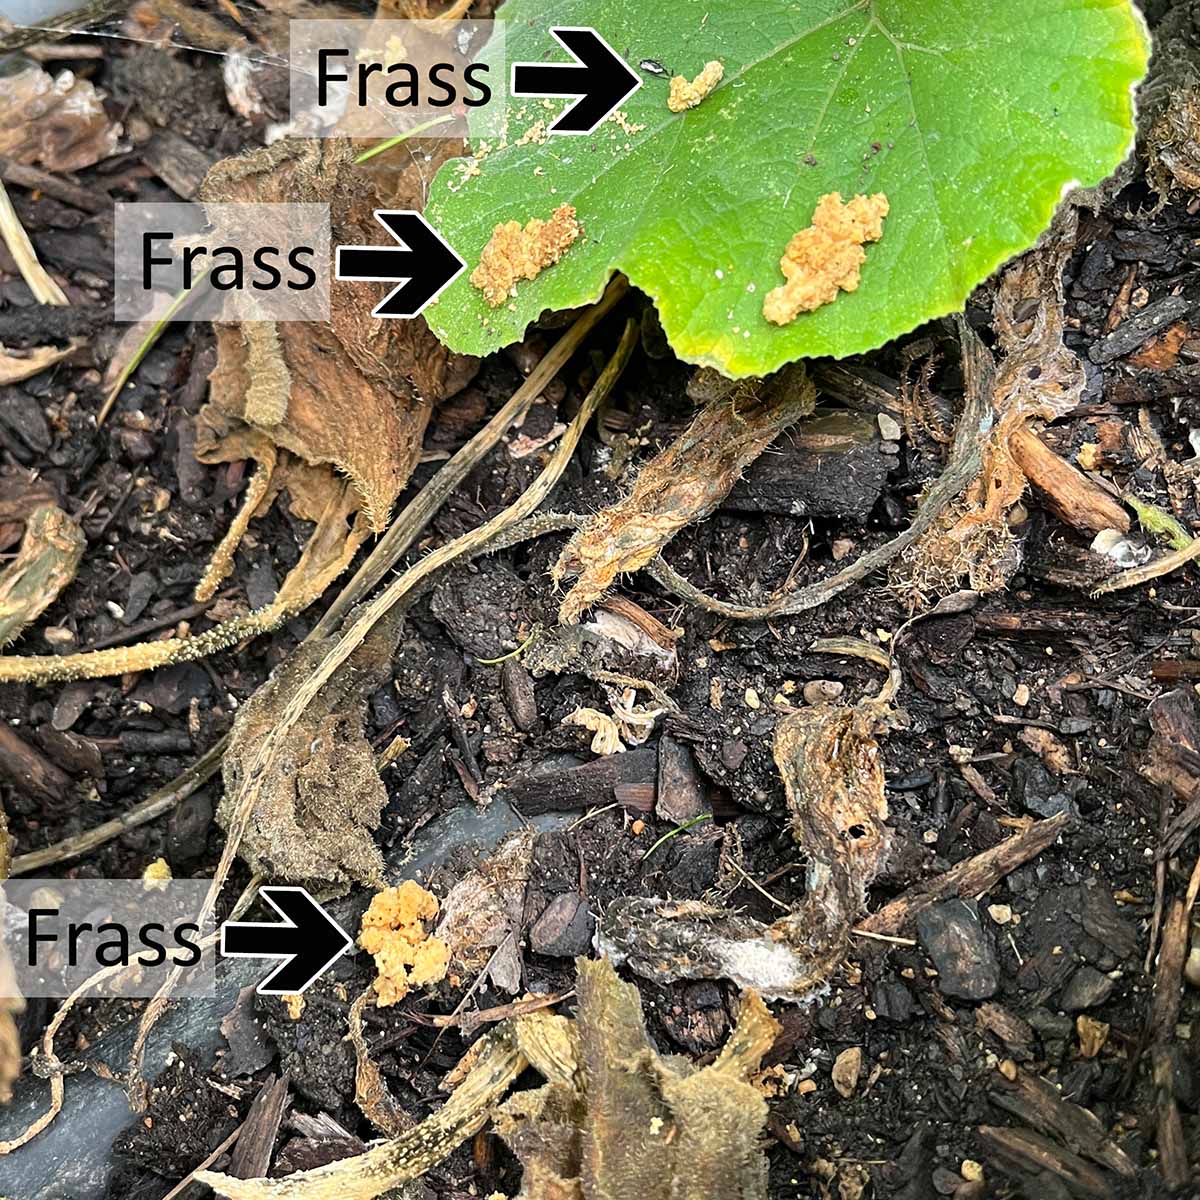
Frass is the larvae poop that looks like wet sawdust. It's the most obvious and reliable sign of squash vine borers.
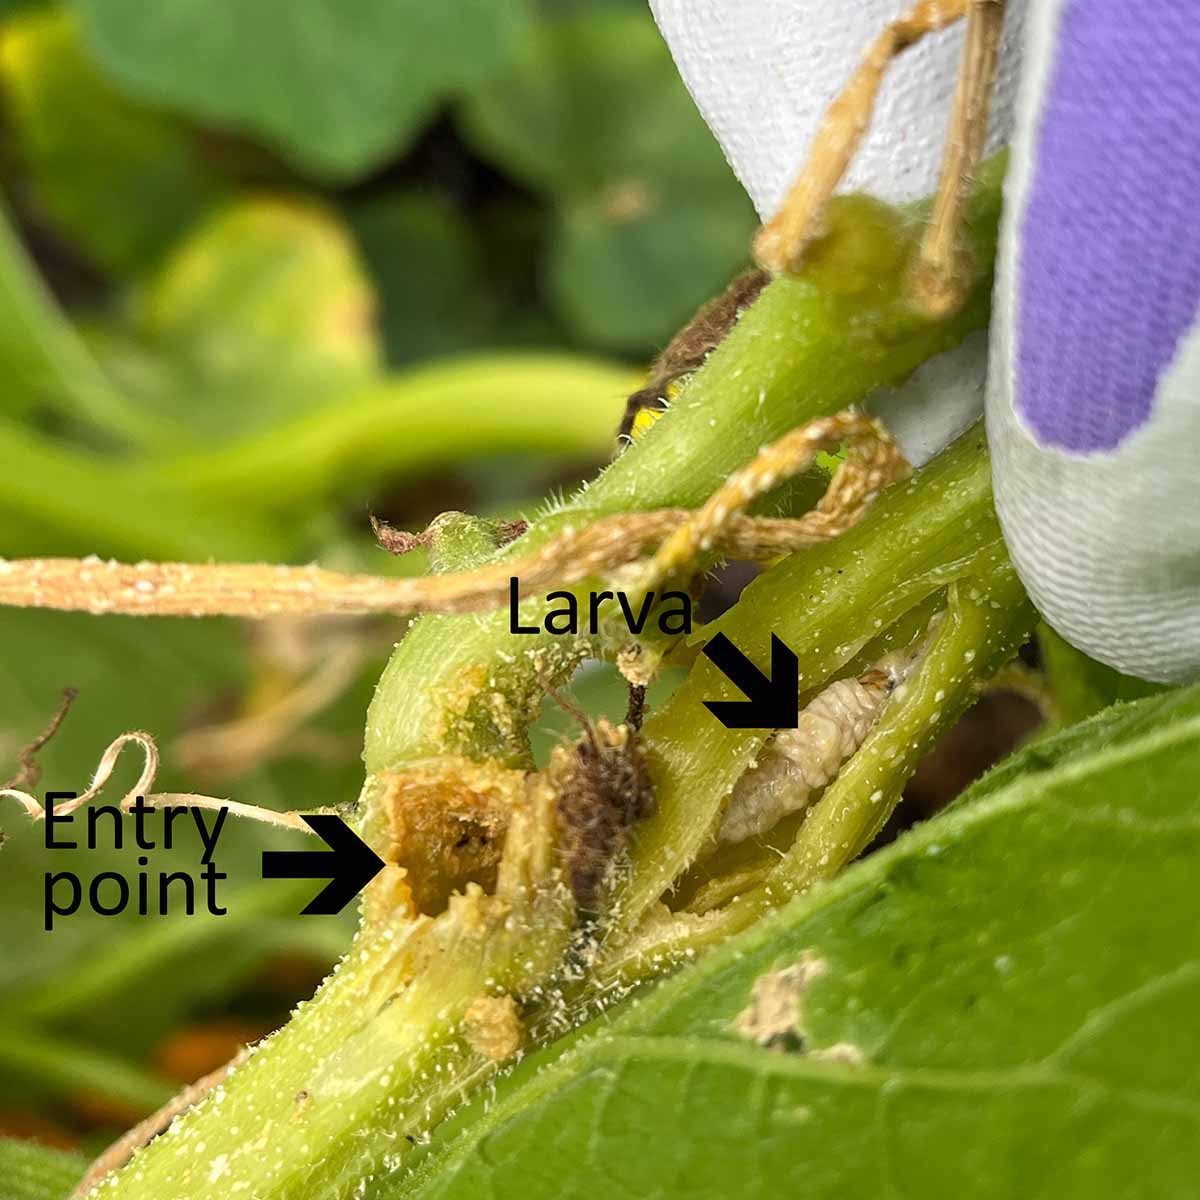
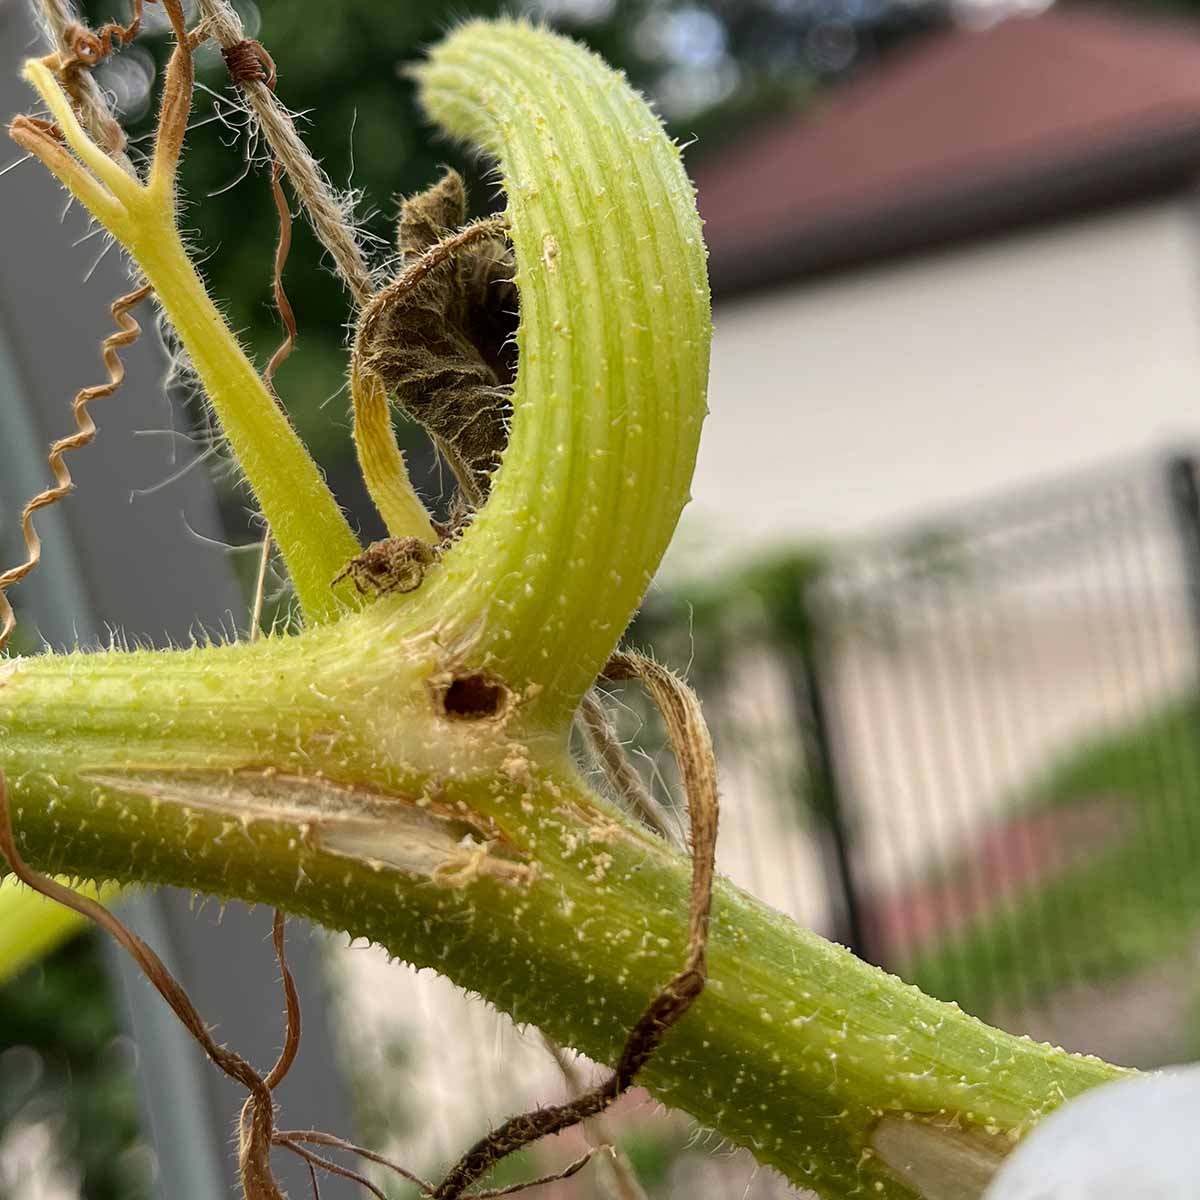
It shows up at the entry point where the larva tunneled inside. They create a small hole that's hard to spot until you see frass coming out of it as they grow.
If you catch the larva at this stage before the leaves have started to wilt, your plant has an excellent chance of survival. That's because the larva is still small and hasn't caused enough damage to interrupt water and nutrient delivery.
Find squash vine borer holes
Once you've determined the damage is from squash vine borers, you have to find the larva (there can be more than one), remove them, and help the plant recover.
The first thing you need to do is figure out where the larvae have entered the vine.
- Small larva will still be very close to the entry point, and easy to miss
- More mature larva might have traveled a couple inches down the vine, but the signs are very obvious
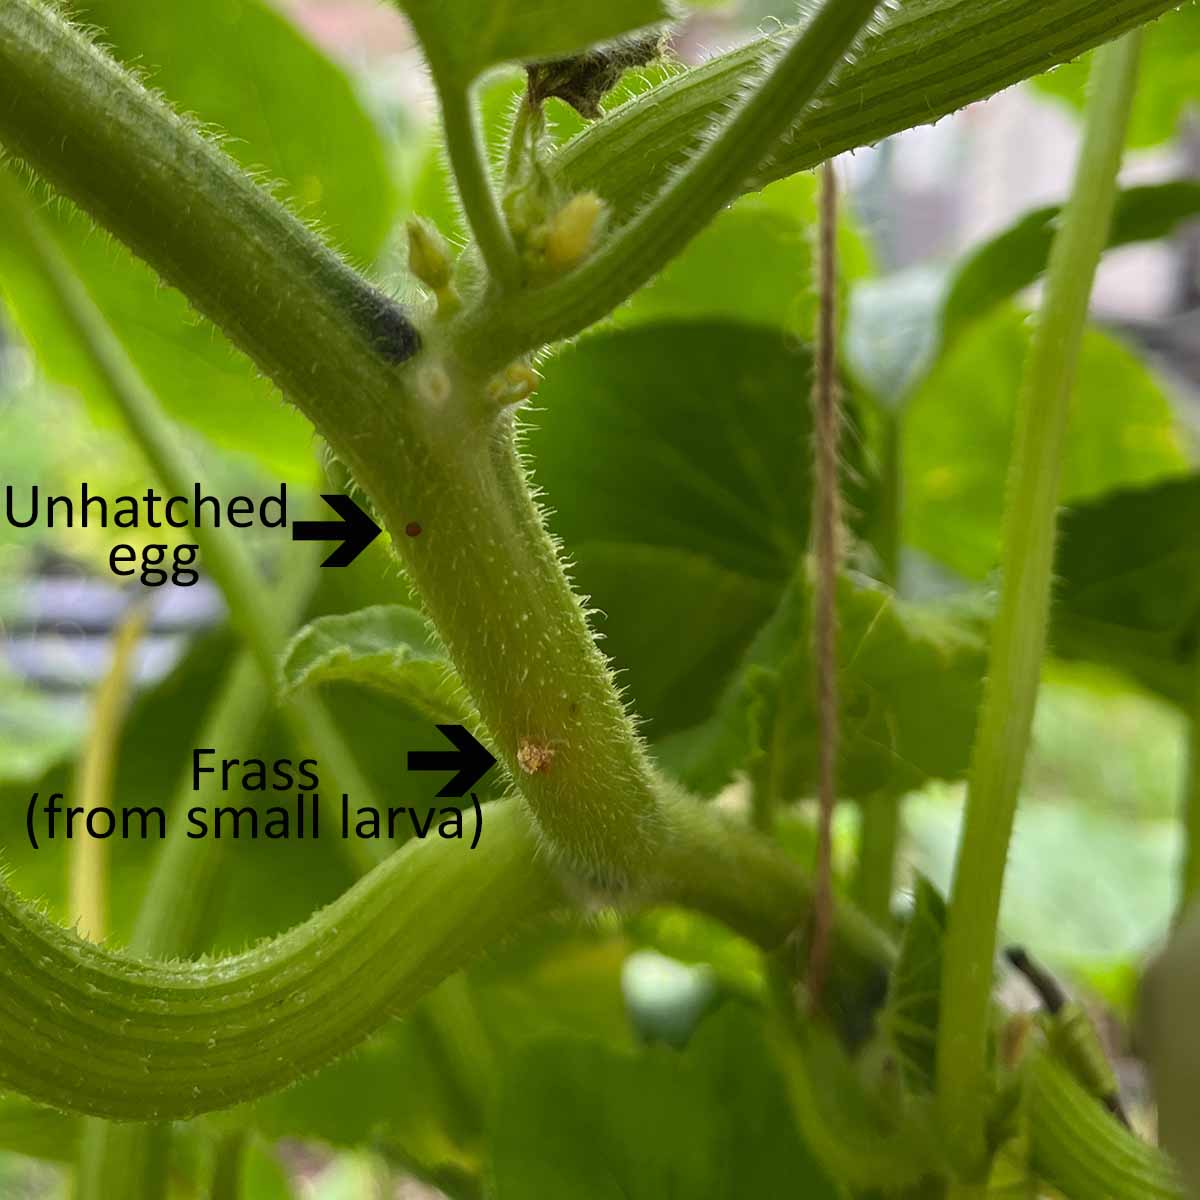
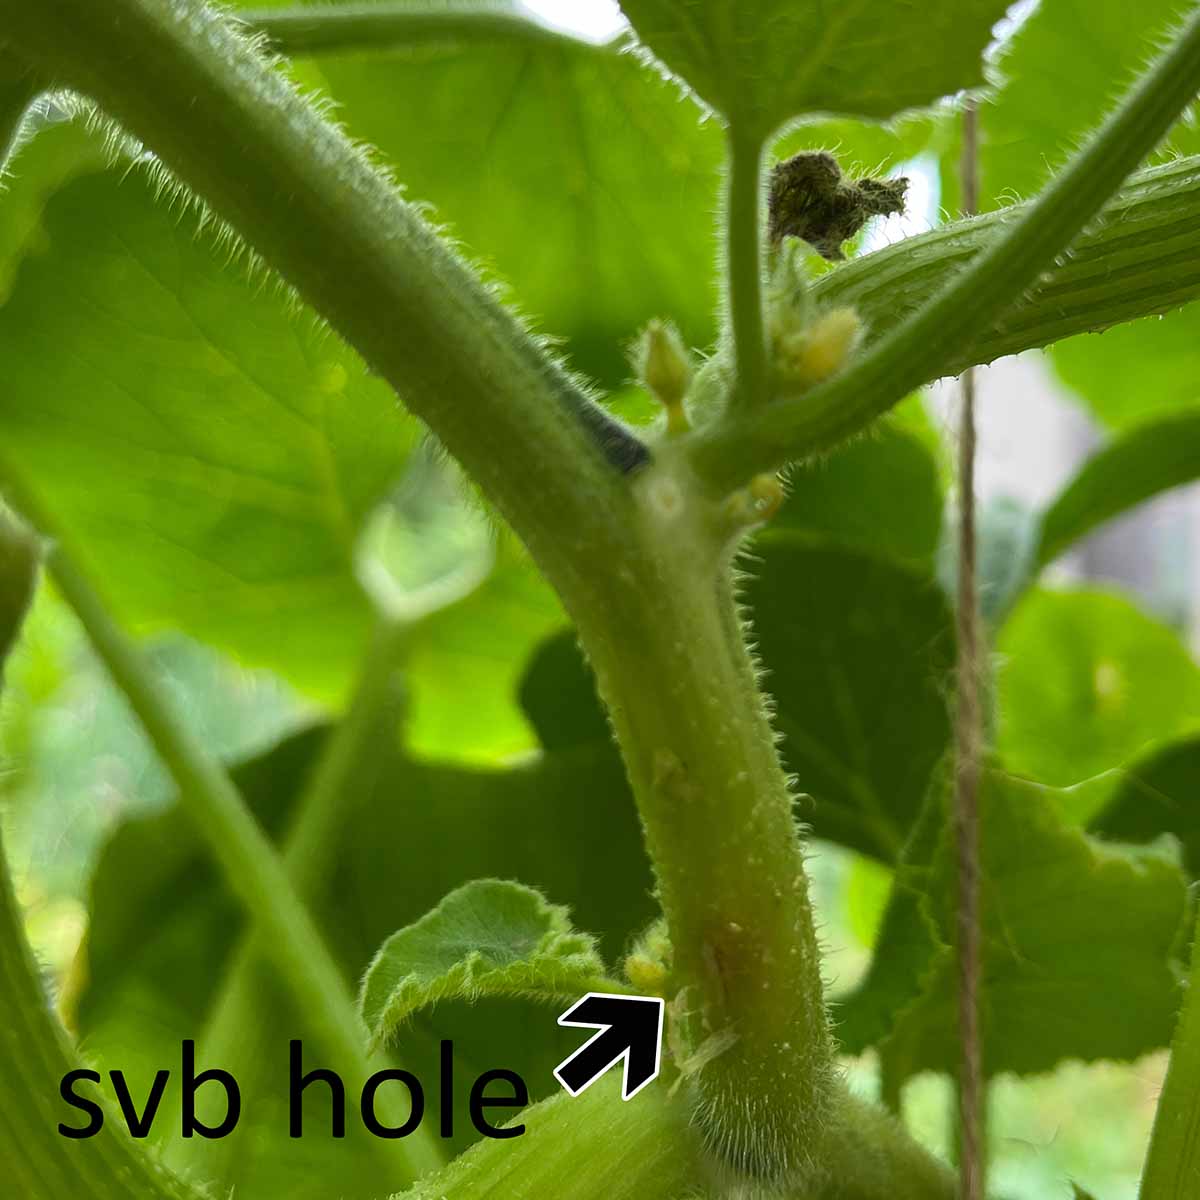
Look for holes and frass
Larva chew into the stems within hours of hatching. For the first several days, you won't see any frass, just a hole. It will look like a sharp pencil pierced the stem and it might be slightly brown from damage and early decay.
Once the larva are several days old, they'll excrete enough waste that it will push out the entry hole. It can still be easy to miss in the early stages, so you should look very closely and carefully.
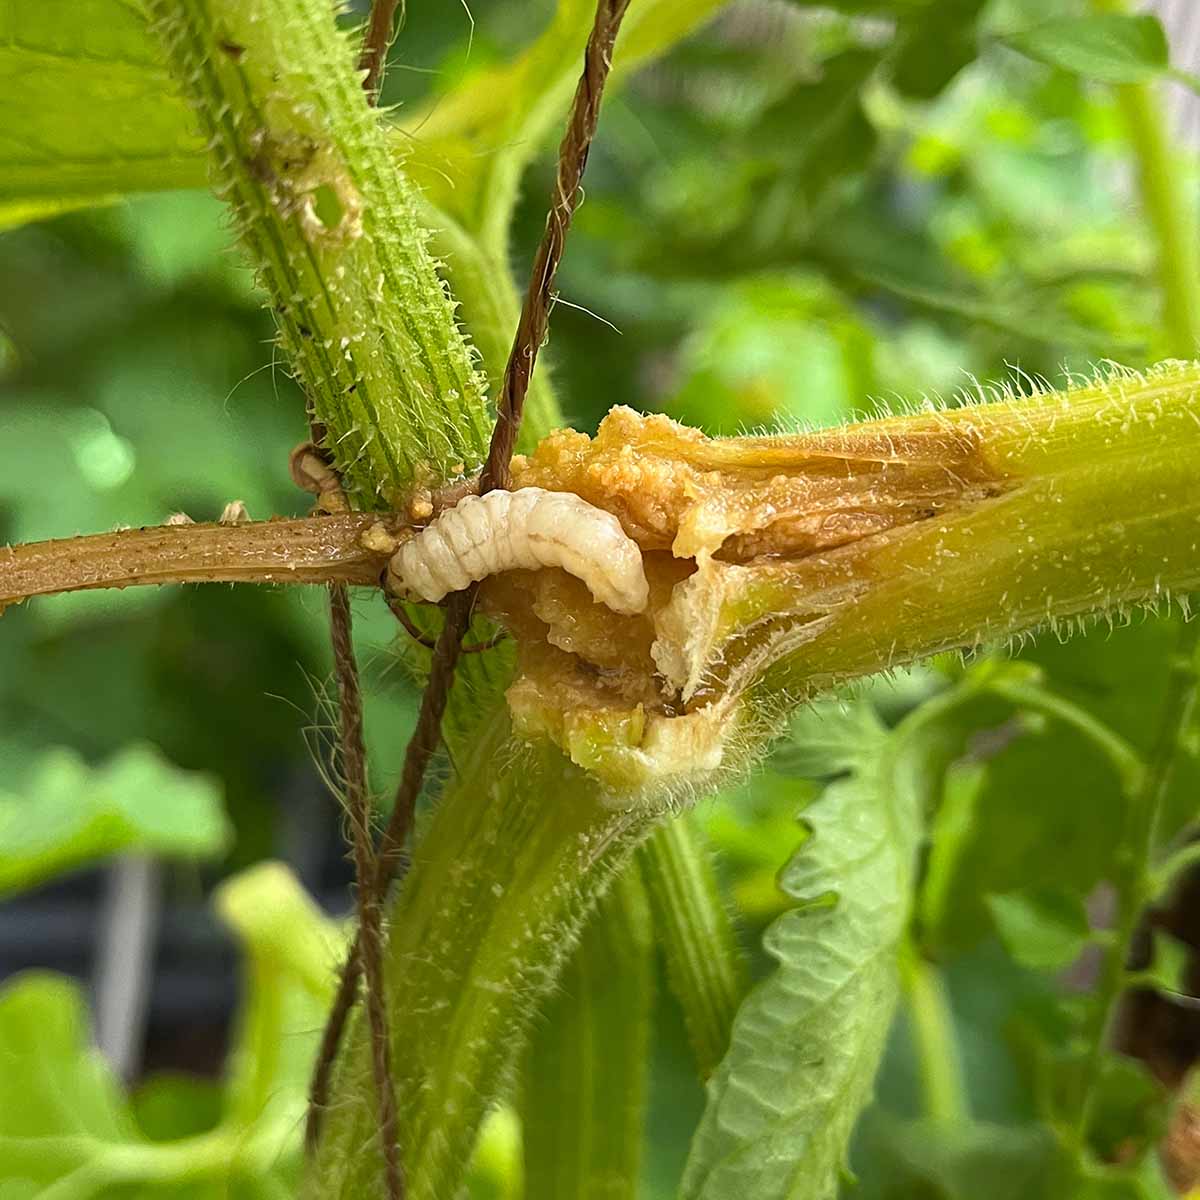
As the larva matures, you'll see large clumps of frass and mushy stems.
Where to look for frass
The borers enter on the stems, leaf junctions, and sometimes the leaf stems. You'll want to check all of it for frass.
The tedious part is checking all sides, tops and bottoms. When the larva enter from the bottom of a leaf junction, the frass often falls, dropping to the leaf below or into the soil.
Check for frass after rain
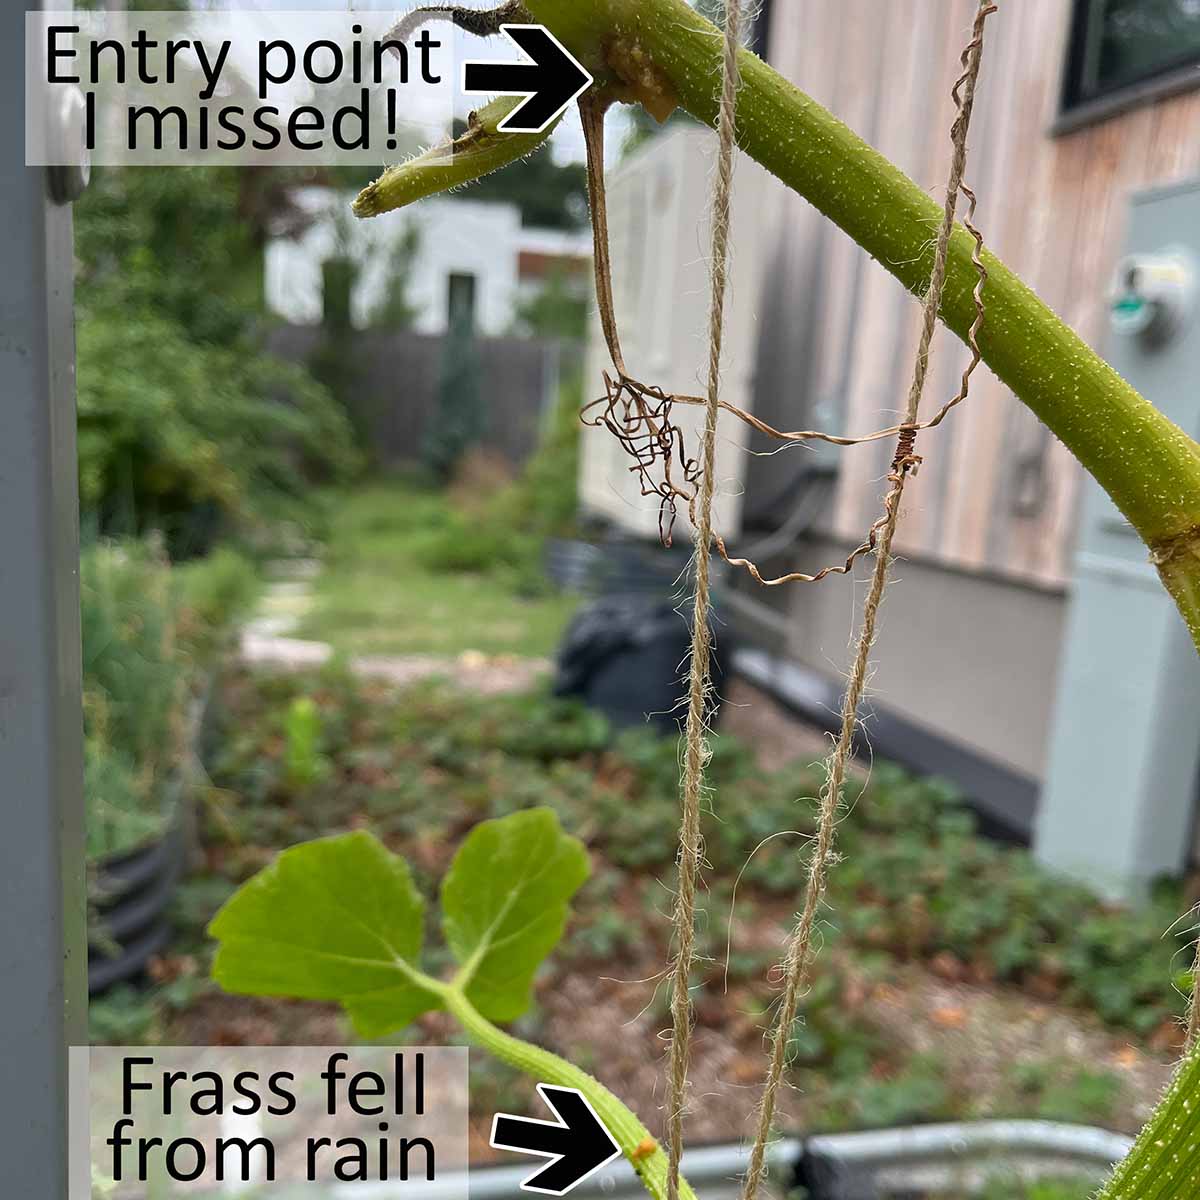
My secret tip is to check for frass after rain to find hidden entry points you may have missed.
Rain washes the frass away from the entry point, dropping it on leaves or soil below it. When you see frass like this, look up to find where it fell from.
I've found so many squash vine borers this way over the years. They are almost always from a hole on the underside of a leave node junction that I missed.
Start at the bottom of the stem and work your way up
You need to search the entire stem to find any (and all) squash vine borers so you can remove them.
Start at the very bottom of the stem, about a half inch below the soil. It will be hard to see, but you can rub the stem and see if any pale yellow sawdust like frass comes off.
Continue up the stem, checking all sides and leaf junctions for holes, frass, and soft spots. If you find one, either remove the larva right away or mark it to return to after you've inspected the entire vine.
I urge you to look very closely along the entire stem. Some spots will be easy to identify with overflowing frass and soft stems.
But you also want to catch any small holes with larva that haven't matured yet.
How to remove the larva
The larva is as much of a threat to the plant as you are. Hear me out - you can cause a lot of damage by cutting too deep or accidentally breaking the stem. I've done both, so I want to warn you to be very careful.
You have two options to remove the squash vine borer larva. You can inject an organic insecticide to kill them or try to cut them out.
- Small larva with no frass are hard to find, so I like to inject insecticide
- Larger larva can be easily found and cut out, but be very careful to not further damage the stem (or you can inject insecticide)
How to inject an organic insecticide
I prefer to inject insecticide because it causes less damage to the vine in my experience, giving me a higher chance of saving the plant. It's also a recommended option by extension offices, like Virginia Tech.
Injecting insecticide into the stem sounds like something only a master gardener would do, but I promise it's easier than you might think.
I have an entire guide on how to use Bt or spinosad for squash vine borers if you want more detail.
- Buy cheap, blunt syringes
- Fill them up with liquid Bt (can buy on Amazon)
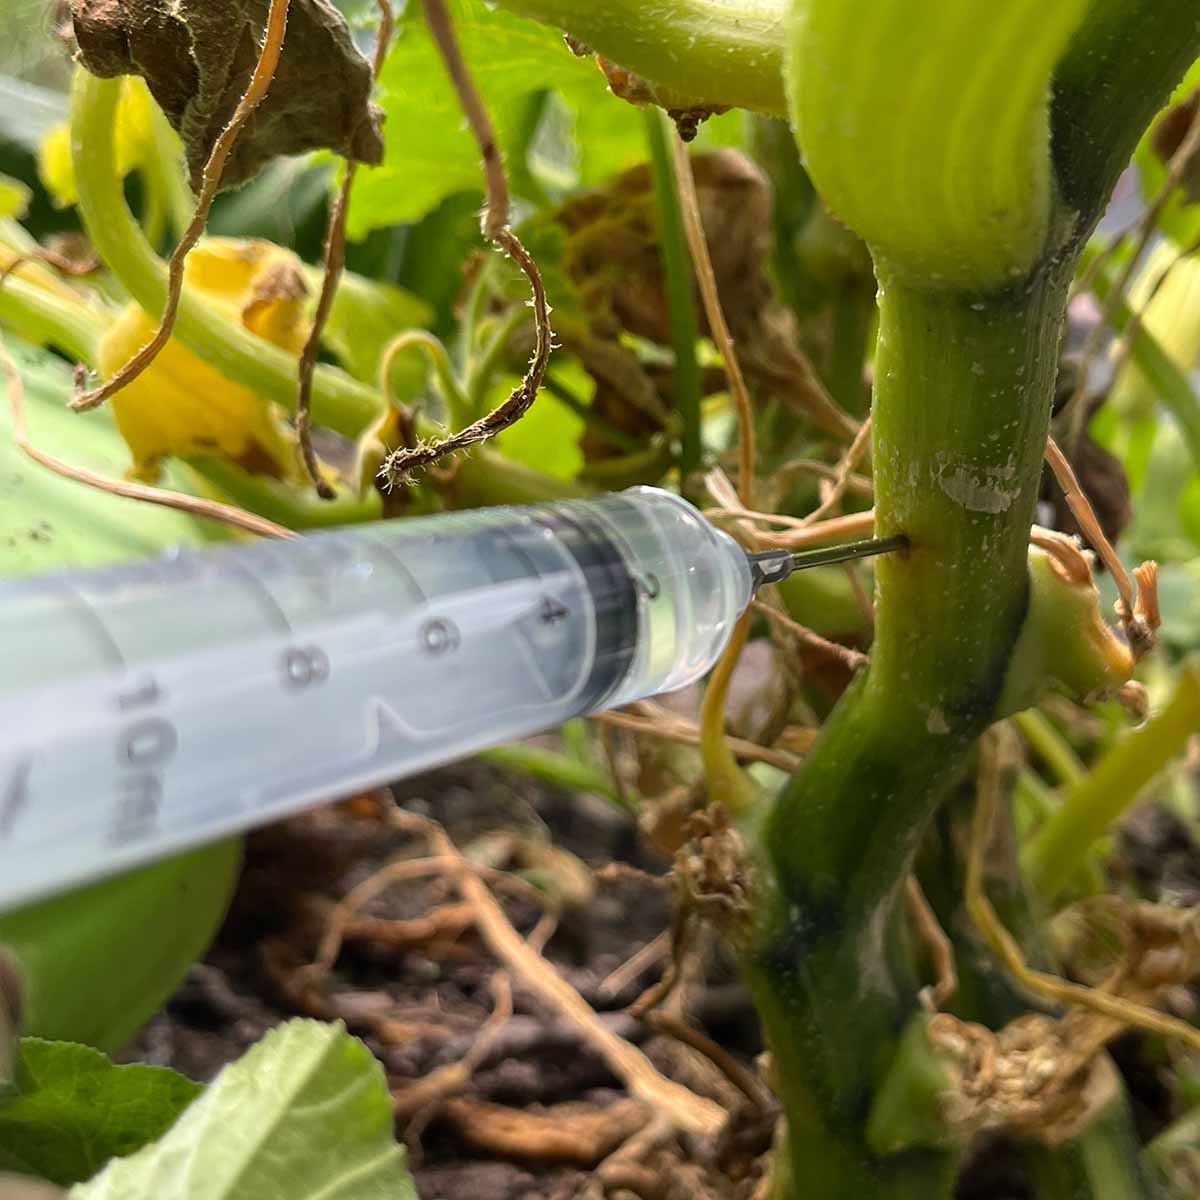
- Inject about 2 ml into the entry hole (until it runs back out)
It's that simple! But, if this is your first time doing it, I know you have a lot more questions. So let's go over how to inject Bt in more detail.
You will need the following tools:
I've provided links on Amazon for the products I use (these are affiliate links so I do get a small commission if you buy something).
- A syringe with a large, blunt tip (16-20 gauge is great) - these don't have a needle end so you won't be accidentally piercing yourself!
- Bt formulated for caterpillars (or Btk) - I use Captain Jack's, but other brands should be fine. You might also see "Thuricide" on the label.


Need to buy it now? It's possible you can find Bt at a farm supply store or a nursery, but I rarely see it at big box hardware stores. Otherwise, look for same-day or overnight shipping on Amazon.
If you can't get Bt fast enough, look for Spinosad. It's also organic and can be injected into the stem to kill the squash vine borers. I've used this as well and had just as good of success.
Inject the Bt
Fill the syringe and inject it into the stem through the already existing hole. I inject enough until it starts running back out so I know I've filled the entire section the larva has eaten and will continue to eat. That seems to be about 2 milliliters on average (as marked on the syringe).
Remember, you need to inject enough for the larva to ingest the Bt.
I also try to angle to syringe up (or down) toward where the larva is and push forward, then inject some more. I'm trying to ensure I have enough Bt coverage to fill the tunnel, and if I pierce and kill the larva while doing this, that's a bonus.
You can also use the blunt metal tip to poke through a more solid part of the stem, which is sometimes necessary if the larva has traveled a distance. However, you may notice that the syringe feels stuck and you can't push the plunger down.
This isn't because you're in an area that hasn't been hollowed out yet, it's because part of the solid stem is lodged in the tip, completely plugging it up. Point the syringe away from you, into a safe area, and push the plunger until it's expelled.
That's it! Sometimes the borer crawls out right away (very satisfactory), but sometimes it doesn't.
You will start to see the injured area heal within a day or two. It will start to dry out and recover.
How to cut out the borers
Larger squash vine borers can be easily found inside the stem and removed by cutting the stem open.
The tricky part is keeping the damage you are causing to a minimum.
You need a knife to cut open the stem and something to remove it. This can be wedging it out with the tip of a knife, a bamboo skewer, a tweezers, or anything similar that you can find around your house.
I like using a curved finger knife because I am less likely to cut through the rest of the vine, and I can also use it to wedge the cut area open to get the larva out.
The ones I bought on Amazon are no longer in stock, but here's a similar set so you can see what I'm talking about. I wear it for most of my spring gardening too, so I can cut twine without having to continuously keep track of a knife or scissors that I'm setting down and losing all the time.
Remove frass and monitor
After removing the larva (or injecting the insecticide), remove the frass. This helps the wound site dry out, but it also acts as a signal for additional larva activity.
Return the following day and check each entry site for new frass. If you see none, you've successfully killed the larva.
If you've injected insecticide, it's possible you see a tiny amount of frass the next day as it munched before it died. That said, I do this all the time and never see fresh frass the next day.
You also want to inspect the vine for new entry points and frass that you may have missed when the larva was still tiny, or from eggs that hadn't hatched yet.
How to help your squash plant recover
Once you have removed the borer, you're going to want to save the plant. Your zucchini and winter squash have a high chance of recovery if you catch damage early.
However, if you're removing a larger borer that's ¾ to 1 inch long, and have already seen wilting leaves, the plant's recovery isn't as easy and it will need all the help you can give it.
How do you know if it will recover?
The best way to determine if your squash plant can recover from the larva damage is to inspect the stem's structure. Let's take a look at some examples.
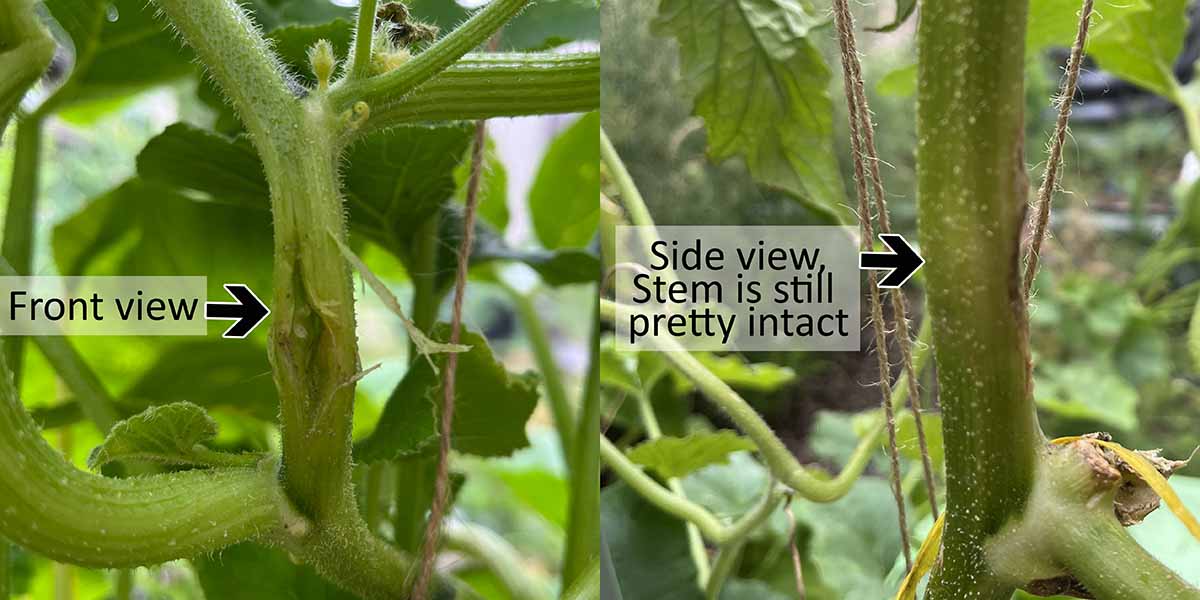
After cutting out a squash vine borer, if the rest of the stem is still intact, the plant will very likely recover.
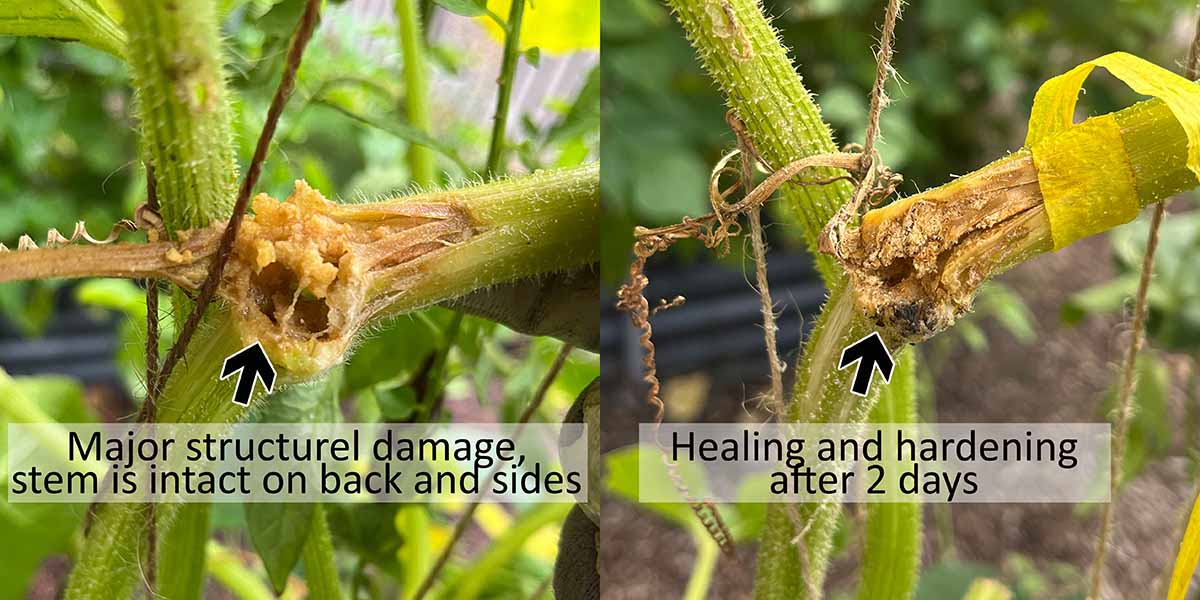
In this image you can see more extensive damage. However, it can still be healed because the vine is still intact and sturdy enough around the sides and back (not shown). After a couple of days, the damage is healing and the vine is stiffening back up.
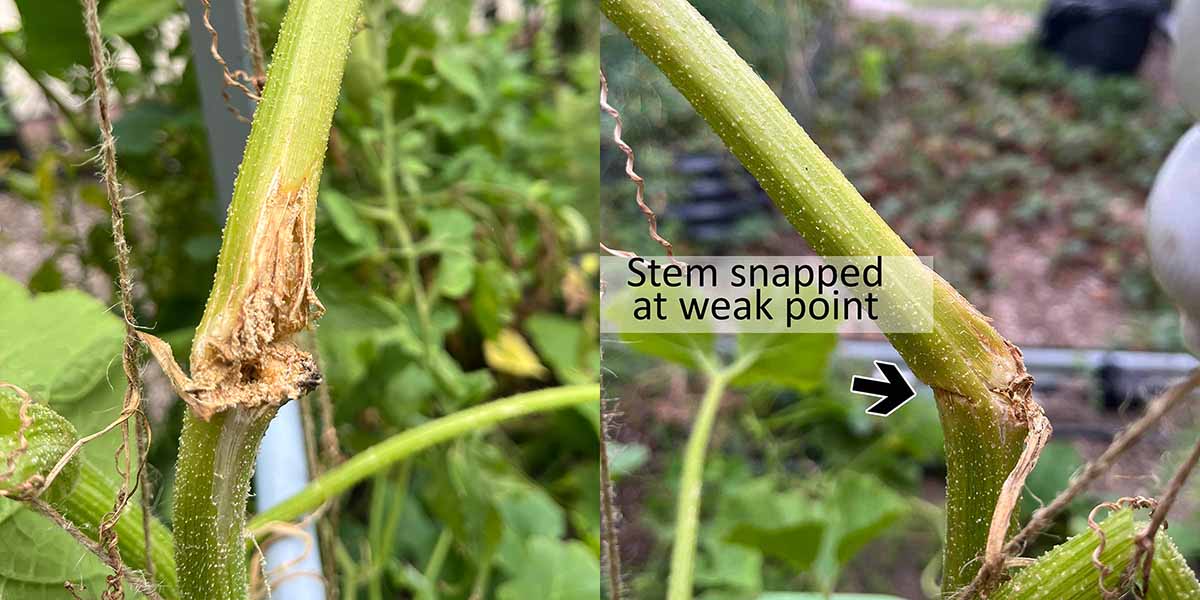
In the image above, the left side shows a standard open cut to remove the borer. Even if the rest of the stem is sturdy, take caution so it doesn't bend and snap at the weak points.
On the right, you can see that stem snapped in back and this plant was going to seriously struggle to recover. I needed to help it as much as I can. It actually did recover, which is honestly surprising for that much damage. So never give up!
How to help your plant recover as much as possible
The trick is to help it heal, reduce weather stresses, and if possible, form new roots near the injury and further down the plant (after the injury).
Look for roots at leaf nodes & cover with soil
Squash plants grow adventitious roots at their leaf nodes that touch moist soil. These extra roots can help funnel more water and nutrients when they are further down from the point of injury, relieving the bottleneck from an injured stem.
Zucchini, summer and winter squash vines all grow these types of roots. However this is much more applicable to winter squash vines that trail along the ground.
This is similar to how tomato plants grow extra roots from the stems when buried.
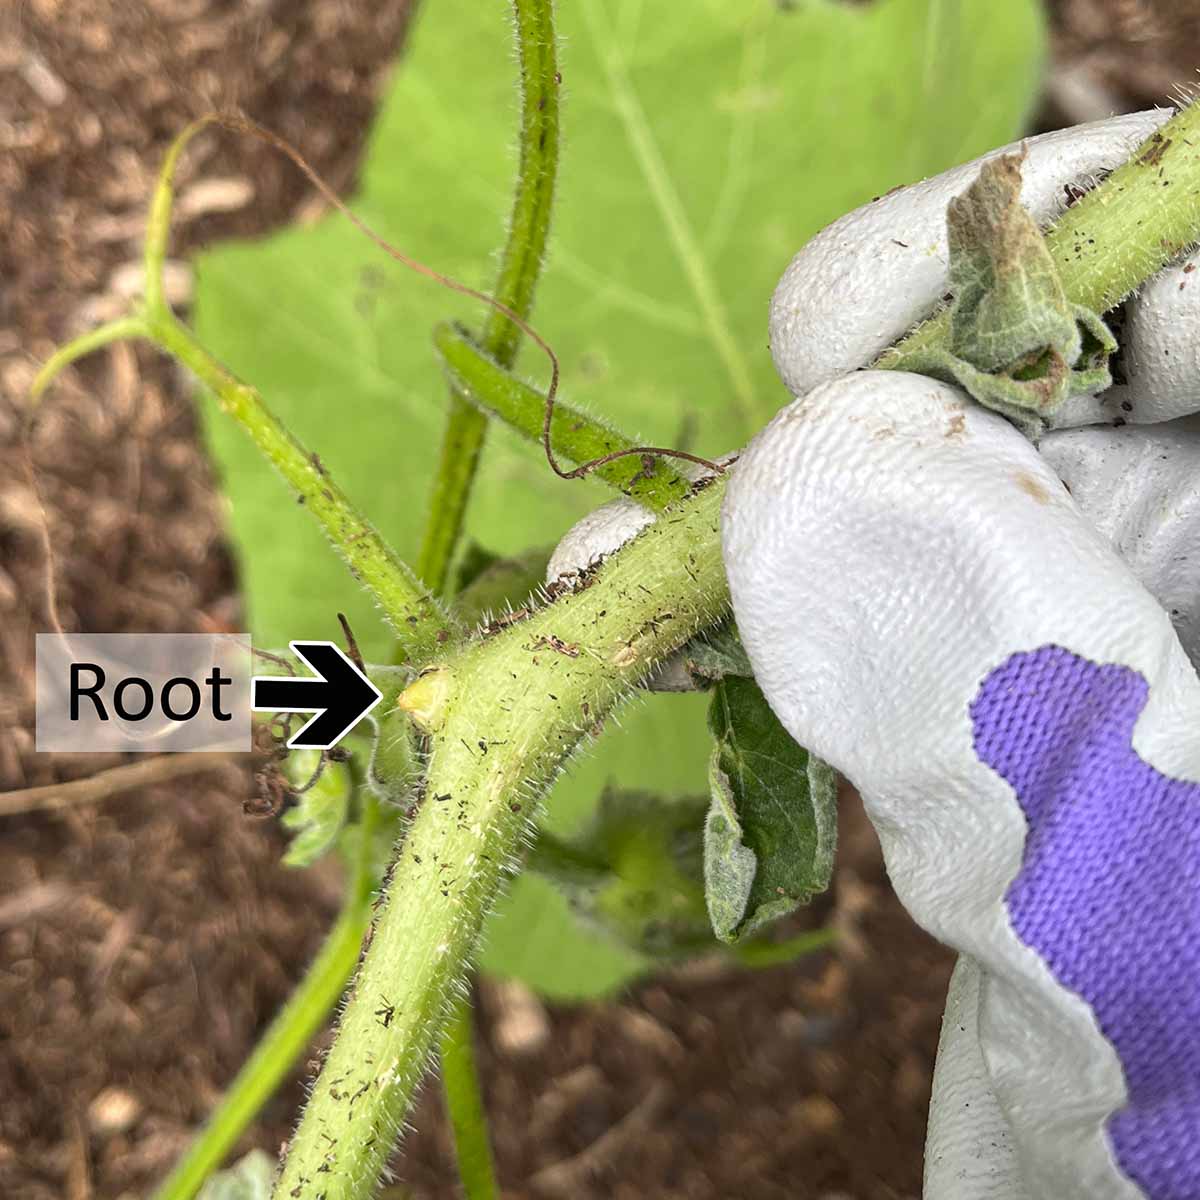
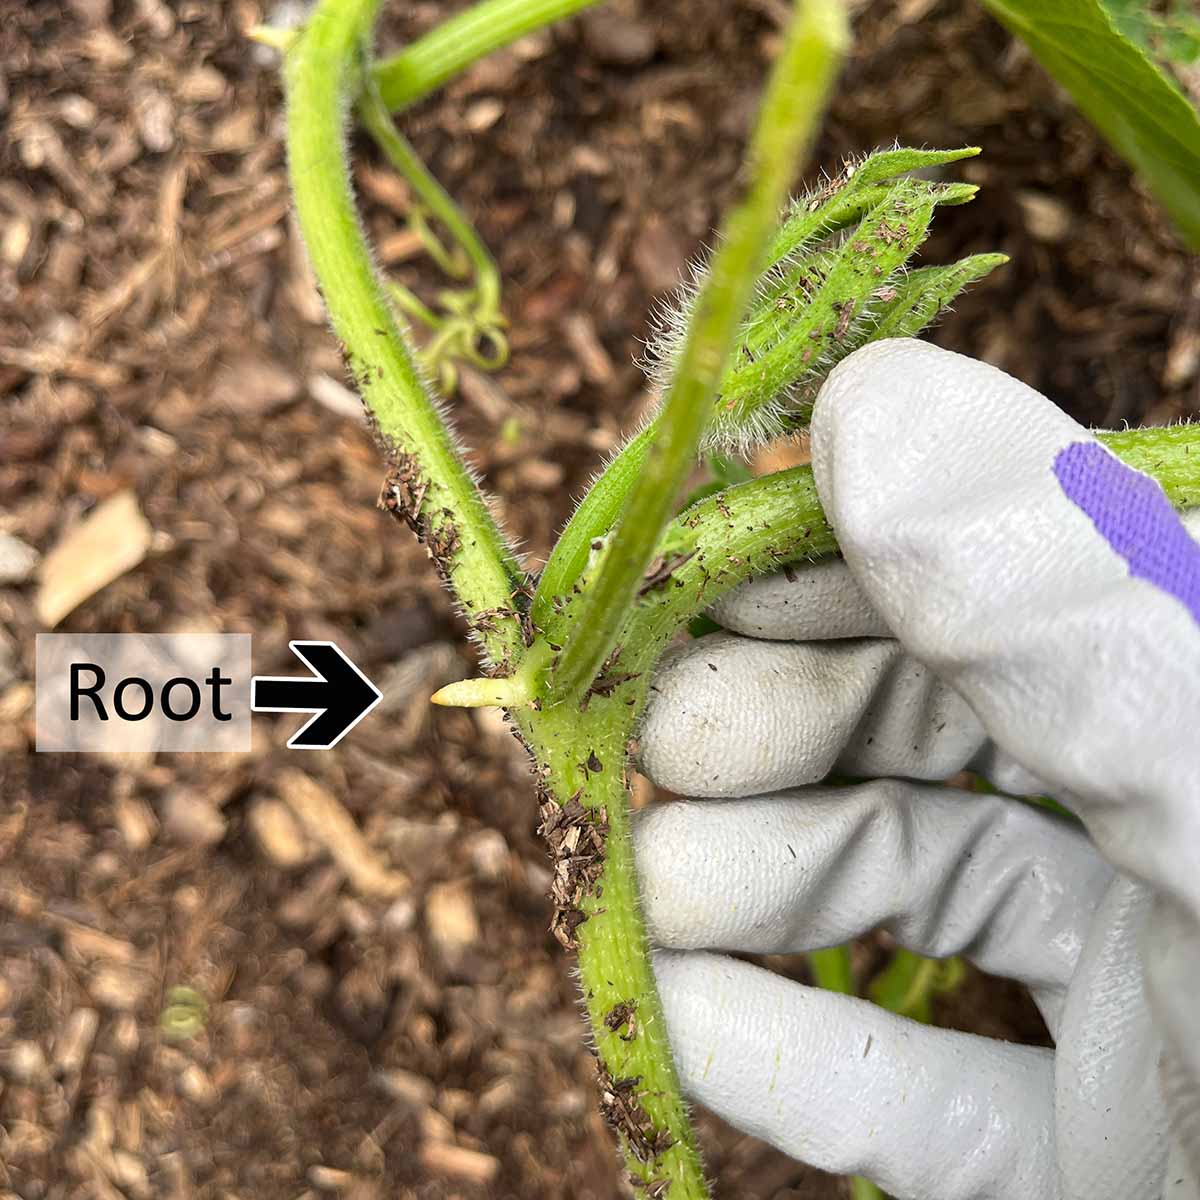
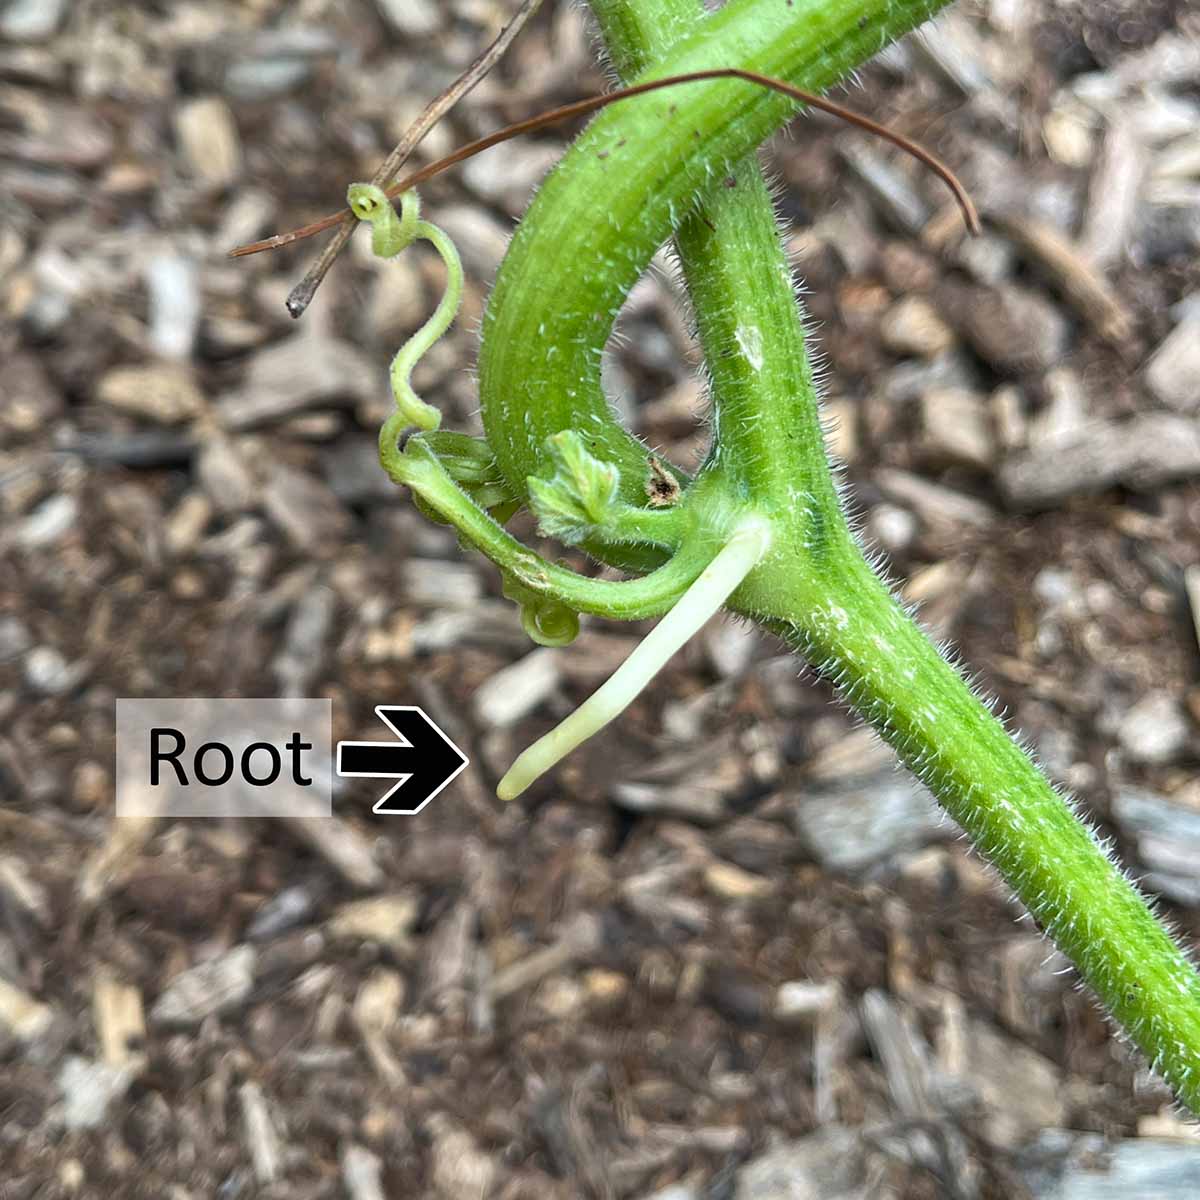
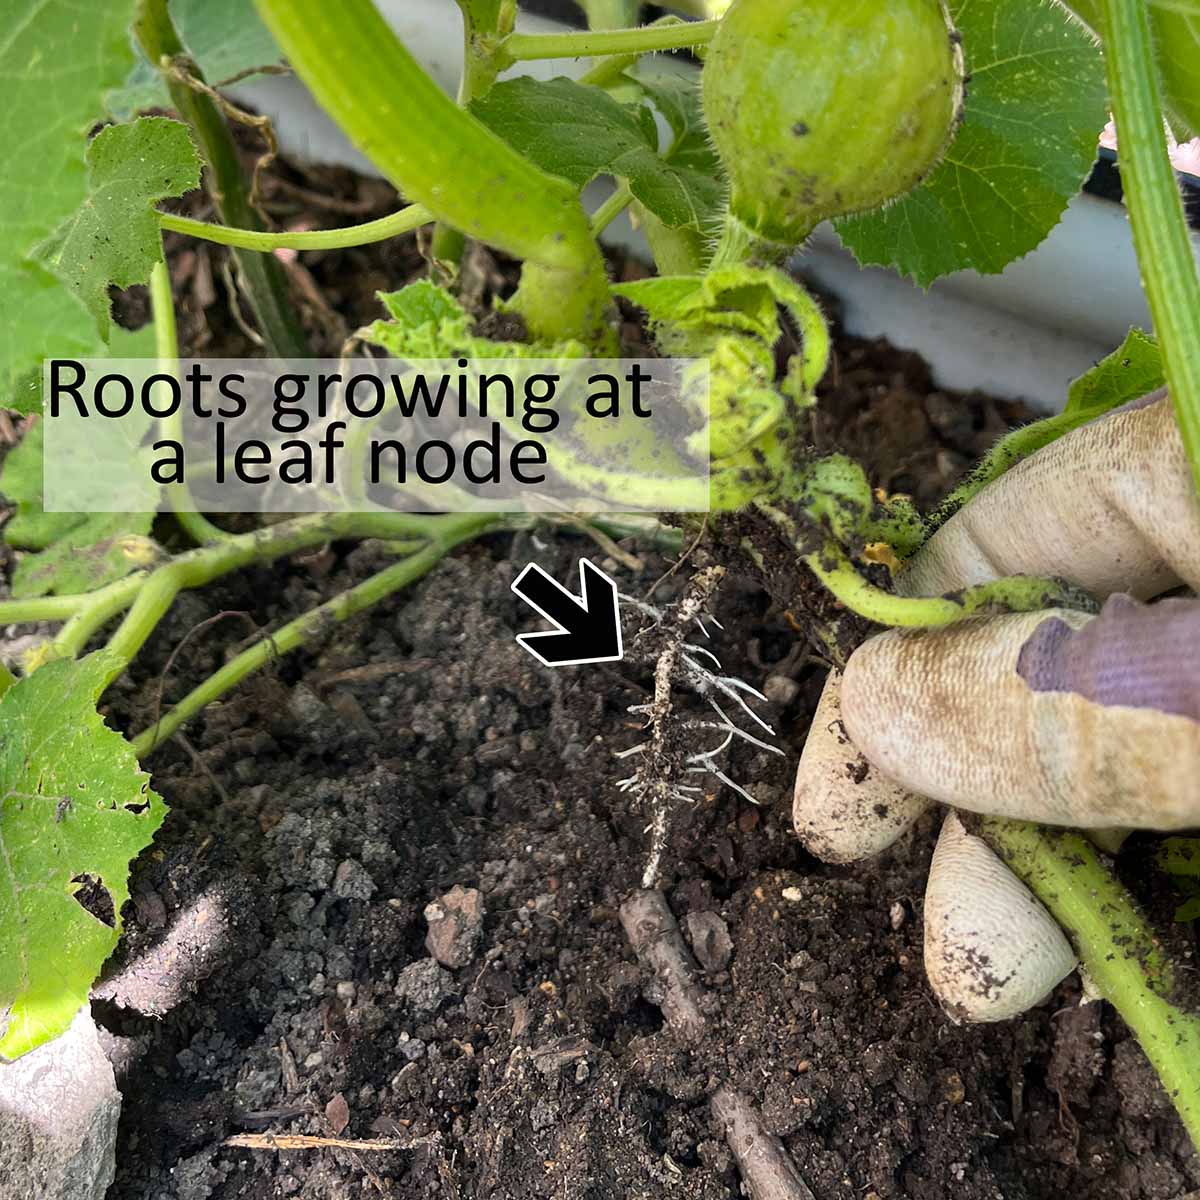
What to look for:
- Whitish nubs forming at a leaf node
- Longer white, firm roots that might be an inch or two long
- Green curly tendrils are not roots and will not turn into roots
How to bury the vines:
- Look for roots further down the vine (past the site of the injury). You'll find them at leaf nodes that have been in contact with moist soil.
- If the vine doesn't want to stay buried, stake it down (gently) with those metal landscape staples.
- If you can't find any spots with roots already forming, you should still bury a couple leaf nodes to encourage them to form roots.
You can also mound dirt around the injury to help it form new roots if it's near a leaf node, and bury nearby leaf nodes for extra root support as well.
Should you bury the injured spot?
Nearly every guide advises you to bury the injured spot to form new roots. I was worried that might encourage decay, so I reached out to the University of Minnesota extension office.
It turns out that the advice is likely for very small wounds. Exposure to air invites air-borne fungal infections, while burying invites soil-borne infections and rotting.
Their reply to my question was extensive, as expected, they are always incredibly helpful. Anyway, they said: "I am aware that the UM website suggests mounding soil over the damaged vine area. This sometimes works if the wound is very small. If the wound is large, things often fail."
They continued to say that for a large wound, it would be best to set the injured part of the vine on a pile of mulch instead of letting it have contact with the soil.
Support vines that are trellised
I trellis most of my winter squash, so I treat it a little differently.
If the cut is really long, I usually tie it closed to help support it, or make sure I have support already tied to it. I don't want it to split open, bend, and weaken along the cut area.
Ideally, you don't have to wrap the injured part of the stem because it can trap moisture and promote decay. Sunlight and air will help the stem heal.
However, sometimes the stem is so damaged that I do end up wrapping it for support. It does seem to heal slower and sometimes I find a little rot when I take the wrap off. But it's better than the stem breaking, in my experience.
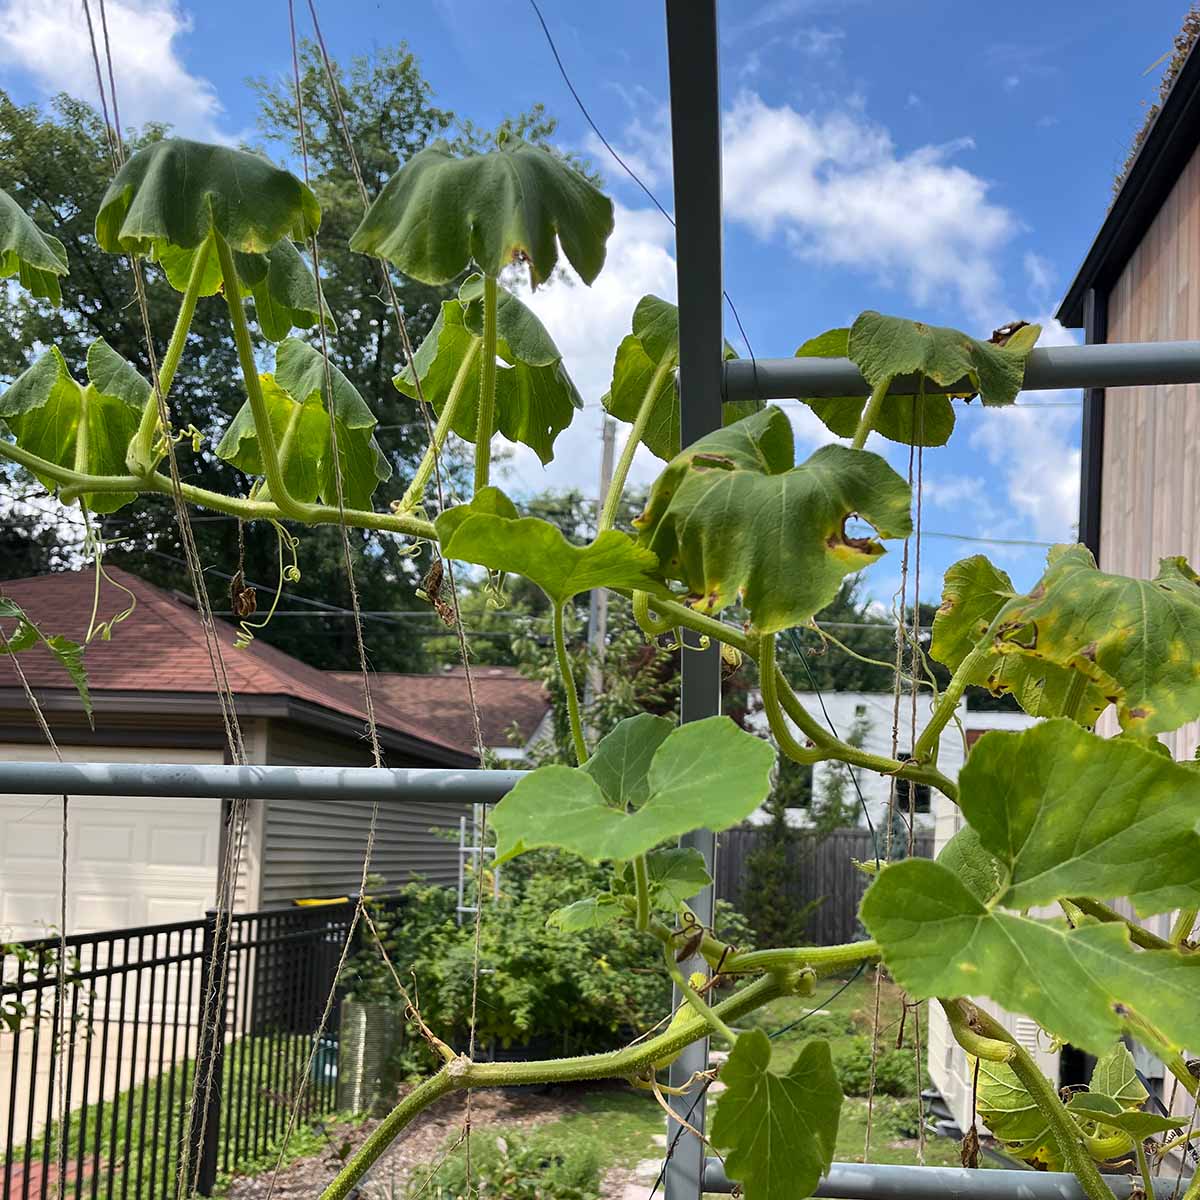
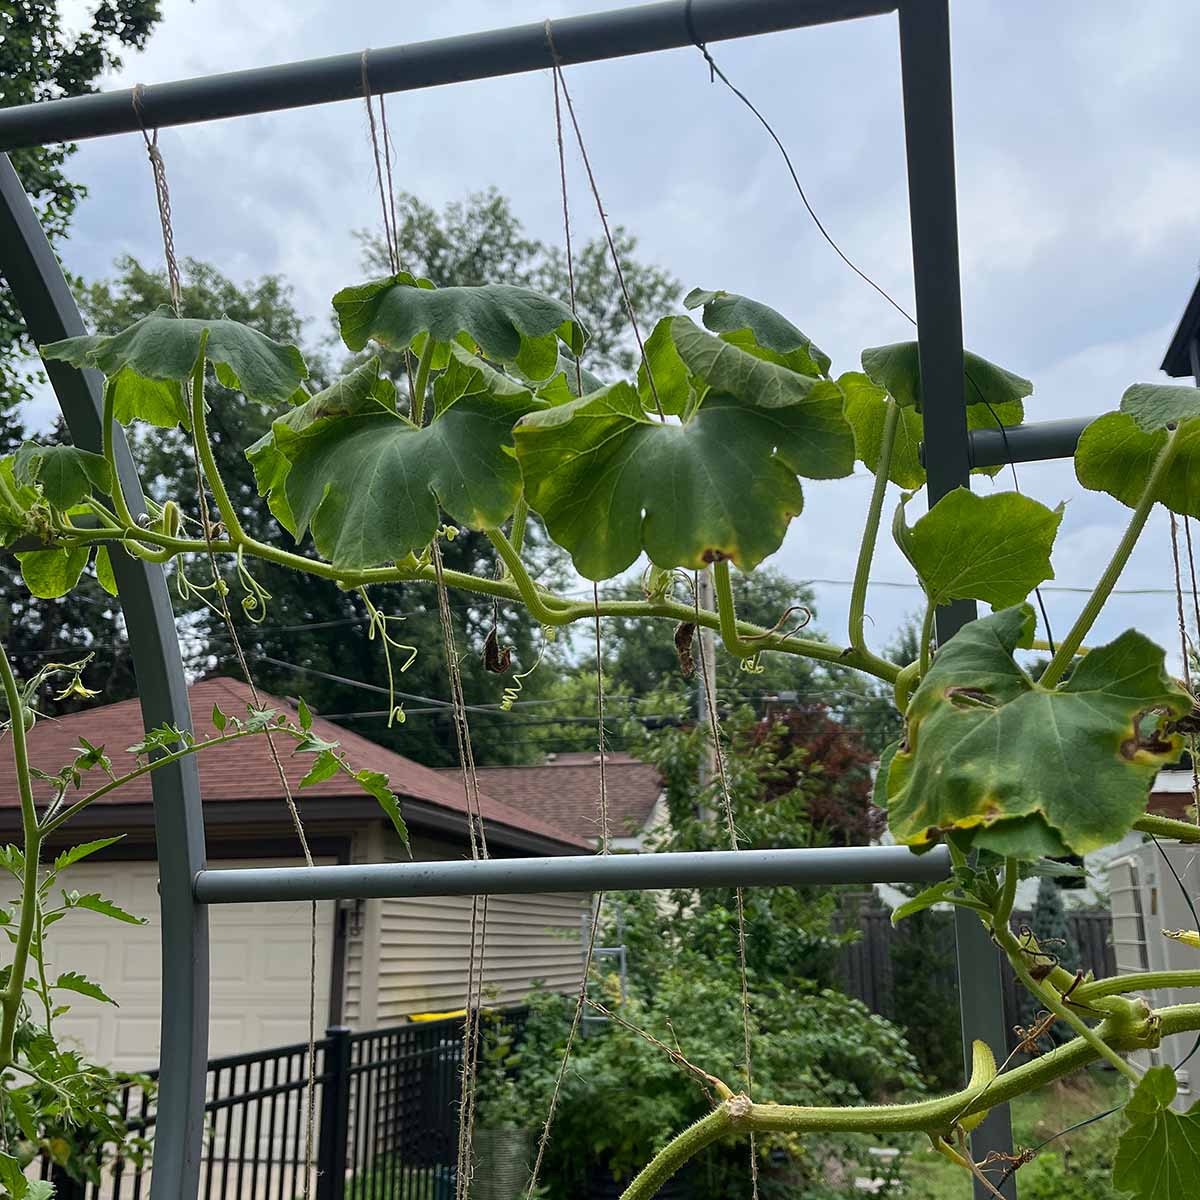
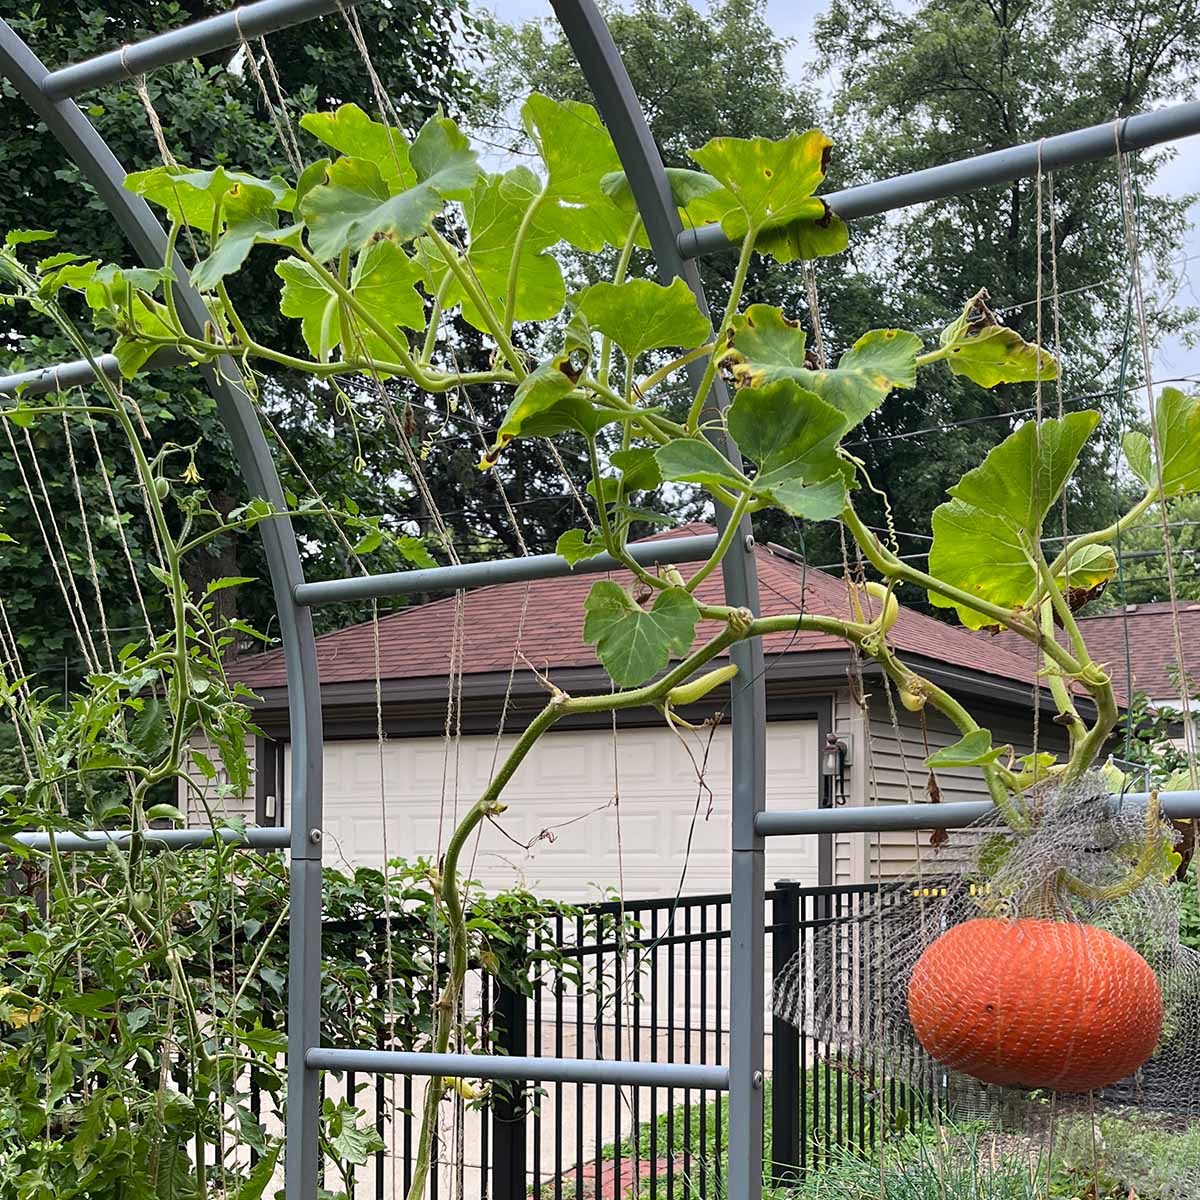
Signs of plant recovery
After removing the squash vine borer, you'll start to see some signs of recovery depending on the extent of the damage. If the larva was removed early and enough of the stem tissue remains intact, the plant should look better within a few days.
- Leaves look less wilted or fully recovered
- New growth shows up past the injury point
For more extensive damage, not every leaf will recover (some will continue to turn yellow and die with large amounts of damage). What you want to look for is some of the leaves stop declining in health and new growth starts to appear.
Here are some general signs the plant is recovering:
| Timeline | Signs of healing |
|---|---|
| Same day | (Plant may continue to wilt) |
| 1-2 days | Wound begins drying, stem starts to harden |
| 3-5 days | Wilting stops getting worse (duration depends on severity of damage) |
| 5-14 days | New growth begins, plant looks healthy |
During this time, try to reduce all extra stress.
- Make sure the soil is consistently moist
- During heat waves, provide shade (since it's harder to get water to the leaves through the injured site at this time)
- Avoid fertilizer until the plant has recovered, as a new flush of growth can stress the system even more. After 1-2 weeks, you can resume your normal fertilizer schedule.
Monitor for missed damage
Just because you found one (or several) today, doesn't mean there aren't tiny ones that you missed or eggs that have yet to hatch.
I've found 8 along a single vine one year. Every egg has a chance to hatch and there's enough vine to support a lot of borers. So always be on the lookout.
- Check back daily looking for new entry holes and frass
- Look for leaves that are wilting (that weren't before)
See where I commonly find the eggs, what they look like in more detail, and my routine for spotting them in this squash vine borer egg guide.
What to do next year
Saving this plant is only half the batter. If squash vine borers are a problem in your area and in your garden this year, you'll want to learn how to stop them before they enter the stem.
Squash vine borers are probably one of the most infuriating pests that gardeners deal with. My next guide will cover every strategy to control them for your garden next year.

Leave a Reply