Worried about freezing temperatures in the forecast damaging your fruit trees? In general, temperatures below 28F degrees is the danger zone, but it depends on the type of tree and the stage of the flower buds. These temperatures apply to apple, pear, peach, nectarine, plum, and cherry trees.
This article covers everything you need to know to protect your fruit trees:
- Critical temperatures that can cause damage during each stage of the fruit tree
- Weather & soil conditions that are easier (or harder) to work with
- Steps to protect your fruit tree (and when to do them)
- Specific (affordable) products that I use, and you might already have at home
The best way to protect your fruit trees is to cover them, essentially creating a mini-greenhouse that traps in heat. As the ground radiates heat at night, your 'tented' fruit tree benefits from the warmer trapped air. You can add in warm jugs or buckets of water for additional heat.
Jump to:
Fruit tree bud stages & freezing temperatures
Regarding fruit trees, the critical temperature refers to the point at which a bud (or flower) can only survive exposure for 30 minutes (or less). At which point, it will be damaged.
Over winter, the fruit trees go dormant and can handle really cold temperatures, with some able to withstand chills well below zero. Once the days get longer and the weather warms up, they break dormancy - and that's when they become more sensitive to temperatures below freezing.
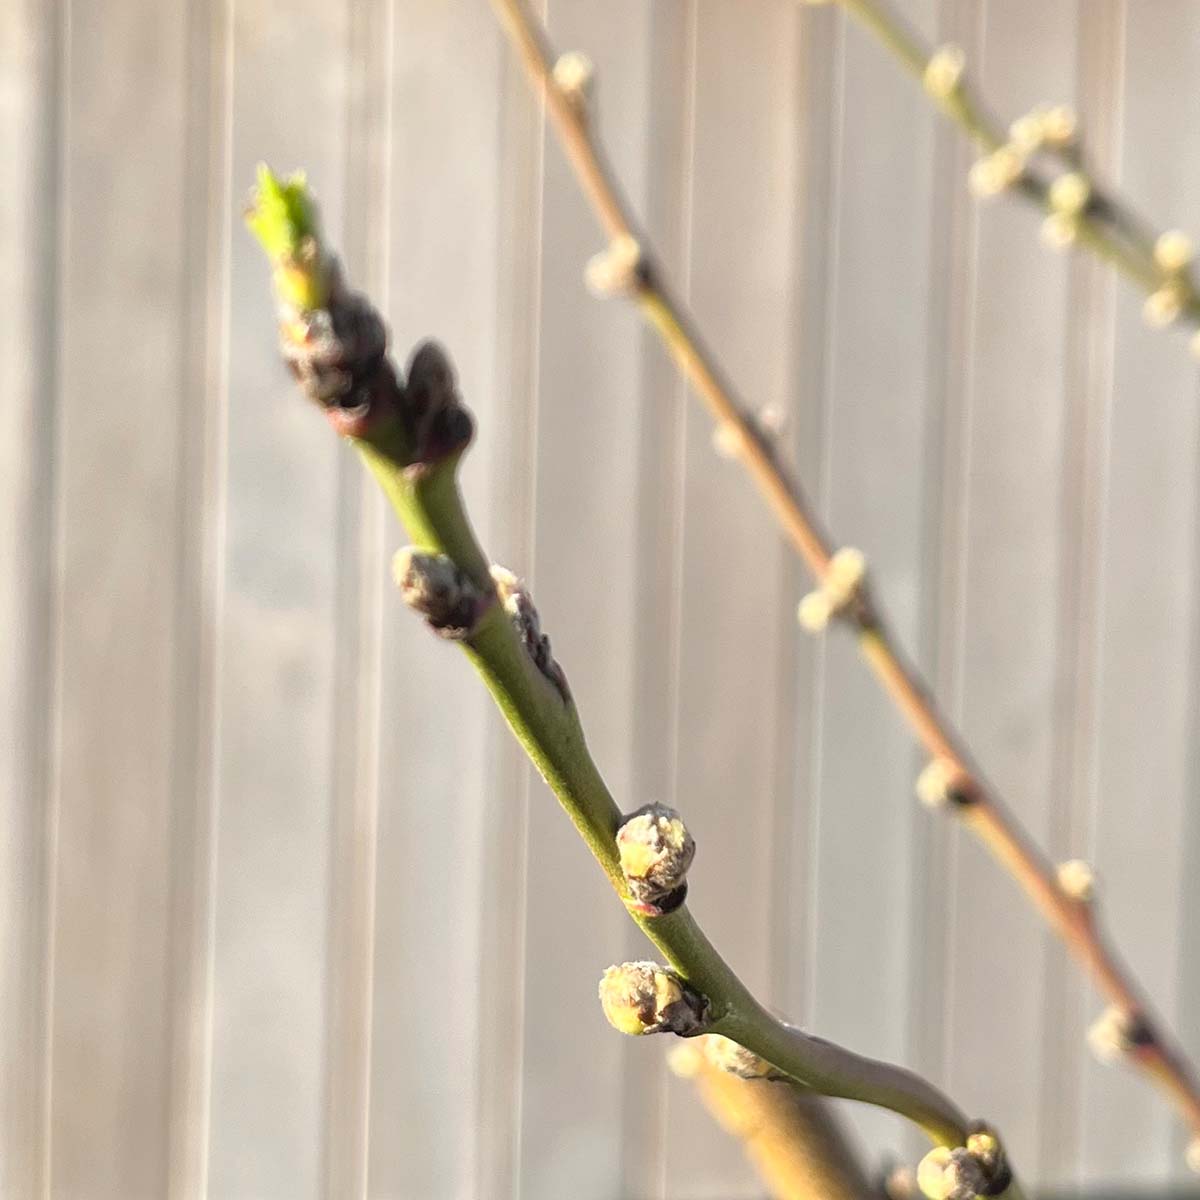
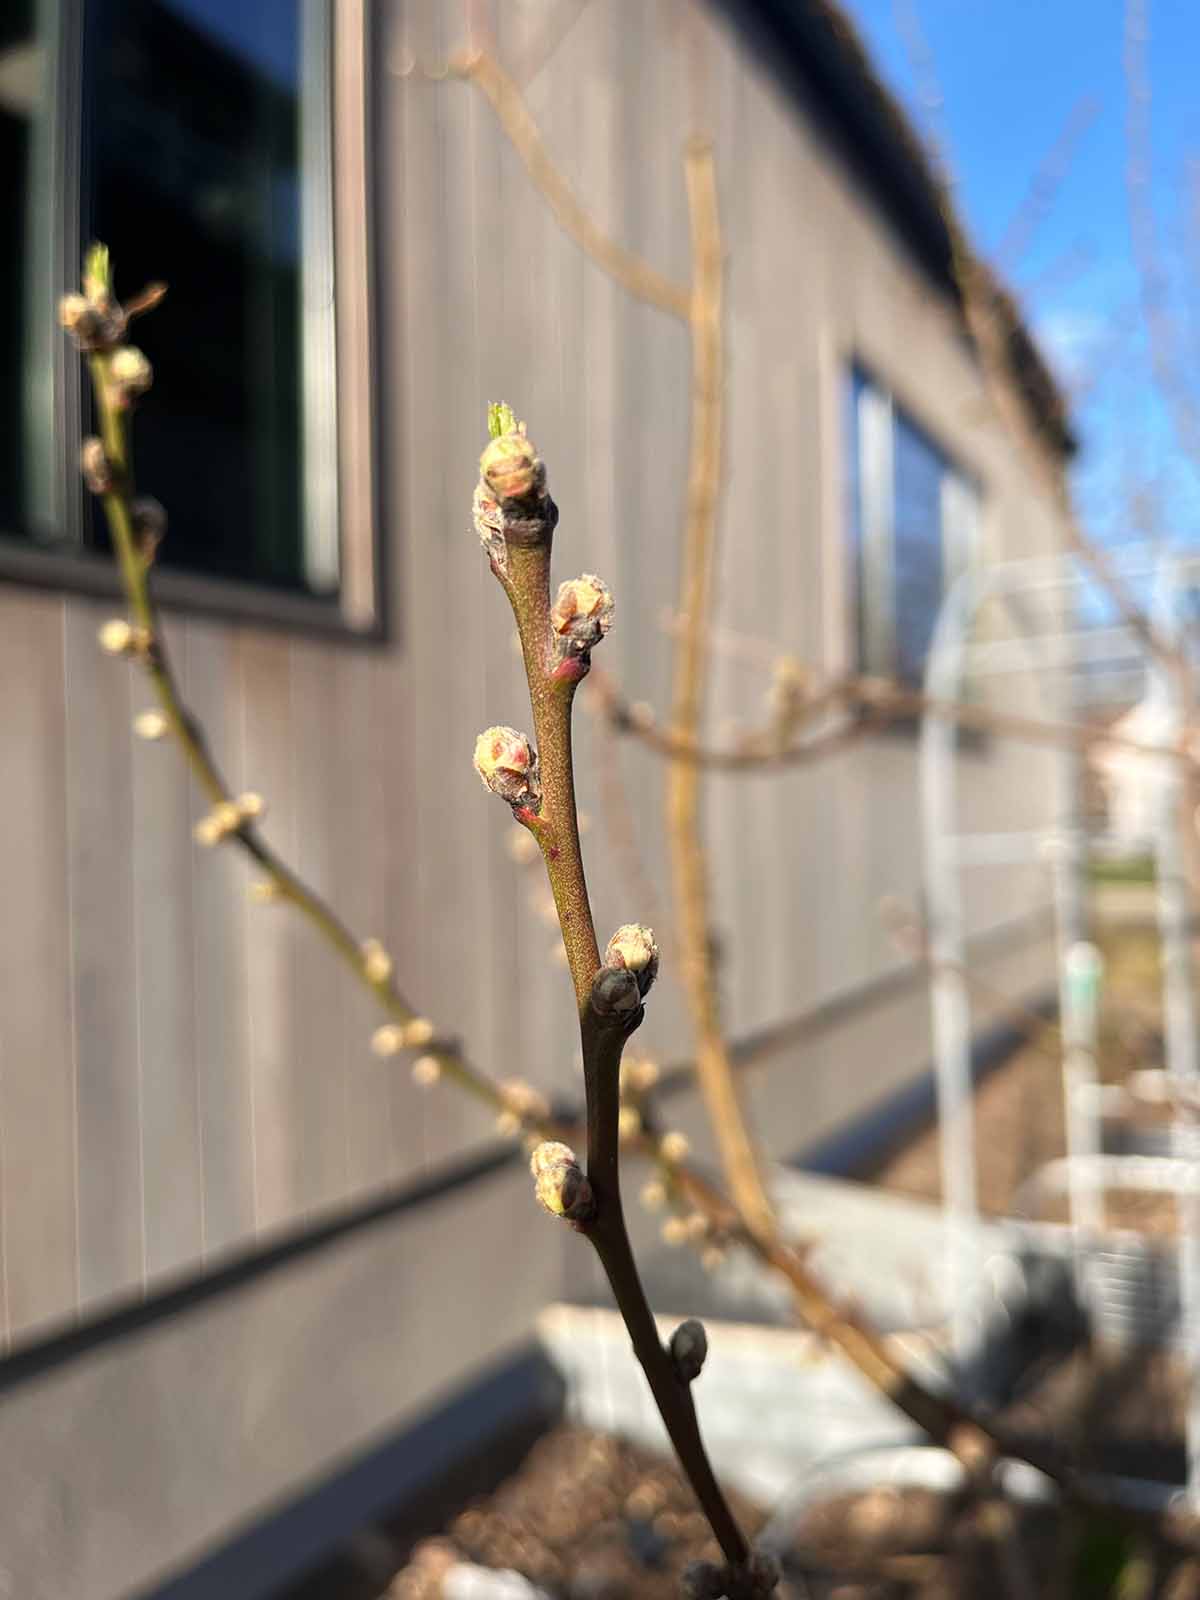
Flower bud stages
When fruit trees first break dormancy, the buds start to swell (often referred to as the Swollen Bud stage). At this point, they are still fairly hardy, withstanding temperatures in the teens (Farenheit).
Over the course of a few days or a week, the buds start to expose the tips of flowers and leaves. The bud will still look closed, but you'll see a tiny bit of color near the tip. They are much more sensitive to cold damage at this stage, with 24-25F damaging some buds, and almost a complete loss if temps drop to 15F.
Over the next week or two, the buds start to open, exposing most of the leaves and flowers. They are very sensitive to freezing temperatures at this point and beyond, usually anything at 28F degrees or below.
Critical temperatures below freezing
The chart below shows the temperatures at which you'll have a 10% flower bud kill rate and a 90% kill rate. The tree will live - this only refers to the buds. For example, when apples have a swollen bud, 10% of the buds will probably die in 15 degrees Fahrenheit, and a 90% kill rate at 2F.
The bud stage names vary slightly based on the type of fruit tree. For example, instead of a 'swollen bud' stage, apples have a 'silver tip' phase. This PDF from Michigan State has really helpful pictures along with a table of temperatures.
| Fruit tree | Swollen bud | Green tip | First bloom | Full bloom |
|---|---|---|---|---|
| Apples | 15F / 2F | 23F / 15F | 28F / 25F | 28F / 25F |
| Pears | 15F / 0 | 24F / 15F | 27F / 23F | 28F / 24F |
| Apricots | 15F / n/a | 24F / 14F | 25F / 19F | 27F / 22F |
| Peaches | 18F / 1F | 25F / 15F | 26F / 21F | 27F / 24F |
| Plums | 14F / 0F | 20F / 7F | 27F / 23F | 28F / 23F |
| Sweet cherry | 17F / 5F | 25F / 14F | 28F / 25F | 28F / 25F |
| Sour cherry | 15F / 0F | 26F / 22F | 28F / 24F | 28F / 24F |
Weather & soil conditions
You can definitely protect your fruit trees from frost damage, if the conditions are right. There are a few things to take note of:
- Low or no winds are crucial to frost protection
- A dew point above the critical temperature is very beneficial
- Moist soil stays warmer than dry soil
- Clay soil stays warmer than sandy soil
- Bare soil radiates more heat than cover crops
Wind
Windy conditions are a problem for a couple of reasons. First, they remove the warmer air you're trying to trap near your fruit tree. Second, it can create a cooling effect as it runs over wet soil (creating a sort of swamp-cooler effect).
Wind above even just 5 miles per hour can be harder to protect against, as it steals heat from the trees and doesn't let the warmth radiating from the ground to create a warmer micro-climate around the tree.
Dew point
Next, let's talk about the dew point. This can get technical, but I'll try to explain it as simply as possible. The short takeaway: a dew point above your critical temperature is good, below it is bad. (See the Critical Freezing Temperatures section for reference).
Let's start with something basic, that we've all noticed. Hot air can hold more water than cool air - that's why you get really muggy, humid days. But at night, when the temperature cools, the air can't hold any more water, so it condenses onto nearby cooler surfaces, like the grass and plants.
The dew point is the temperature at which that cooling air can no longer hold onto all of the water. That water condenses on to the coldest, nearby surfaces, which tend to be the fruit buds (even more than the branches).
Condensation generates an enormous amount of heat, which protects the buds. Dr. Robert Evans, an agricultural scientist, explained at the Washington State Horticultural Association, "At the dew point, the heat release from condensation replaces the radiative heat losses."
Furthermore, once the dew point is reached, the air cools at a much, much slower rate, which is good for our fruit tree flowers!
But that's at a high dew point - one that's above the critical temperature for your fruit tree buds (refer to chart in the next section). If the dew point is below your critical temperature, you definitely need to protect your trees.
The University of Wisconsin has a really in-depth article about wind speed and dew point. And the University of Connecticut has another excellent dew point explanation, with examples, if you're trying to understand it. They both relate to orchards and commercial growing techniques to prevent damage, but the rest of their information still applies.
Soil
Why does the soil matter? Because we're relying on the heat that naturally radiates from the ground to keep the fruit tree warm. The more heat it retains during the day, the more it heats the air around it at night.
Moist soil retains more heat because water retains more heat. Water your fruit trees really well 1-2 days before the cold temperatures are forecast. Clay soils retain more water, so they are warmer than sandy soils which retain very little water.
Moist soil will keep your fruit trees about 2 degrees (F) warmer than dry soil, according to the Penn State article, "Frost, Critical Temperatures, and Frost Protection."
They also tested other soil conditions. They found that when the soil isn't bare, but instead covered with a shredded cover crop (or even last year's fall leaves), it's a ½ degree colder. That's because the sun isn't warming the dark, moist soil, which is better at retaining heat that plants.
If the soil is fluffy (say it's been tilled or raked), it's 2 degrees colder. Tall cover crops (or tall weeds) drop the soil temperature by 2-4 degrees, and up to 8 degrees if they restrict air drainage.
Gravel can also retain a large amount of heat, so if you have a gravelly soil, it can end up even warmer.
How to protect fruit trees from freezes
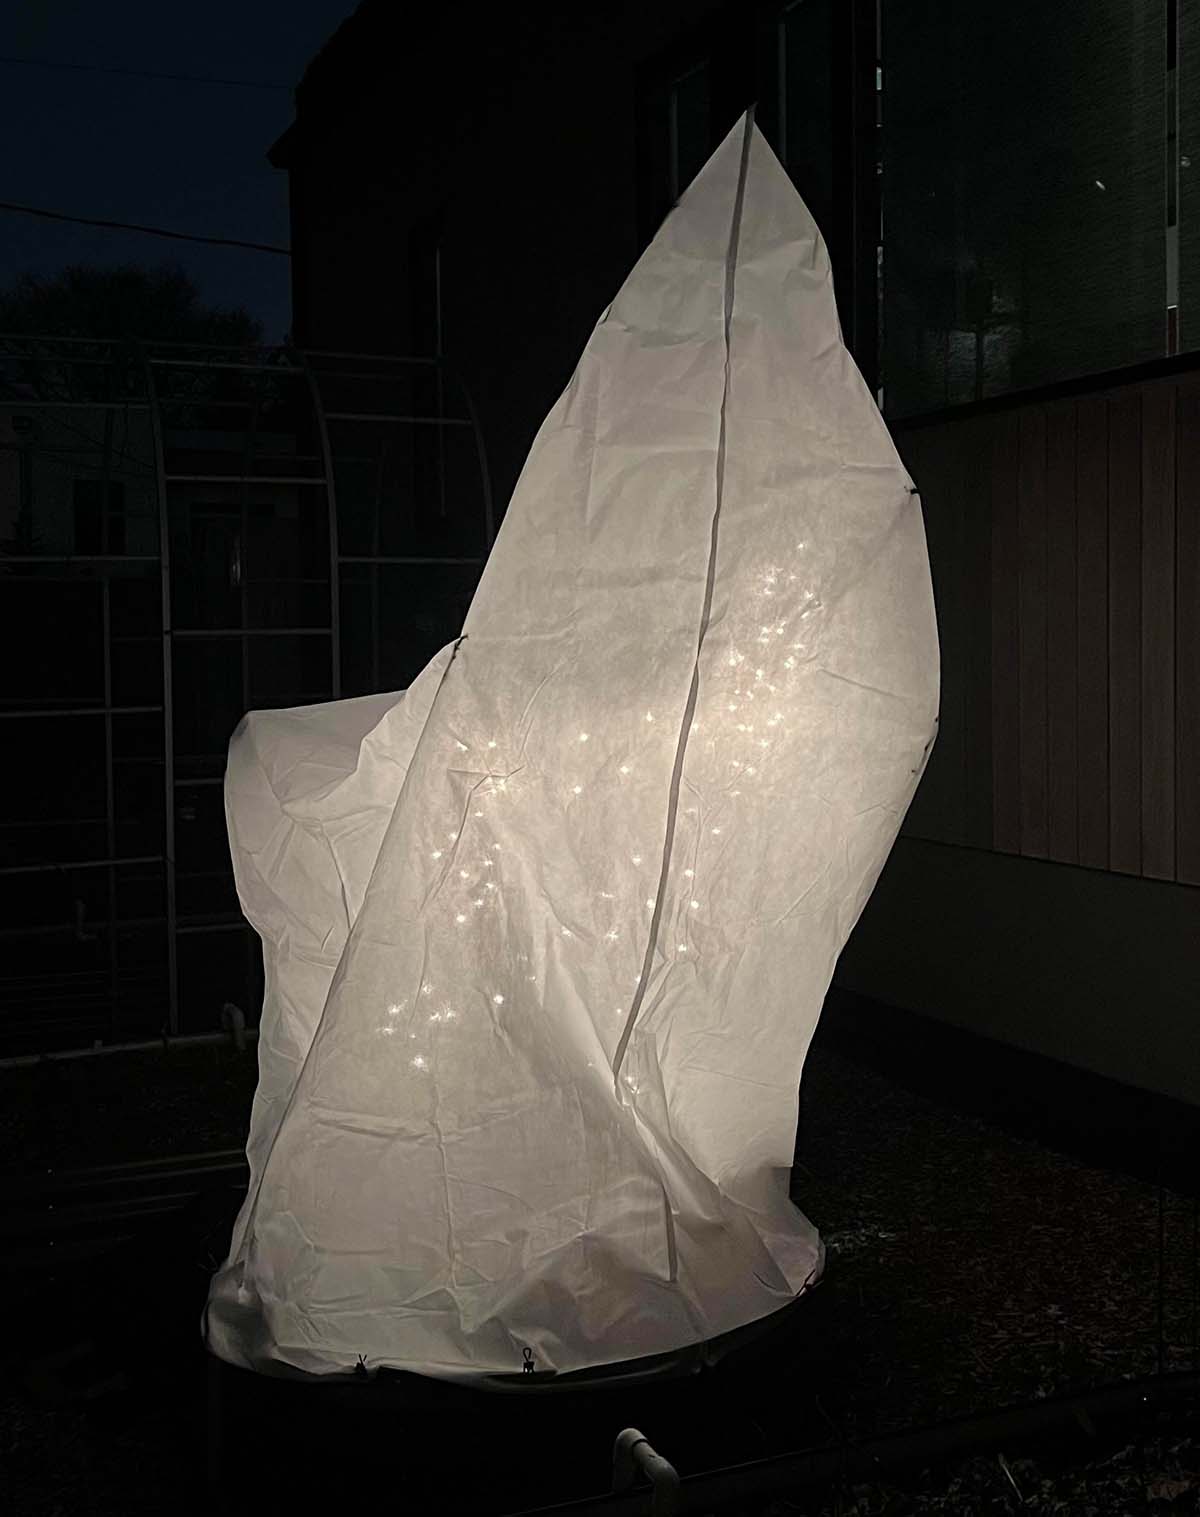
The best way to protect fruit trees from freezing temperatures is to trap heat under a canopy, creating a make-shift greenhouse. Cover the trees during the day, before the temperature cools and before the sun goes down.
The canopy can be a tent canopy (for hosting a backyard party in the rain), or a homemade version with bed sheets and plastic.
Doing this will capture the heat that's naturally radiating from the ground (which is warmer than the air overnight). You can also make sure the ground is well-watered a day or two before the freezing temperatures hit. The water holds extra heat (more than dry soil), which radiates from the ground into your canopy.
A cover like this can raise the temperature by 2-4 degrees (F), just by using the ground's natural heat, according to the University of Wisconsin Extension, "Understanding Frost in Fruit Crops" (see the pdf under cited resource "2").
Lastly, you can add some jugs of warm water under your fruit tree canopy. You can also place other hot objects on the ground, like pre-heated stoneware that you use for baking, or even warm bricks.
A homemade canopy is ideally made out of 2 layers. The first layer is fabric (like a bed sheet), which helps protect the trees. The second layer is plastic, to keep frost away from the flower buds.
This protects any size fruit three that you are willing to make a canopy for. For me, that's trees under 8 feet tall. If you have really small trees, you can put a cage around them, and simply wrap that cage with a bed sheet. Stark Bro's has a short 2-minute video (and article) demonstrating this process.
Steps for using a tent canopy
Water the soil 1-2 days before the freezing temperatures set in. Water holds heat better than dry soil, keeping the temperatures higher in your canopy, as explained by Maryann Mickewicz from the NC Cooperative Extension.
- Set up the tent canopy over the tree
- Secure plastic to the sides, down to the ground (this traps in the heat)
- Place warm jugs of water inside the canopy (optional)
- Secure the plastic sides to the ground with garden stakes, rocks, bricks, buckets of soil, 2x4's , etc.
Steps for using bed sheets
Water the soil 1-2 days before the freezing temperatures set in. Water holds heat better than dry soil, keeping the temperatures higher in your canopy.
- Cover the tree with bed sheets (all of the branches, but it doesn't need to go to the ground)
- Cover the whole thing with plastic, all the way to the ground
- Place warm jugs of water inside (optional)
- Secure the plastic to the ground garden stakes, rocks, bricks, buckets of soil, 2x4's , etc.
Materials
Here's what you'll want to gather:
- CHOOSE: a tent canopy or bed sheets (or other large material, like a table cloth or old blanket)
- Plastic tarp like for camping, or thick painter's plastic drop cloths. Try to get something that's at least 3 mil thick (the thickness of a construction-grade black garbage bag)
- Garden stakes to pin down the plastic, or heavy rocks or bricks to weigh it down
- Optional: a central 'stake' or even an umbrella, to keep the weight off the top fruit tree branches
- Optional: warm (closed) jugs of water or other hot objects that retain heat
You can buy tree protection 'bags' on amazon, but I don't like them. I've tried them in the past, but they are very difficult to get on. They also don't reach the ground and are breathable, so they don't trap the heat in well.
Tent canopy
If you already own a canopy tent, like you pop up in the rain for an outdoor party, that's perfect! Just buy some painter's plastic or hang sheets on each side to trap in some heat.
You can do the same thing if you have a trellis or garden arch that can be places over your fruit tree.
This is the easiest and most fool-proof method for protecting the trees, so reach out to friends and neighbors if you don't own something suitable. You can buy a tent canopy, but you'll be spending $60-$150 for one that's 10x10 feet. Here's a cheap-ish option if you are looking to get one anyway. (I've never used this specific product, to be up front!)
How many sheets?
Bed sheets work out great for this, because they are already really large. But what size do you need to use? For the works simplest math, use the following calculation:
- Take the height of your tree, and DOUBLE it. (You need enough fabric to go up the tree, then back down the other side.
- Then ADD IN the width of your tree (diameter). That's how much you need to make it over and across to the other side.
For example, if I have a 6 foot tall tree that's 4 feet wide, I'd need 6 feet to go from the ground to the top of the tree, 4 feet to go over the top to the other side, then another 6 feet to make it back to the ground. For a total of 16 feet.
However, I only need the sheets to cover the branches and buds, because they are less likely to trap moisture against the flower than plastic. So I can get away with a sheet covering only the branches, rather than going all the way to the ground.
That means, I can subtract out any length from the lowest branch to the ground. In my case, it's about 2 feet from the lowest branch to the ground, so I can subtract that off both sides, saving 4 feet. That brings my total down to 12 feet.
How large are bed sheets?
- Full: fitted 4.5' x 6' / top sheet 8' x 8.5'
- Queen: fitted 5' x 6.5' / top sheet 8' x 8.5'
- King: fitted 6.5' x 6.5' / top sheet 8.5' x 9.5'
Note that top sheets are larger, so that might be better if you can cover a tree with a single sheet. However, I like the fitted sheets when I need to use 2 or more. The elastic catches on the top branches, and then I don't need to tape them together... I can just drape one down each side.
I actually found a vendor on Amazon that sells just fitted sheets for crazy cheap! (I bought two of these for a new cherry tree I added recently).
Alternatively, you can buy a frost blanket instead of a bed sheet. Buy one that is made from fabric and is advertised as breathable (as this helps from it trapping water directly onto blooms). Then cover it with plastic (which traps in the heat).
You can see available frost blankets on Amazon. (I haven't used one of these yet).
For small trees, use pillow cases, old blankets, t-shirts, whatever you have lying around. Or if you really love your tree, show it extra love with a fuzzy sweater, flannel, or robe?!
Plastic cover
I like to buy the largest plastic sheeting that I can, so I don't have to tape it together. That said, taping isn't too hard if that ends up saving you money.
The thickness of the plastic matters as well, as thicker plastic is better at insulating and keeping the heat inside your little canopy. Since we're building a mini green house, we can look to greenhouse plastic for some guidelines.
Greenhouses that insulate year round have plastic that's 6-7 mil thick in mild climates and 8-12 mil thick in cold climates. But 3-4 mil thick plastic works for short durations (like protecting your trees for an overnight freeze).
To put this in perspective, your average kitchen garbage bag is about 0.7 mil thick (less that 1 mil). Those black construction-duty garbage bags are 3-4 mil thick.
Options for plastic:
- Painter's plastic drop cloths
- Shower curtains
- Plastic table cloths
- Solarizing landscape plastic
- Plastic tarps (like camping tarps to keep out the rain)
Here are some products to consider, if you don't have anything at home.
- 10 x 25 feet, 3 mil thick (and they have a 4 mil option too)
- 7 mil-thick tarp, from small sizes up to 30x30 feet! (I bought one that's 20x20)
- For small trees: Construction-grade garbage bags that fit right over them
Small trees have a lot more options, from covering them with a plastic tub, to an upside down garbage can, a large shipping box, or anything else that is impermeable to air (to slow the heat loss).
The links to Amazon in this article are affiliate links, so I get a small commission if you buy something. I'm only linking to products I would (or have) bought myself, trying to find the best quality for the lowest price possible.
Pinning it all down
You can weigh the plastic down with rocks, bricks, buckets of soil, whatever you have around. Or use garden stakes.
Don't tie it to the tree trunk, because then it won't trap the warm air from the ground throughout the night.
Optional: staking the tree
If you decide to do this optional step, you'd do it first, before covering the tree. The sheets and plastic will weight down the branches. They are pretty resilient and shouldn't break, but it depends on the weight of what you're using.
To protect them from the weight, you can tie a piece of wood, a tent pole, or even a broom stick to the trunk of your fruit tree so it extends above it. Then you proceed to cover it with the sheets and plastic.
Adding warmth
Lastly, you can add some jugs of warm water under your fruit tree canopy. I'd suggest you use covered buckets or gallon jugs of milk, so they give off warmth but not water vapor.
The water vapor could freeze, which you don't want.
You can also place other hot objects on the ground, like pre-heated stoneware that you use for baking, or even warm bricks.
What hasn't worked (for me)
I've tried the tree protection bags, but you have to get them over the tree, pulling them down from the top. This is near impossible, unless the tree is tiny (like 3-4 feet tall). They also cinch closed at the trunk, so they don't trap extra heat in.
I also tried using incandescent string lights (not LED), but they didn't help enough. I'd need too many and I'd worry of a fire risk, so I haven't tried this again.
More resources
Love gardening? Check out my other guides.

Leave a Reply